This article was co-authored by wikiHow Staff. Our trained team of editors and researchers validate articles for accuracy and comprehensiveness. wikiHow's Content Management Team carefully monitors the work from our editorial staff to ensure that each article is backed by trusted research and meets our high quality standards.
The wikiHow Video Team also followed the article's instructions and verified that they work.
This article has been viewed 215,805 times.
Learn more...
Origami frames are quick, easy, and fun to make! All you need to make this beautiful frame is a square piece of paper and a flat surface. This method creates a square-shaped outside frame with a diamond-shaped inner frame. Tuck your photo into the frame and then hang it on the wall or gift it to a loved one.
Steps
Making the Major Folds
-
1Get a square piece of lightweight paper in your desired colour. Lightweight paper works best for origami, as it is easy to fold. This helps to create sharp folds which make the end product look professional and tidy. Choose a colour that will compliment your photo. Black and white photos look great in brightly coloured frames and coloured photos tend to look good in paler coloured frames.[1]
- A 6 in (15 cm) square of paper makes a frame that is about 3 inches (7.6 cm) wide and high. Similarly, an 8 in (20 cm) square of paper makes a frame that is about 4 inches (10 cm) high and wide.
- Origami paper works best for this activity, as it has 1 coloured side and 1 blank (or different coloured) side. This helps to create a frame with different colours in it. However, regular paper will also work.
-
2Fold your piece of paper in half twice. Fold the paper in half horizontally and then fold it in half vertically. Press down on the folds to make them nice and crisp. These folds will leave you with a square that is ¼ of the size of your original piece of paper.[2]
- If you find it easier, use a popsicle stick to make the edges look sharp.
Advertisement -
3Unfold the paper and lay it back on the table. This will reveal 2 perpendicular lines. The point where the 2 lines cross over is the middle point of your square.[3]
- If the paper is bending up, simply smooth down the creases so that it sits flat on the table.
-
4Fold the top and bottom edges 0.75 in (1.9 cm) toward the middle. This creates a rectangle shape. Try to make each fold even, as this helps the finished frame to have a perfect square shape.[4]
- If you are using a square of paper that is wider than 8 in (20 cm), make 1.25 in (3.2 cm) folds.

Finishing the Frame
-
1Fold the 2 side edges 0.75 in (1.9 cm) toward the vertical middle line. This will make a square shape. If it doesn’t look like a square, adjust the folds until each side looks a similar length. Try to make the folds as crisp as possible in order to get a tidy and professional finished result.[5]
- Once again, If you are using a square of paper that is wider than 8 in (20 cm), make each fold a length of 1.25 in (3.2 cm).
-
2Turn the paper over and pull each corner to the middle point. Take the tip of a corner to the intersecting lines in the middle of the paper and then press the paper down to create a fold. Repeat this technique for each of the corners. This will leave you with a smaller square shape.[6]
- Try to place the tip of each corner on the very middle point of the paper, as this helps to make the photo frame look even.
-
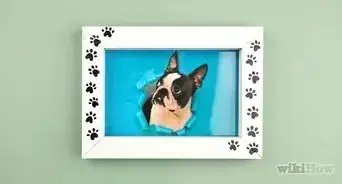
3Turn your paper back over to reveal your finished photo frame. When you turn over your origami square, you will see small triangle pockets over each corner. Tuck a square photo under the pockets to keep it in place. These triangle pockets also give the inside of your frame a pretty diagonal shape.[7]
- These frames make great gifts, wall decorations, and fridge decorations.
Community Q&A
-
QuestionMost origami sheets are squares. Can I use a rectangle for this?
 Community AnswerYes, sometimes you need rectangle paper to make origami things.
 -
QuestionDo you need to put a pic in it?
 Community AnswerThe purpose of a picture frame is to hold a picture, but you can do whatever you want with it.
 -
QuestionDoes the picture frame have to be red, or can it be a different color?
 KatieCommunity AnswerNo, it can be whatever colour you would like.
Things You’ll Need
- 1 square of origami paper


References
- ↑ https://www.easypeasyandfun.com/easy-origami-for-kids/
- ↑ https://youtu.be/UZAUn98TNgA?t=7
- ↑ https://www.makeandtakes.com/super-simple-origami-picture-frames
- ↑ https://www.makeandtakes.com/super-simple-origami-picture-frames
- ↑ https://www.makeandtakes.com/super-simple-origami-picture-frames
- ↑ https://www.makeandtakes.com/super-simple-origami-picture-frames
- ↑ https://www.makeandtakes.com/super-simple-origami-picture-frames
About This Article

Origami photo frames are fun and simple to make, requiring only a rectangle piece of paper and a little patience. Start by folding the piece of paper in half twice to begin the major folds. Then unfold the piece of paper and fold the top, bottom, and side edges in 0.75 inches towards the center. Finally, turn the piece of paper over and fold each corner towards the middle point. Now that the photo frame is complete, insert the photo into the frame by tucking it into each folded corner. For more advice on how to perfect each fold, read on!