This article was co-authored by wikiHow staff writer, Jennifer Mueller, JD. Jennifer Mueller is a wikiHow Content Creator. She specializes in reviewing, fact-checking, and evaluating wikiHow's content to ensure thoroughness and accuracy. Jennifer holds a JD from Indiana University Maurer School of Law in 2006.
There are 9 references cited in this article, which can be found at the bottom of the page.
This article has been viewed 11,918 times.
Learn more...
The space between your bass strings and the frets, also called "action," is measured at the neck, the bridge, and the nut. Setting up a new bass so that it has the action you want may involve making adjustments in all 3 places. However, once you've got it right, your bass will sound better and be more comfortable to play. If the idea of taking your bass apart is terrifying or you're afraid you'll mess it up, take it to a luthier instead. You might also get a friend who's a more experienced bass player to help you set it up.[1]
Steps
Checking Your Neck Relief
-
1Tune your bass to pitch. Since different string gauges have different amounts of tension, use the strings you would normally use when you're playing your bass. Then, tune your bass to your preferred pitch so the strings are holding the same amount of tension as they do when you're playing.[2]
- If you use different tunings on the same instrument, tune it to the pitch you use the most.
- Neck relief is the distance between the strings and the frets. Since this distance depends in part on the tension in the strings, there's no way to properly measure it unless your bass is in tune.
-
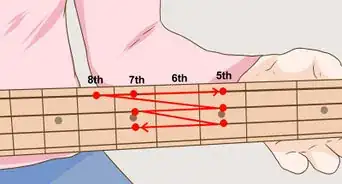
2Fret the lowest string to measure the relief. With your fretting hand, fret the lowest string on the 1st fret. Then, stretch the thumb and index finger of your picking hand along the same string with your thumb pointing toward the bridge of your bass. Fret the same string with your thumb somewhere between the 14th and 16th frets (wherever you can comfortably reach). Your index finger should be approximately halfway between your thumb and your finger on the 1st fret.[3]
- Look at the distance between the string and the fret where the index finger of your picking hand lands. If you tap it repeatedly, you can get a good idea of how much space is between the string and the fret.
- How much space you want depends on your playing style — there's no right answer! But if you're not sure, start with a distance about the distance of 2 playing cards or business cards stacked on top of each other.
Advertisement -
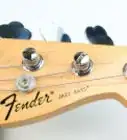
3Locate the truss rod nut on your bass. Typically, the truss rod nut is a hexagonal nut. Its location varies depending on the style and manufacturer of your bass, but it's usually on one end or the other of the neck of your guitar. It might be hidden behind a plate on the headstock or behind the pick guard.[4]
- Most truss rods are behind a plate of some sort. You'll likely need a screwdriver to take the plate off.
- If your truss rod is located at the heel of the neck, you'll have to unstring your bass and take the neck off to adjust it, then put the neck back on, restring your bass, tune it up to pitch, and test it to confirm you've adjusted it correctly. You may have to do this a couple of times before you get it right.[5]
-
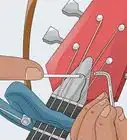
4Turn the truss rod a quarter-turn at a time to adjust it. Mark the spot where you started with a pencil (the top-most point of the hex). Then, insert your hex key and gently turn the screw a quarter-turn (1-2 hex sides). Turn to the left if you want to loosen the truss rod to increase the distance between the strings and the frets. Turn to the right if you want to tighten the truss rod, which will reduce the distance between the strings and the fret.[6]
- Being gentle is important — don't force it, you could crack the neck of your bass.
- Make sure the hex key you use fits snugly so you don't strip the truss rod nut. If your bass came with a hex key, use that.
- If the nut doesn't want to move, loosen it a little by turning it just a little (less than a quarter-turn) to the left first.
-
5Replace the plate and retune your guitar. Once you've made your adjustment, screw the plate back on. If you had to take off your strings, you'll need to put them back on and tune them up to pitch. However, even if you didn't loosen your strings at all, they might have fallen out of tune when you adjusted the truss rod.[7]
- Check the distance between the fret and the strings again by fretting the lowest string at the first fret and on the 14th, 15th, or 16th fret using the thumb of your picking hand. If the distance from the string to a fret about halfway between your finger and thumb still isn't at the height you want, adjust the truss rod again.


Setting Action at the Bridge
-
1Measure the distance between each string and the 12th fret. Make sure your bass is tuned to your preferred pitch, then fret the string at the 1st fret. Use a metal ruler that's precise and capable of measuring tiny distances. Set the ruler on top of the 12th fret to measure the distance between the bottom of the string and the top of the fret.[8]
- You can also use a capo to hold the strings down at the 1st fret.
- Generally, the lowest string (E string in standard tuning) should be at 6⁄64 inch (2.4 mm) and the highest string (G string in standard tuning) should be at 5⁄64 inch (2.0 mm).
- If you play very technically and have a relatively light touch, you might prefer the strings to be closer to the frets. If you're new to the bass, you might try several different distances before you find the action you like the most that best suits your playing style.[9]
-
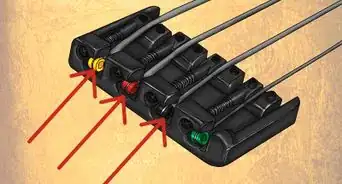
2Turn the screws on the bridge to move the saddle to your desired height. Start with the 2 outside strings. Use your screwdriver to turn the screw to the left if you want to lower the saddle or to the right if you want to raise the saddle.[10]
- After you make your adjustment, get your ruler and check the height again. If it's still not there, go back and adjust again. Make sure you're fretting the 1st fret if you aren't using a capo.
-
3Adjust the 2 middle strings based on the radius of the neck. Slide a radius gauge (which you can buy online or from a guitar specialty shop) under the strings at the 12th fret and pull it up through the strings to measure the radius of the neck. Then, put the radius gauge on top of the strings next to the saddle. Adjust the saddles of the middle 2 strings up or down as necessary to match the radius of the neck.[11]
- After you make your adjustments, place the radius gauge back over the top of the strings at the saddle to see if they line up. If the middle 2 strings are still off, make additional adjustments until they match up with the radius gauge.


Setting Action at the Nut
-
1Fret each string at the 2nd fret and check the action at the 1st fret. Generally, you want the distance between the bottom of each string and the top of the 1st fret to be as little as possible without the string buzzing. If it's too close, the string will vibrate against the fret and you'll get a buzz.[12]
- You can usually eyeball this distance by tapping the string on the top of the 1st fret. You can also use a business card or playing card. There should be just enough room to slip a business card or playing card between the bottom of the string and the top of the fret.
-
2Loosen a string to pop it out of the nut slot. If you find a string with more space than necessary between the bottom of the string and the 1st fret, loosen it with a couple of turns on the tuning peg so you can move it to the side of the nut slot where it normally rests.[13]
- There's no need to take the string off completely. You also want to make sure you're only doing one string at a time, even if you have several strings that need to be lowered.
-
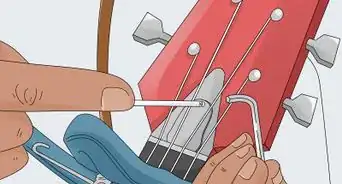
3File the nut slot to deepen it if necessary. Take a nut file, which you can buy online or from a guitar specialty store, and gently file the slot where the string fit. File downward so that the slot slopes towards the fretboard.[14]
- If you file evenly, it will ruin the sound of your bass and you might have difficulty keeping that string in tune. Make sure you're filing at a slope. This is a delicate operation — if you're uncomfortable doing it or afraid of ruining the nut, take your bass to an experienced luthier.
-
4Check the action after each stroke with your nut file. Adjusting the nut action on your bass is not something you can rush. Run the file over the nut slot a single time, then replace the string and tune it back up to pitch. Check the action as you did initially[15]
- While it's relatively easy to deepen a nut slot, there's really no way to make it shallower apart from starting all over from scratch with a new nut. This means that you need to be extra careful not to file away too much — especially if this is your first time trying to adjust the nut action.


Warnings
- If you're new to the bass and don't feel comfortable setting up the instrument, take it to a luthier or have a more experienced bass player set it up for you.[17]⧼thumbs_response⧽
- Even though you might not need to set the action in all 3 places, always start with the truss rod, then the action at the bridge, then the action at the nut. If you do them in a different order, you could mess up your bass.[18]⧼thumbs_response⧽
Things You'll Need
Checking Your Neck Relief
- Screwdriver (to remove the plate)
- Hex key
- Pencil
- Business cards or playing cards
Setting Action at the Bridge
- Precise metal ruler
- Wrench that fits the bridge screws
- Radius gauge
Setting Action at the Nut
- A business card or playing card
- Nut file


References
- ↑ https://www.notreble.com/buzz/2012/07/06/getting-to-know-your-bass-how-your-basss-action-influences-what-you-can-do/
- ↑ https://www.studybass.com/gear/bass-setup/adjusting-neck-relief/
- ↑ https://www.premierguitar.com/articles/DIY_How_to_Set_Up_a_Bass_Guitar
- ↑ https://www.studybass.com/gear/bass-setup/adjusting-neck-relief/
- ↑ https://www.premierguitar.com/articles/DIY_How_to_Set_Up_a_Bass_Guitar
- ↑ https://www.studybass.com/gear/bass-setup/adjusting-neck-relief/
- ↑ https://www.premierguitar.com/articles/DIY_How_to_Set_Up_a_Bass_Guitar
- ↑ https://youtu.be/26-n2rGnKAg?t=15
- ↑ https://www.premierguitar.com/articles/DIY_How_to_Set_Up_a_Bass_Guitar?page=2
- ↑ https://youtu.be/26-n2rGnKAg?t=40
- ↑ https://youtu.be/26-n2rGnKAg?t=107
- ↑ https://www.premierguitar.com/articles/DIY_How_to_Set_Up_a_Bass_Guitar?page=2
- ↑ https://youtu.be/tSl1S-YE5QU?t=204
- ↑ https://www.premierguitar.com/articles/DIY_How_to_Set_Up_a_Bass_Guitar?page=2
- ↑ https://www.premierguitar.com/articles/DIY_How_to_Set_Up_a_Bass_Guitar?page=2
- ↑ https://www.notreble.com/buzz/2012/07/06/getting-to-know-your-bass-how-your-basss-action-influences-what-you-can-do/
- ↑ https://www.notreble.com/buzz/2012/07/06/getting-to-know-your-bass-how-your-basss-action-influences-what-you-can-do/
- ↑ https://www.youtube.com/watch?v=tSl1S-YE5QU
About This Article