wikiHow is a “wiki,” similar to Wikipedia, which means that many of our articles are co-written by multiple authors. To create this article, 11 people, some anonymous, worked to edit and improve it over time.
This article has been viewed 334,892 times.
Learn more...
Adjusting the action on a bass (which is the height of the strings from the fret board) is an important part of the overall setup of the instrument. This must be done when the instrument is new. In addition, exposure to temperature changes, humidity changes and changes in string gauge can affect the setup of your bass and necessitate adjustment of the action.
Steps

Inspect the Neck of the Bass
-
1Wait at least 30 minutes after any significant change in string tension before inspecting or adjusting the neck of your bass.
- It takes time for the neck of a bass to settle into its final position after significant changes have been made to the forces applied to it.
- Waiting longer periods will increase the accuracy of your adjustments.
-
2Determine the relief, or bow, in the neck.[2]
- The neck of your bass must have a slight bow to play properly. If the neck were straight, you would get fret buzz, especially on notes played on the first 5 frets.
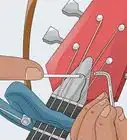
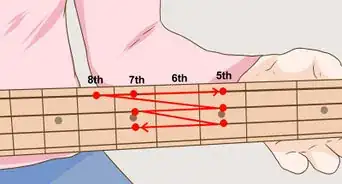
- If you have a capo, attach it at the first fret; otherwise, hold down the E-string (or B-string on a 5-string bass) at the 1st fret with your left index finger. Hold the string down at the 12th fret with your right thumb or right elbow. Use a feeler gauge to determine the largest gap between the string and the tops of the 4th through 8th frets. If the string is touching any of these frets, the neck needs more relief. If the gap between the string and any of these frets is greater than 0.020 inch (0.5 mm), then the neck needs less relief.
- Alternatively, attach a capo at the first fret or hold down the G-string at the 1st fret with your left index finger. Press the G-string down at the end of the neck with your elbow. Use a feeler gauge to measure the gap between the bottom of the string and the top of the 8th fret. If the gap exceeds 0.012 inch (0.3 mm), the neck needs less relief. If there is no gap, the neck needs more relief.
- The truss rod needs to be adjusted if inspection of the neck indicates that it needs either more or less relief.


Adjust the Truss Rod
-
1Remove the truss rod cover on the headstock, just beyond the nut.
- Depending on the model of your bass, you will need a small Phillips screwdriver to remove the screws securing the truss rod cover or a small flat-blade screwdriver to "pop" or pry off the truss rod cover.
-
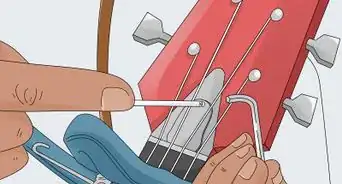
2Use an appropriately sized allen wrench to adjust the truss rod.[3]
- If the neck needs less relief, you will tighten the truss rod by turning the truss rod nut clockwise.
- If the neck needs more relief, you will turn the truss rod nut counterclockwise.
-
3Adjust the truss rod a 1/8-turn at a time. After a 1/8-turn, tune the strings again and remeasure the string height.
-
4Make additional truss rod adjustments with no more that a 1/8-turn at a time, retuning and remeasuring after each adjustment.
-
5Test your truss rod adjustment by fretting each string of the bass at each fret.
- If there is fret buzz when playing at any of the first 5 frets, the neck is too straight and the truss rod needs to be loosened.
- If there is fret buzz only above the 12th fret, there is too much relief in the neck and the truss rod needs to be tightened.
- If there is fret buzz consistently up the neck, the truss rod is likely set properly and the bridge needs to be raised to adjust the action.


Adjust the Action
-
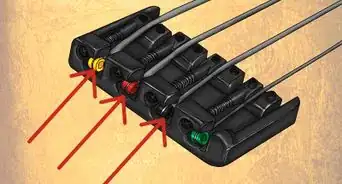
1Raise or lower the bridge or the individual string saddles on the bridge.[4]
- If your bass does not have individual saddle height adjusting screws, you must adjust the action by raising or lowering the entire bridge. There are many bridge designs, each with its own specific adjustment features. Select the proper tool for the adjustment hardware on your bass. Typically, tightening (turning clockwise) bridge height adjusters will raise the action and loosening (turning counterclockwise) bridge adjustment adjusters will lower the action.
- If your bass has individual saddle height adjusting screws, make general action adjustments by raising or lowering the entire bridge, then make your final adjustments by changing the height of the individual string saddles. Individual string saddles are generally adjusted with allen wrenches.
-
2Test your action adjustments by playing your bass at each fret. You have lowered the action too much if you hear fret buzz.


Community Q&A
-
QuestionWhat's a good cleaner for the neck of a bass guitar?
 Community AnswerThere are many different products made for wooden instruments. Go to your local music shop and tell them the type, age, and brand of your instrument and they should be able to advise you.
 -
QuestionWhat size Allen wrench do I need to raise the individual string saddles on the bridge?Community AnswerEach instrument is different. You can get the proper tools from the manufacturer. If that is not possible, buy a set of Allen wrenches and try the different sizes to see which one fits your instrument.
-
QuestionWhat is the best string height on bass?
 MidLifeISISCommunity AnswerIt depends on the desired tone and projection of the string, although the standard height is 7/64” for bass guitar strings.
Warnings
- Do not force the truss rod nut. If it does not turn freely, stop and contact a qualified dealer or repair center. It is possible to break the truss rod by over-tightening it, and end up paying a lot more than you were willing to give.⧼thumbs_response⧽
Things You'll Need
- Electronic tuner
- Capo
- Feeler gauge
- Small Phillips screwdriver
- Small flat-blade screwdriver
- Allen wrenches


References
About This Article
Adjusting the action on your bass is important when you have a new bass or when the instrument’s been exposed to temperature or humidity changes. To start, use an electronic tuner to tune your bass as you normally would. This will ensure the strings are at the proper tension when you adjust the action. Once you’ve tuned it, wait 30 minutes for the strings to settle. Then, inspect the neck of your base to see how much relief it has. A bass neck should normally have a slight bow. Too much bow or too little bow means you need to adjust the truss rod on the bottom of the headstock. Once you’ve done this, raise or lower the bridge or the individual string saddles on the bridge with an Allen wrench. Test your action adjustments by playing your bass at each fret. If you hear buzzing, you’ve lowered the action too much and need to adjust it. To learn how to test your truss rod adjustments with a capo, read on!