This article was co-authored by wikiHow Staff. Our trained team of editors and researchers validate articles for accuracy and comprehensiveness. wikiHow's Content Management Team carefully monitors the work from our editorial staff to ensure that each article is backed by trusted research and meets our high quality standards.
This article has been viewed 79,656 times.
Learn more...
If you're a beginner, amateur, or professional hockey player, you need to know how to measure a hockey stick. Determining the proper length of the stick is a personal preference and can affect your performance on the ice. Having a stick that's too short or long can make it difficult to handle and shoot the puck. It can be difficult to find a hockey stick that is sized correctly for your specific skill level and position, so you may want to learn how to measure hockey sticks and cut your own.
Steps
Measure Your Hockey Stick
-
1Determine what type of hockey you will be playing. If you are playing ice hockey or playing in roller blades, you will need a longer stick than if you were playing street hockey or playing in shoes.[1]
-
2Wear the proper foot wear. If you will be playing street hockey, wear shoes and measure your hockey stick. If you will be playing in skates or rollerblades, make sure to wear them or add inch or two to the length of your your hockey stick.[2]Advertisement
-
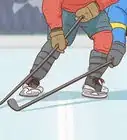
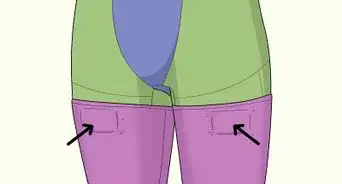
3Stand up straight and look forward. Place the shaft of your stick parallel to your body and let the toe of blade touch the ground. The stick should be between your chin and nose. A long stick is anything above the nose and anything below the chin is short.[3]
-
4Determine what type of player you are. The length of your hockey stick is a personal preference and your style of play may determine what length you need.
- The dangler is a short hockey stick meant for skilled stick handlers. A short stick is easier to move around as it is lighter and easier to keep closer to the body. It also helps when pulling a deke.[4]
- The grinder is an average hockey stick used by players who get into the corners, dig at pucks, and station themselves around the net. With an average length you may be able to poke check easier, intercept passes, or hammer a slapshot.[5]
- The defensemen is a long hockey stick that allows you to reach and poke the puck away from attackers, intercept passes, or stop the puck before it leaves the offensive end. It will also provide more power to your slapshot.[6]
- Stick length is completely a personal preference and there is no absolute rule in choosing. Don’t be afraid to experiment with what suits your game.
-
5Adjust your stick length. It may be difficult to find the perfect length that's right for you so cut down your hockey stick to your preference. You may also add a wooden plug to the butt end of your stick to lengthen it. This is common amongst younger players who experience a growth spurt and need to lengthen their stick to match their height.[7]
- Cutting your stick will affect the flex of your stick.
-
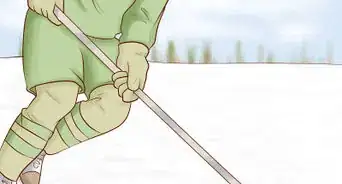
6Know when the stick is too long. If you are skating on ice or moving with the stick handle jutting out behind the top of your hand two to five inches then your stick is too long. The stick should be flat on the ice with both your hands free to pass, your body upright, and eyes looking ahead.[8]
- If you find your back hurting it may be because your stick length is causing you to move in an unnatural manner to compensate.


Choosing the Correct Stick
-
1Choose the correct size. A stick that is too small or is not stiff enough may easily break. If a stick is too long or too stiff it may be difficult to handle the puck, pass, or shoot. Determine which stick fits your height and length.[9]
-
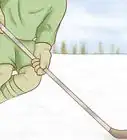
2Determine the right stick classification. Sticks usually come in four sizes: youth, junior, intermediate, and senior. Each size has a larger flex and larger shaft circumference. Easily determine stick length by standing without your skates and placing the toe of the stick between your feet. Make sure it touches the ground and is vertical against your body so that it reaches your nose.[10]
- If the stick is too long, mark where your nose in and cut the stick to length. The stick should come to your chin if you’re wearing skates. You may also insert an end plug if you cut the stick too short or if you experience a growth spurt. Stick length is a personal preference.[11]
- Women use flexible senior sticks or whichever stick is most comfortable. Players 4 - 8 years old use youth sticks; ages 7 - 8 use junior; ages 10 - 15 use intermediate; and players aged 14 and older use senior sticks.[12]
-
3Select your prefered materials. Sticks can be composed of a variety of materials including: kevlar and graphite, fiberglass and carbon, fiberglass and wood, and wood. Before purchasing a stick ask:
- Are you using the stick for street hockey or ice?
- Is this stick right for your skill level?
- Is this my first stick?
- Has it been a long time since the last stick?
- A heavier stick gives you a better feel for the puck. It will improve your shot as you practice and help with your stick handling, passing, and shooting on ice. Wood sticks are prefered for beginners or casual street hockey enthusiasts.
- Sticks made out of a combination of carbon-fiber, graphite, kevlar, resin, fiberglass, or other high quality materials are meant to improve your performance. They will be more durable, lighter, and provide greater torque. The price will reflect the quality of your stick.
- The lighter your stick the faster the energy transfer to your shots and passes. Manufacturers may also include technology in the blade for better feel.
-
4Choose between a one or two piece stick. A one piece stick has the blade fused to the shaft. This is the most common stick as it guarantees the manufacturer's specifications. A two-piece stick means that the blade and shaft are separate units. You are able to mix and match to your personal preference and you are able to salvage one part if the other breaks.[13]
-
5Understand flexibility. You want the shaft of your stick to bend a little to help with accuracy and puck speed. Manufacturers will offer a variety of flexibility in the form of different rating systems. The flex can be broken down into senior, intermediate, junior, or youth.[14]
- Youth (Approximately 30 flex) 0-60lbs
- Junior (Approximately 50 Flex) 60-100lbs
- Intermediate (60-70 flex) 100-150lbs
- Senior Mid (Approximately 75 flex) 150-170lbs
- Senior Regular (Approximately 85 flex) 170-200lbs
- Senior Stiff (Approximately 100 flex) 200+ lbs[15]
- Generally the higher the flex number, the stiffer your stick will be. Correct flex allows the player to bend the shaft during a wrist or slap shot. It is a measure of the weight required to create a 4 inch bend on the stick when it is supported by two points 48 inches apart.
- The flex will change if you cut the size of the stick. Each inch that is cut may increase the stiffness of your stick by 10%.
- Generally, the taller and heavier the player is, the greater the flex is needed for the stick.
-
6Get a grip. A stick with a smooth surface is known as a non-grip whereas a sticky textured surface is a grip. A non-grip may aid in passing, handling, and shooting because your hand can easily move up and down the shaft. However, if you find that moisture on your gloves or from the ice makes it difficult to handle your stick, you may need to choose a grip.[16]
- Some sticks have a grip on the entirety of the stick while others have a grip strategically placed. You may also use a coating as your grip or choose a stick where the grip is incorporated into the texture. You want maximum control during your playing conditions so choose your preference accordingly.
-
7Determine kick point based on your position and skill level. The kick point is where your stick will flex as you shoot or pass. Defenseman with a powerful slap shot and forwards who like to take one-timers should opt for a mid to low kick point. Players who are more agile and skilled in stickhandling that prefer wrist shots should opt for a lower kick point.[17]
- Mid kick: this is the traditional flex profile that gives you the feel for the wood and composite.
- Low kick: this is a flex point at the taper and towards the blade. It creates a quicker release.
- Constant flex: this is designed to react to your bottom hand. The flex begins from the bottom hand and works down the rest of the shaft.
- Dua-kick: this flexes in two points. If your bottom hand is lower down the shaft the stick will load more power higher in the shaft. If your bottom hand is higher up, the flex creates a more accurate and accurate.
- High kick - this uses the entire stick to load energy. The flex is at the top of the shaft.
-
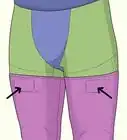
8Know your dominant hand. If your hold the top of your stick with your right hand and use your left hand at the bottom of the shaft, you are a left handed player and need a left handed stick. The same applies to a right handed player but in reverse.[18]
-
9Evaluate the best blade pattern for your game. Different manufacturers have different specs and pattern names for different curves. The pattern of your blade is completely up to your preference. You may have to try several before you find what’s best for you.[19]
-
10Understand blade lie. The lie of a stick is the angle that the shaft takes when the bottom of the blade is sitting flat. The lie is part of the pattern and is up to your personal preference. The more vertical and upright your stick, the greater the lie. A stick normally has a range between 4.0 to 6.0 going up in half increments.[20]
- The blade pattern can determine the curve type, curve depth, blade toe, face angle, blade length, and blade lie of your stick.[21]
-
11Take the most important factors into consideration. You should note the weight, flex, and performance of your stick. This is all personal preference and will take time to understand the right combination for you. Don’t invest in a stick that’s beyond your skill level. Also factor in the amount of usage you plan to get.[22]


References
- ↑ http://www.totalhockey.com/support/How_to_fit_hockey_sticks/pg_id/202
- ↑ http://www.totalhockey.com/support/How_to_fit_hockey_sticks/pg_id/202
- ↑ http://www.totalhockey.com/support/How_to_fit_hockey_sticks/pg_id/202
- ↑ http://hockeyreviewhq.com/hockey-resources/hockey-stick-length-guide/
- ↑ http://hockeyreviewhq.com/hockey-resources/hockey-stick-length-guide/
- ↑ http://hockeyreviewhq.com/hockey-resources/hockey-stick-length-guide/
- ↑ http://hockeyreviewhq.com/hockey-resources/hockey-stick-length-guide/
- ↑ http://hockeyreviewhq.com/hockey-resources/hockey-stick-length-guide/
- ↑ http://www.totalhockey.com/support/How_to_fit_hockey_sticks/pg_id/202
- ↑ http://www.totalhockey.com/support/How_to_fit_hockey_sticks/pg_id/202
- ↑ http://www.totalhockey.com/support/How_to_fit_hockey_sticks/pg_id/202
- ↑ http://www.totalhockey.com/support/How_to_fit_hockey_sticks/pg_id/202
- ↑ https://www.purehockey.com/equipment-guidance/hockey-stick-sizing-guide
- ↑ http://www.totalhockey.com/support/How_to_fit_hockey_sticks/pg_id/202
- ↑ https://www.purehockey.com/equipment-guidance/hockey-stick-sizing-guide
- ↑ http://www.totalhockey.com/support/How_to_fit_hockey_sticks/pg_id/202
- ↑ http://www.totalhockey.com/support/How_to_fit_hockey_sticks/pg_id/202
- ↑ https://www.purehockey.com/equipment-guidance/hockey-stick-sizing-guide
- ↑ http://www.totalhockey.com/support/How_to_fit_hockey_sticks/pg_id/202
- ↑ http://www.totalhockey.com/support/How_to_fit_hockey_sticks/pg_id/202
- ↑ https://www.purehockey.com/equipment-guidance/hockey-stick-sizing-guide
- ↑ https://www.purehockey.com/equipment-guidance/hockey-stick-sizing-guide
About This Article

To measure your hockey stick, start by putting on your skates so you're the same height you'll be when you're playing. Next, stand up straight, place the toe of your stick on the ground, and lean the stick against your body. If your stick reaches somewhere between your chin and your nose, you have the correct length. However, if you need to change your stick's length, cut it down to size or add a wooden plug to the butt end to increase its length. For tips on how to decide whether you need a dangler or defenseman stick, read on!