This article was co-authored by wikiHow staff writer, Janice Tieperman. Janice is a professional and creative writer who has worked at wikiHow since 2019. With both a B.A. and M.A. in English from East Stroudsburg University, she has a passion for writing a wide variety of content for anyone and everyone. In her free time, you can find her working on a new crochet pattern, listening to true crime podcasts, or tackling a new creative writing project.
There are 10 references cited in this article, which can be found at the bottom of the page.
This article has been viewed 108,631 times.
Learn more...
You’ve got your bag of colorful wax beans ready to go, but how exactly are you supposed to melt them down? Thankfully, you don’t need any fancy equipment to do a hard wax treatment at home. We’ll walk you through how to melt your wax down in the microwave, on the stove, or in a wax warmer—and most importantly, how to tell when it’s ready to go. In a matter of minutes, you’ll be one step closer to smooth, hair-free skin.
Things You Should Know
- Microwave hard wax beans in 10-second increments using a microwave-safe bowl.
- Create your own double-boiler setup by adding 1-2 in (2.5-5 cm) of water to a pot or saucepan and melting the wax beans in a heat-resistant bowl overtop.
- Set your wax warmer to the highest possible heat to melt down all of the wax beans.
- Check the consistency rather than the temperature of the melted wax to see if it’s ready to use.
Steps
Microwave
-
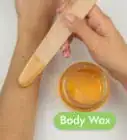
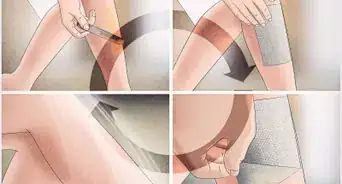
1Pour the wax beans into a microwave-safe bowl. A heat-resistant glass mixing bowl is a safe bet—just make sure that it’s large enough so you don’t have to fill it more than halfway with hard wax beans.
- Check the bag instructions on your beans to see how many you need to melt. Ultimately, it’ll depend on how much skin you plan to wax.
-
2Heat the wax for 10 seconds and give it a stir. After a quick round in the microwave, check the wax beans and see how much they’ve melted. Stir the beans with a wooden stick as they start to congeal so your wax has an even consistency.[1]Advertisement
-
3Microwave the wax repeatedly for 10 seconds until it looks like thick honey. Scoop up some of the wax and see how it looks on the wooden stick. It’s good to go if it’s pretty thick and honey-like.[2]
- Check the temperature of the wax by patch-testing it along the backside of your wrist. If it feels a little too warm, wait a few minutes before applying any wax.[3]
-
4Reheat the wax in 10-second increments when it starts to congeal. While a microwave is the quickest way to melt hard wax beans, it doesn’t provide a lot of residual heat to keep them at the ideal temperature and consistency. Stick the wax in the microwave in 10-second increments until it is once again warm with a thick, honey-like consistency.
- Be sure to stir the wax with a wooden stick in between each microwave cycle.


Stovetop (Double Boiler)
-
1
-
2Bring the water to a boil and reduce it to a simmer. Turn the stovetop burner up to high heat and wait for the water to bubble and boil. At that point, turn the heat down to a low temperature so the water settles to a simmer. Remember: with double boilers, the name of the game is gentle heat.[6]
-
3Pour the hard wax beans into a stainless steel or tempered glass bowl. Grab a small- or medium-sized mixing bowl that’s heat resistant—stainless steel or tempered glass is a safe bet.[7]
- Check the instructions on the wax bean bag to see how much you should melt at once.
-
4Nestle the bowl into the pot so it doesn’t touch the water. Center the mixing bowl so it rests along the edge of the pot while hovering slightly above the water. If the bottom of the bowl touches the water, the wax beans might get too hot.[8]
-
5Stir the wax frequently with a wooden stick.[9] Grab a clean stick and give the melting beans a good stir every minute or 2. This helps give your wax a more even consistency since the indirect heat of the double boiler prevents the beans from melting evenly.
-
6Do the “flip” test to see if your wax is ready. Scoop up a large dollop of melted wax with a wooden stick and flip it over in front of you, watching the wax slowly collect and fall away from the base of the stick. If you can count to 2 or 3 before the wax completely drips off the stick, your wax is ready to use. Then, quickly flip the stick back over before the wax can actually separate and fall off.[10]
- The wax is much too hot to apply if it immediately falls and separates from the stick. If it takes more than 3-4 seconds to drop away, the wax is too cool to apply.[11] Depending on the consistency, either raise the temperature slightly or give your wax some time cool off so it’s safe to apply to your skin.


Wax Warmer
-
1Pour the wax beans into the warming chamber. Simply open the lid on your wax warmer and pour the beans into the inner compartment.[12] Many warmers have a fill line marked on the inner chamber—don't add beans beyond this line. If there isn't a fill line, don't fill the chamber more than two-thirds full.
- Double-check your wax warmer’s user manual to see what the manufacturer recommends.
-
2Set the warmer to the highest possible setting for 10-15 minutes. As the wax starts to melt, use a wooden stick to mix the melted wax along the edge of the chamber with the less-melted wax at the center. In about 10-15 minutes, all of the wax will be melted.[13]
- To be safe, consult your wax warmer’s manual to see if the manufacturer mentions any specific temperature suggestions.
-
3Check the wax with a wooden stick to see if it resembles molasses. Dip a wooden stick into the melted wax and scoop up a dollop of it. Then, hold out the wooden stick and watch how quickly (or slowly!) the melted wax drops from the bottom of the stick—just be sure to flip the stick over before it actually does. If you can count to 2 or 3 before the wax falls off, your wax is safe and ready to use for waxing.[14]
- Liquid-like wax is far too hot to wax your skin with, while super slow wax is too cool.[15] Adjust the temperature on your warmer accordingly until the wax looks like molasses or thick honey.


Community Q&A
-
QuestionDo I melt just enough wax for one application (upper lip), or can it be reused and reheated? I am the only one who uses it.
 EsterCommunity AnswerHard wax is the only kind of wax that salons can re-use. Because hard wax must be applied in a thick layer and is typically applied at least twice in order to remove all the hair, certain salons re-use it to save money. They melt the wax, strain out the hair, let the wax harden again and then melt it for re-use.
Warnings
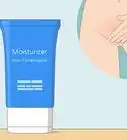
- Stop using any OTC or prescription retinol creams for 2-5 days if you plan on waxing your eyebrows or upper lip hair. This way, you won’t accidentally remove any skin while you wax.[17]⧼thumbs_response⧽
Things You’ll Need
Microwave
Double Boiler
- Medium-sized pot or saucepan
- Small mixing bowl (made with steel or tempered glass)
- Wooden stick
Wax Melter


References
- ↑ https://coveteur.com/wax-beads-hair-removal
- ↑ https://coveteur.com/wax-beads-hair-removal
- ↑ https://www.glamour.com/story/wax-legs-at-home-how-to
- ↑ https://www.bonappetit.com/story/double-boiler
- ↑ https://www.thekitchn.com/double-boilers-what-are-they-a-132018
- ↑ https://www.bonappetit.com/story/double-boiler
- ↑ https://www.thekitchn.com/double-boilers-what-are-they-a-132018
- ↑ https://www.bonappetit.com/story/double-boiler
- ↑ https://www.youtube.com/watch?v=q8U1PlFZ3IE&t=0m36s
- ↑ https://www.youtube.com/watch?v=K2qmTSgfyls&t=1m25s
- ↑ https://www.youtube.com/watch?v=K2qmTSgfyls&t=1m54s
- ↑ https://www.youtube.com/watch?v=Q9rMErDcBXc&t=0m25s
- ↑ https://www.youtube.com/watch?v=K2qmTSgfyls&t=0m42s
- ↑ https://www.youtube.com/watch?v=K2qmTSgfyls&t=1m25s
- ↑ https://www.youtube.com/watch?v=K2qmTSgfyls&t=1m54s
- ↑ https://www.aad.org/public/everyday-care/skin-care-basics/hair/how-to-wax
- ↑ https://www.aad.org/public/everyday-care/skin-care-basics/hair/how-to-wax