This article was co-authored by Marty Stevens-Heebner, SMM-C, CPO® and by wikiHow staff writer, Hunter Rising. Marty Stevens-Heebner is a Certified Professional Organizer (CPO) and Founder of Clear Home Solutions, a home organizing and senior moving management company based in southern California. Marty is the first Certified Senior Move Manager (SMM-C) in the United States and is a Certified Aging in Place Specialist (CAPS) through the National Association of Home Builders. She is the President-Elect and is on the board of directors of the National Association for Senior Move Managers, a member of the National Association of Professional Organizers, and has been acknowledged as a Hoarding Specialist and ADHD Specialist through the Institute for Challenging Disorganization.
There are 11 references cited in this article, which can be found at the bottom of the page.
This article has been viewed 31,040 times.
Pods are portable storage units that are dropped in your yard so you can pack them for storage or for an easier, worry-free move. When you pack the moving container, have a plan so you can maximize the number of items you can store. By organizing your stuff and stacking it efficiently, you’ll have a pod ready to move in no time!
Steps
Filling Your Container
-
1Work through 1 tier of your pod at a time. The tiers in your pod are 4 ft (1.2 m) horizontal sections marked by a wooden or metal panel on each side of the pod. Working on 1 tier at a time allows you to pack each section of the pod to its full potential without the hassle of you climbing over your belongings.[1]
- Pods are typically 8 by 8 ft (2.4 by 2.4 m) wide and tall, but have 3 different depths: 16 feet (4.9 m), 12 feet (3.7 m), and 7 feet (2.1 m).[2]
- The largest pod has 4 tiers, the medium-sized pod has 3 tiers, and the smallest has 2.
-
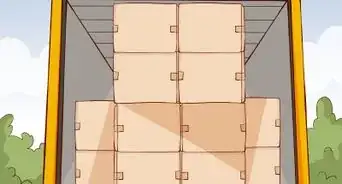
2Distribute furniture and appliances evenly throughout the pod. Place your furniture so the weight is balanced on each side. If you place a heavy couch on one side of the pod, place a piece of furniture similar in weight on the other side so it’s evenly distributed and less likely to tip over.[3]
- Break down your furniture as much as you can. This could include removing the legs from tables and chairs and taking off the cushions for couches.
- Turn couches on their ends if you can so you have more floor space for storage.
- Don’t place all of your heavy furniture on one side of the unit since this could cause damage to your goods when it’s transported.
Advertisement -
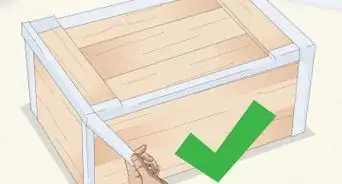
3Use boxes similar in size to make them easy to stack. Irregular sized boxes are more difficult to stack without the risk of them falling over. Find cube-shaped boxes with the same dimensions on each side to give you the most versatility while stacking them.[4]
- The PODS company has boxes in uniform sizes available to purchase to make moving and finding boxes easier.
-
4Place heavier boxes on the bottom and lighter ones on top. Make a wall with your boxes in the open areas of your unit. Stack the boxes as high as you can and as close to the ceiling of the container as possible. This ensures a tight fit so your belongings won’t jostle or move around![5]
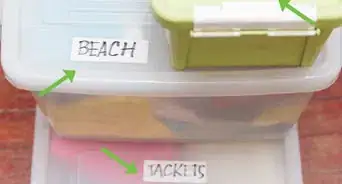
- Pack your boxes completely. Fill in smaller spaces with knick-knacks to prevent the contents of your box from shifting. Don’t forget to label what’s inside each box with a marker for future reference.
- Fill your boxes up all the way to keep boxes from collapsing in the center when you stack them.[6]
-
5Keep items you need to access easily at the front of the container. If you’re using your pod for extra storage or have objects you need to take out immediately after a move, keep them near the door of the pod. This way you can pull them out as needed and get to your stuff much faster.[7]
- Leave 4 to 6 in (10 to 15 cm) between your stuff and the door.
- Think about what things you’ll want to use immediately after you move, such as a coffee maker or kitchen supplies. Place these sorts of items near the door.
-
6Place pieces of cardboard between your things and the door to the unit. Use broken down cardboard boxes and place them vertically against your things. These act as a wall and help prevent your things from falling forward and jamming the door closed when you move.[8]
- Or, place your mattress in the pod last. This will act as a barrier and you won’t have to use a layer of cardboard.


Maximizing Empty Spaces
-
1Use pillows or garbage bags filled with clothes to secure small spaces. As you pack your unit, you’re bound to have open spaces in between some of your objects. Use soft and malleable objects like clothes or stuffed animals to fill the space and prevent everything from shifting.[9]
- The more tightly packed your pod is, the less likely it is for your belongings to get damaged.
-
2Place narrow objects like bikes or golf clubs near the ceiling of the unit. If you weren’t able to reach the ceiling of the unit with your boxes or furniture, find objects that will fit the space. Wrap them in blankets or bubble wrap to make the fit even tighter.[10]
- Oddly shaped items, like sporting equipment or folding chairs, work perfectly in the top space of your container.
-
3Slide framed photos or thin boxes into narrow gaps. If you have any large prints of photos or artwork, you may be able to find room for them in between boxes or furniture. Look for the spaces you have in between your objects and see if anything in your home could easily fit there.[11]
- Use a layer of bubble wrap or a soft blanket in between stacks of frames and delicate items.[12]
- You can also stack framed work on top of your boxes near the ceiling.


Protecting Your Items
-
1Wrap furniture and appliances in plastic wrap or moving blankets. Protect your upholstery and furniture from rips and scratches during your move by wrapping them entirely. Make sure the material is completely covered with the plastic or blankets to keep them clean. Use duct tape or packing tape to secure the blankets to the furniture.[13]
- Large rolls of plastic wrap and moving blankets can be purchased at hardware stores.
- Use a plastic mattress bag in the correct size to protect your mattress.
-
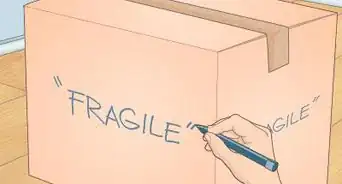
2Place fragile objects in moving blankets or bubble wrap. Pictures in frames or mirrors are susceptible to breaking while being moved, so wrap them thoroughly. Hold the bubble wrap or blanket around the object with packing tape so they don’t accidentally slip out and get damaged.[14]
-
3Secure rope or loading straps around the hooks to keep your belongings in place. Most pods should have hooks or anchors where each tier is separated. Use a braided rope or elastic loading straps across the unit to secure your stuff in the tier you packed it in.[15]
- Use a zigzag pattern with the rope or bands working from the top of the unit to the bottom. Use overhand knots to secure the ropes to each of the hooks.
-
4Cover items that may be damaged by the sun with a blanket. Since your unit will be outside of your home, it will be exposed to the heat of the sun and indirect light. This could cause damage over a prolonged amount of time. If you have sensitive items that you plan on storing, cover them with a moving blanket to protect them.[16]
- Lay blankets on all of your belongings at the top of the unit to protect everything inside.
- Pods are waterproof and weatherproof, but they hold heat.
-
5Include moisture absorbers in the container to prevent mold or mildew. Moisture absorbers are small containers filled with baking soda and calcium chloride to get rid of dampness in an area. Although the pod is protected from the elements, the heat could cause unwanted mold or mildew to develop. Place 1 or 2 moisture absorbers in each tier of the container to keep everything dry and mold-free.[17]
- Moisture absorbers can be purchased at hardware stores or online.
-
6Make sure your unit is locked when you’re not using it. Locks are usually provided with the unit, but you may need to provide your own. Keep your belongings secure whenever you leave the unit unattended.[18]
- Even when your unit is locked, don’t store valuables or important documents in the container. Always bring them with you personally when you move so they don’t get lost.


Warnings
- Don’t store valuables or important documents in your pod.⧼thumbs_response⧽
- Practice lifting safely so you do not hurt yourself.⧼thumbs_response⧽

References
- ↑ https://youtu.be/ztejkGZGvCU?t=1m16s
- ↑ https://www.pods.com/container-sizes
- ↑ https://youtu.be/ztejkGZGvCU?t=1m5s
- ↑ https://youtu.be/ztejkGZGvCU?t=1m11s
- ↑ https://www.pods.com/how-to-load-your-pods-container/loading
- ↑ Marty Stevens-Heebner, SMM-C, CPO®. Certified Professional Organizer & Senior Move Manager. Expert Interview. 14 January 2020.
- ↑ https://youtu.be/ztejkGZGvCU?t=1m43s
- ↑ https://youtu.be/ztejkGZGvCU?t=1m56s
- ↑ https://youtu.be/ztejkGZGvCU?t=1m31s
- ↑ https://www.pods.com/how-to-load-your-pods-container/loading
- ↑ https://youtu.be/ztejkGZGvCU?t=1m29s
- ↑ Marty Stevens-Heebner, SMM-C, CPO®. Certified Professional Organizer & Senior Move Manager. Expert Interview. 14 January 2020.
- ↑ Marty Stevens-Heebner, SMM-C, CPO®. Certified Professional Organizer & Senior Move Manager. Expert Interview. 14 January 2020.
- ↑ https://www.pods.com/how-to-load-your-pods-container/loading
- ↑ https://youtu.be/ztejkGZGvCU?t=1m18s
- ↑ https://www.pods.com/how-to-load-your-pods-container/loading
- ↑ https://www.pods.com/how-to-load-your-pods-container/loading
- ↑ https://www.pods.com/how-to-load-your-pods-container/loading
About This Article