This article was co-authored by Andres Matheu. Andres Matheu is the Owner of Hömm Certified Painting Systems, an Interior and Exterior Residential painting business based in the Washington, DC Metro area. Andres specializes in interior and exterior residential painting, color consultations, cabinet refinishing, wallpaper removal, and epoxy flooring among other services. An EPA Lead-safe Certified Firm, Hömm Certified Painting Systems has been awarded the Best of Houzz 2019 Service, Angie's List Super Service Award 2019, and Northern Virginia Magazine's 2018 Best Home Experts (painters) award.
There are 7 references cited in this article, which can be found at the bottom of the page.
This article has been viewed 104,529 times.
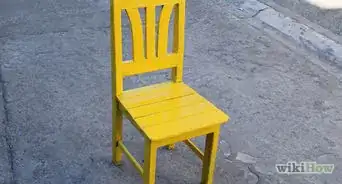
Painting your furniture can be a fun, cheap, diy way to bring new life into old furniture. There is a vast spectrum of colors available, and sometimes it can be difficult to choose. Black is a classic and elegant choice, but improper application can bring out any flaws and imperfections and make the paint appear messy. This article will not only teach you the proper way of painting your furniture, but also give you tips and advice on how to make the black paint look its best.
Steps
Preparing Your Work Area and Choosing Your Paints
-
1Choose your work area. Find a well-lit, well-ventilated area that you can paint your furniture in. Good lighting is important, as it will help you spot any imperfections in your work. The best place to paint is outside, so long as it is not windy or humid.
- If you cannot paint outside or in a well-ventilated area, make sure to keep a window open. If possible, keep a fan turned on, and turned away from you, so that it does not blow paint fumes or dust towards you.
- If you start start to feel sick or lightheaded, take a break and move to an area with fresher air.
-
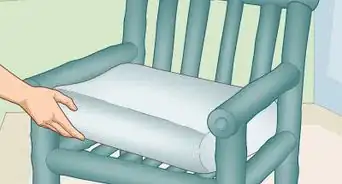
2Prepare your work area. Painting can be messy, so you will have to cover your work area with something that can get dirty or be discarded, such as newspaper. If you do not have newspaper, you can use newsprint, butcher paper, old tablecloths, or old bed sheets instead. You can also purchase cheap, plastic tablecloths from a party supply store or an arts and crafts store and use those.Advertisement
-
3Wear proper clothing. Some paint may also get on your clothes, so wear something that you do not mind getting stained with paint. You can also wear an artist's smock.
- If you have sensitive skin, consider wearing gloves to protect your hands in case you get paint on them. You can also protect a manicure with gloves.
-
4Determine what your furniture is made of. What primer and paint you will use on your furniture will depend on what the piece is made of. Choose an indoor primer and paint intended for the surface, be it wood, metal, or plastic. If your furniture has already been painted, consider choosing a primer intended for pre-painted surfaces. The label will tell you whether or not the primer and paint will work on the material your furniture is made of.
-
5Consider what sort of paint you want to use. You can use latex, acrylic, or oil-based paint. You can also use wood stains or spray paint as well. Each of these has pros and cons:
- Latex, acrylic, and oil-based paints have little to no fumes and can be used indoors. Unfortunately, improper painting techniques can result in visible brush strokes and tackiness. Brushes used for oil-based paints will need to be cleaned with paint thinner, which can create headache-causing fumes.
- For a sleek finish, consider using a black enamel paint with a semi-gloss finish. Enamel paints dry harder than other paints, so they're a durable option for furniture.[1]
- Wood stain gives you more of a translucent look, so you'll still be able to see the wood grain. It will protect the surface of the wood, but it will still allow moisture to escape, so it's ideal for outdoor furniture. Wood stain is available in both oil-based and water-based formulas. Both are fine, but the oil-based may last longer.[2]
- Spray paint is fast and easy to use, but it can also be expensive. It creates a smooth finish, and you will not have to clean any brushes afterwards. You will have to work in a well-ventilated area to prevent lightheadedness, however.
-
6Decide what sort of finish do you want. Paint comes in all sorts of finishes, with its own benefits and drawbacks:
- Glossy finishes look elegant, but they show any imperfections in the paint and wood, such as brush strokes and dents. Glossy finishes can also be easily marred.
- Satin or semi-gloss finishes are decent at hiding imperfections, and are easier to maintain than glossy surfaces.
- Matte surfaces hide imperfections the best, but they can look simplistic.
- A chalkboard finish gives you a matte surface that hides imperfections well. It can create a fun, interactive surface that you can draw on with chalk. It also does not need to be sealed afterward.
-
7Think about the final design. Before you start painting your furniture black, ask yourself what you want the finished piece to look like. To you want it to be completely black? Or do you want to add some designs to it? Alternatively, do you want the piece to be a solid color with black designs painted onto it? Asking yourself these questions will help you decide how much paint you will need as well as what other supplies you will need to get (such as thin paint brushes for detailing or stencils). For example:
- For a weathered or antique look, paint your furniture a matte or semi-matte black, and then buff the corners with fine grit sandpaper. Keep in mind that anything underneath the paint will show through, depending on how much you sand. This includes primer, previous paint jobs, and the original surface of the furniture.
- Consider stenciling some designs onto your finished piece in a contrasting color, such as white, silver, or gold.
- Consider painting the entire piece a contrasting color first, and then adding black designs using stencils.


Sanding and Priming Your Furniture
-
1Remove drawers and any pieces you don't want painted. If your furniture has removable pieces, such as drawers and doors, take these off and set them aside. If your furniture has any pieces that you do not want painted, such as hinges, knobs, and pulls, remove them and set them aside; if you cannot remove them, then cover them with painters tape.
-
2Fix any dents and scratches. Imperfections show up on black surfaces, and even more so if that surface is glossy. If your furniture has any dents or holes, fill these in with some wood filler or putty.[3]
-
3Sand your furniture. Before you can start priming and painting your furniture, you need to sand your piece. This gives the primer a rough surface to grip on to. Take some fine grit sand paper (between 180 and 220 grit) and lightly buff the entire surface of your piece. You do not have to strip the entire previous paint job; you simply need to create a rough texture.
- If your furniture has a varnish on it, then use 80 grit sandpaper.[4]
-
4Wipe your furniture down with a tack cloth. You need to remove any dust created from when you sanded your furniture. Do this by wiping the entire surface of your furniture with a tack cloth.
-
5Apply a grey, paint primer to your furniture. Grey primer helps make shadows more visible, which will help you find and fix any imperfections. You can either paint or spray on the primer. To prevent drips and puddles, apply several light coats of primer (while letting the primer dry between coats) as opposed to one thick coat.
- Be sure to choose a primer intended for the material your furniture is made out of.
-
6Use sandpaper and tack cloth to remove any imperfections. Once the primer has dried, run 220 grit sandpaper over any imperfections in the primer, such as paint drips, bubbles, and globs.[5] After that, wipe the piece down again with tack cloth.
- If necessary, apply more primer and repeat the process. Remember, imperfections show up more on black surfaces, so your primed surface needs to be as smooth as possible.
-
7Wait for your primer to dry. Before you start painting, let your primer dry at least 24 hours. Refer to the directions on the can, as some primers might require more time.


Painting and Finishing Your Furniture
-
1Choose your brushes and foam applicators. Paint and wood stains can be applied to furniture in many ways: paint brushes, foam applicators, and foam rollers. You will need a foam roller or a large, angled brush (at least 1 inch wide) for the large, flat areas of your piece. You will also need a small brush to reach details such as carvings, crevices, and corners.
- Consider using higher-quality brushes or foam rollers for best results. Avoid cheap brushes with stiff bristles if you can, as these are more likely to create brushstrokes. Remember, details and imperfections show up more in black paint, especially if it has a glossy finish.
- You can also purchase spray paint and spray the paint on using light, even coats. Keep the can 6 to 8 inches away from the piece.
-
2Condition your paint brush. If you have decided to use paint or wood stain, you will need to condition your paintbrush before using it. If you are using latex or acrylic paint, then dip your brush in water; if you are using a wood stain or oil-based paint, then dip your brush in paint thinner.
-
3Apply a thin coat of paint, let it dry, and then add another. Brushing or spraying the paint on in many, thin layers as opposed to one thick layer will give you a smoother finish and help reduce brush strokes.[6] If you are applying one thick layer of paint, then wait at least 24 hours before applying another coat.[7]
- If you see brush strokes, you can smooth them out by going over them lightly with a foam roller. Keep rolling over the brush strokes while the paint is still wet until the surface is smooth.[8]
-
4Start with the largest areas first, then move onto the details. Use long strokes when applying paint to large, flat areas. If your furniture is made of wood, then apply the paint with the grain, not against it. Paint the corners and details last.
-
5Consider sanding the piece before applying the last coat of paint. Sometimes, the paint will puddle or drip, no matter how careful you are. Other times, bits of dust may fall onto your piece and stick to the paint. If happens, take a fine grit sandpaper, such as 220 grit, and buff the surface. Then, wipe the piece down with a clean tack cloth, and apply one or two more coats of paint.
-
6Consider sealing your painted furniture. Some paint or stains come with a sealer already in them. Others will need to be sealed for additional protection. Look for a polycrylic or polyurethane sealer in either brush on or spray on form.
- You can also consider using a wax sealer, but keep in mind that the finish will not be as durable.
- If you are using chalkboard paint, do not use a sealer, as it will ruin the surface and prevent it from functioning.
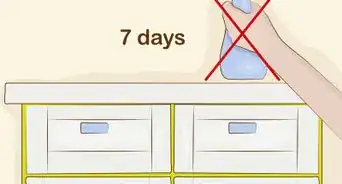
- After you have applied the sealer, sure that you give the sealer enough time to cure before you use the furniture. This can take anywhere between 24 hours to 1 week.
-
7Reassemble your furniture. Once the paint and sealer has dried, put your furniture back together. Remove any taped-off areas, screw on the knobs, pulls and hinges, and reinsert the drawers and doors.


Expert Q&A
Did you know you can get expert answers for this article?
Unlock expert answers by supporting wikiHow
-
QuestionHow do you make black furniture look good?
 Andres MatheuAndres Matheu is the Owner of Hömm Certified Painting Systems, an Interior and Exterior Residential painting business based in the Washington, DC Metro area. Andres specializes in interior and exterior residential painting, color consultations, cabinet refinishing, wallpaper removal, and epoxy flooring among other services. An EPA Lead-safe Certified Firm, Hömm Certified Painting Systems has been awarded the Best of Houzz 2019 Service, Angie's List Super Service Award 2019, and Northern Virginia Magazine's 2018 Best Home Experts (painters) award.
Commercial PainterClean off the furniture before you paint it. Your furniture needs to be completely clean of any grease, dust, dirt, or debris before you begin to paint it, or else the paint will not adhere properly to the surface.
Support wikiHow by unlocking this expert answer.
-
QuestionWhat is the best black paint for furniture?Andres MatheuAndres Matheu is the Owner of Hömm Certified Painting Systems, an Interior and Exterior Residential painting business based in the Washington, DC Metro area. Andres specializes in interior and exterior residential painting, color consultations, cabinet refinishing, wallpaper removal, and epoxy flooring among other services. An EPA Lead-safe Certified Firm, Hömm Certified Painting Systems has been awarded the Best of Houzz 2019 Service, Angie's List Super Service Award 2019, and Northern Virginia Magazine's 2018 Best Home Experts (painters) award.
Commercial PainterIf you'd like to still see the wood grain, use a black stain. This is ideal for outdoor furniture, because it will protect the surface while still allowing moisture to escape from the wood. If you want a solid black, use black enamel paint in a semi-gloss finish. Enamel paint dries harder than other types of paint, so it's more durable, which is ideal for furniture and high-traffic areas.Support wikiHow by unlocking this expert answer.
-
QuestionDo we need to sand the paint before we polyurethane?
 Community AnswerNo, this is not necessary. It will most likely stick anyway, provided it's a good quality brand. But do rad the packaging of the paint for advice pertinent to the brand.
Warnings
- Some paint fumes can be hazardous. Try to work outside or in a well-ventilated area.⧼thumbs_response⧽
- Consider wearing a dust mask when sanding the furniture.⧼thumbs_response⧽
- Consider wearing protective gloves if you have sensitive skin to avoid any allergic reactions.⧼thumbs_response⧽
Things You'll Need
- Furniture
- Primer
- Spray paint, latex or acrylic paint, or wood stain
- Brushes, foam rollers, or foam applicators
- Water (for acrylic or latex paint) or paint thinner (for oil-based paint or wood stain)
- Paint sealer (optional)
- Newspaper, newsprint, or plastic cloth (optional)
- Painters tape (optional)


References
- ↑ Andres Matheu. Commercial Painter. Expert Interview. 28 July 2020.
- ↑ Andres Matheu. Commercial Painter. Expert Interview. 28 July 2020.
- ↑ Live Love DiY, How to Paint Furniture
- ↑ Country Living, The 5 Biggest Mistakes You Make When Painting Furniture
- ↑ Country Living, The 5 Biggest Mistakes You Make When Painting Furniture
- ↑ The Frugal Girl, How to Paint Wooden Furniture
- ↑ Bob VIla, Paint Makeovers: An Expert Tells All
- ↑ The Miniature Moose, DiY Pottery Barn Style Paint Job
- Homeguides, Recommended Paint Finishes for Furniture
About This Article

To paint furniture black, use a latex, acrylic, or oil-based paint if you'll be painting indoors since these kinds of paints don't have dangerous fumes. If you can work outside in a well-ventilated area, go with spray paint, which is easier and faster to use and results in a smoother finish. Whichever paint you go with, start by sanding your furniture with fine-grit sandpaper so the paint has something to grip onto. Then, apply a coat of paint primer and let it dry for at least 24 hours. Finally, apply several thin coats of black paint, letting the paint dry in between each coat. To learn how to fix any imperfections in your furniture before you start painting, scroll down!