This article was co-authored by wikiHow Staff. Our trained team of editors and researchers validate articles for accuracy and comprehensiveness. wikiHow's Content Management Team carefully monitors the work from our editorial staff to ensure that each article is backed by trusted research and meets our high quality standards.
There are 7 references cited in this article, which can be found at the bottom of the page.
This article has been viewed 20,595 times.
Learn more...
Parchment crafting is an ancient craft, dating back to the 15th or 16th century, and is also known as "Pergamano." It focuses primarily on embossing, but it also utilizes other technique as well, such as perforating, cutting, outlining, coloring, and blending. It is usually mounted onto a sheet of cardstock, but some people also like to add it to handmade cards to create a delicate, layered look. It may look intimidating at first, but once you know what to do, it is quite simple![1]
Steps
Creating and Transferring Your Design
-
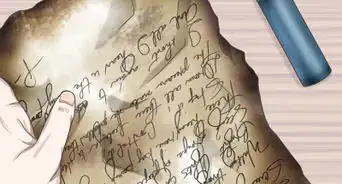
1Create a template on a sheet of paper. You can draw the design directly onto the paper itself, or you can find an image on the computer and print it out instead. Make sure that the lines are dark, otherwise they won't be visible behind the parchment paper.[2]
- If you want to make a card, draw a straight line down the middle of the page. Place your outside design on the left, and the inside design on the right.[3]
-
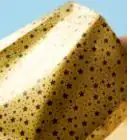
2Tape a sheet of parchment paper over your template. Place the template onto a flat surface and tape down the edges. Set the parchment paper on top, and tape down the edges as well. If you're having trouble seeing the lines, remove the parchment paper, and trace over them with a black pen. Replace the parchment paper when you are done.[4]
- Use scrapbooking parchment paper or vellum, not baking parchment paper.
Advertisement -
3Trace any lines you want embossed with a white colored pencil. This is great for borders and frames. You can also use the pencil to sketch out other guidelines as well that are not part of the original outline. Periodically check your work by sliding a sheet of black paper under the template.[5]
- If you are making a card, remember to trace the center, dividing line.
- If you are making a card, do the outside design on the left first, then flip the card over and do the inside design on the right.[6]
-
4Trace over any desired outlines with a liner pen. Not every line on your design needs to be embossed; some lines can be flat and colored. You can use any color of pen you want, as long as it fits your design and desired color scheme. Black will look the best, however. Check your progress by slipping a blank sheet of white paper under the parchment paper.[7]
- Once again, if you are making a card, do the outside design first, then flip the card over and do the inside design.
-
5Flip the parchment paper over and wipe the back with a drier sheet. Peel off the tape first, then turn the parchment paper over. Rub the back with a drier sheet. This will prepare the parchment paper for embossing.[8]
- If you are making a card, wipe the drier sheet over the back of each traced side.[9]


Embossing Your Design
-
1Transfer the paper to an embossing mat with the back side facing you. Do not tape the paper down. This will allow you to rotate the paper as you work on your design, which is easier than curling your hand to get to it. If you don't have an embossing mat, you can use a dense, rubber mat instead.
-
2Trace the white outlines with a small, ball point embossing tool. The white lines will "disappear" as you emboss the parchment paper. This is because parchment paper automatically turns white when you emboss it. Do not emboss over any black lines, however.
-
3Use star and sun shaped embossing tools to create scalloped borders. This is great for borders within your frame. For example, if you created a floral design, you could create a heart shape around it. When using such tools, you'll want to rock them top-to-bottom and side-to-side. This ensures that each part of the design gets embossed.[12]
-
4Use a ball-point embossing tool to create graduated embossing. This is great for delicate area, such as petals, leaves, or baskets. Press down with the tool, then lift it away as you finish the stroke. Work in layers and rotate the parchment paper a you work; don't curl your wrist to fit the design.[13]


Adding Color
-
1Transfer the paper to a flat surface and make sure that the back is facing you. Do not attempt to color the paper on top of your embossing mat, otherwise you may accidentally emboss the paper while coloring it.[14]
- If you are making a card, you will need to do this entire section twice, once for the left/outside of the paper, and once for the right/inside of the paper.
-
2Place a sheet of paper under your work. This will help make it easier to see what you are coloring. A white sheet of paper will show off the colors the best.[15] If you are planning on coloring something white, then a black sheet of paper would work better.
-
3Color in your work with blend-able colored pencils as desired. You can color in the background and/or the embossed designs as you like. If you don't have any colored pencils, you could try using artist's markers (ie: Copic). Keep in mind that you won't be able to erase any mistakes if you use markers.
- Make sure that you use blending pencils; regular colored pencils will not work.
-
4Blend in your coloring with blending medium and a blending stump, if desired. Dampen a sponge with blending medium, then place it in a shallow jar or dish. Press the blending stump into the sponge, then rub it over the colored areas. The blending medium will dissolve the colored pencil while the stump will smooth out the texture.[16]
- You can get blending medium in the embossing and stamping section of an arts and crafts tore. You can also use white spirits.
- If you can't find a blending stump, make your own by folding a paper towel into a strip, then rolling it into a tight cone.
- Use a blending marker instead if you used markers to color in your work. You can usually find it alongside the other artist's markers.
-
5Erase any mistakes after the blending medium dries. A white "plastic" eraser or mechanical pencil eraser will work the best. Once you have erased the mistakes, you can color over them again.[17]
- You can still erase your mistakes, even if you did not use a blending medium.
-
6Add some color to the front, if desired. You don't have to do this at all, but it is a great way to add shading by making the color deeper. Simply flip the paper over, and color in areas on the front that need a deeper color.[18]


Trimming and Mounting Your Work
-
1Trim off the excess parchment paper with a craft blade for a simple look. Use a craft blade and a metal ruler to cut away any excess parchment paper from outside your border. If you did not create a border, then decide what size you want the parchment to be, then cut it down accordingly.
- You won't be able to combine this with the fancier perforated edge. Pick one or the other.
-
2Perforate the edge first for a fancier look. Place the parchment paper on top of a perforating template. Punch the paper with a perforating tool using the template as a guide. Snipe the little bits of paper between the holes with small, pointed scissors (ie: manicure scissors). Pull the excess parchment paper away.[19]
- You won't be able to combine this with the simple, straight edge. Choose one or the other.
-
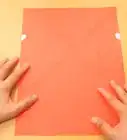
3Cut a sheet of cardstock larger than your parchment paper to use as your background. Use a paper slicer or a craft blade and a metal ruler to do this. You can use any color you want, but make sure that it goes well with your card's design. How much larger you cut the paper is up to you; about ¼ inch (0.64 centimeter) would be ideal, however.[20]
- If you are making a card, fold the paper in half, then unfold it. Cut a slit down the center of the crease the same height as your parchment paper.[21]
-
4Stitch the parchment paper onto the cardstock for a simple, mounted artwork. Tape the parchment paper to the cardstock with low-tack tape. Perforate a cross into each corner, making sure that you go through the cardstock. Stitch the parchment paper to the cardstock through the holes using a needle and white thread. Remove the lo-tack tape when you are done.[22]
- Place a piece of tape over the back of the cardstock where the stitches are. This will strengthen them.
- Consider adding an embossed design into the corners of the parchment paper before you perforate it. This will help disguise it further.
-
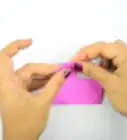
5Slide the parchment paper through the slit if you are making a card. Fold the parchment paper in half to make a crease first. Next, slip the right side through the slit. The left side of your parchment paper should now be on the front of the card. The right side should be on the inside of the card.[23]
- Write your desired message inside the card with a nice pen.


Things You'll Need
- Parchment paper or vellum
- Embossing mat
- Embossing tools
- Black and white paper
- Felt liner pen
- Blendable colored pencils
- Blending medium or mineral spirits
- Blending stump or paper towel
- Drier sheets
- Cardstock
- Low-tack tape
- Craft blade and metal ruler
- Paper slicer (optional)

References
- ↑ https://www.perfectparchmentcraft.com/extras/beginners/
- ↑ https://www.youtube.com/watch?v=Hfedwc_aB9E
- ↑ https://www.youtube.com/watch?v=xQQe8Jzsb5Q
- ↑ https://www.youtube.com/watch?v=Hfedwc_aB9E
- ↑ https://www.youtube.com/watch?v=Hfedwc_aB9E
- ↑ https://www.youtube.com/watch?v=xQQe8Jzsb5Q
- ↑ https://www.youtube.com/watch?v=Hfedwc_aB9E
- ↑ https://www.youtube.com/watch?v=Hfedwc_aB9E
- ↑ https://www.youtube.com/watch?v=xQQe8Jzsb5Q
- ↑ https://www.youtube.com/watch?v=xQQe8Jzsb5Q
- ↑ https://www.youtube.com/watch?v=xQQe8Jzsb5Q
- ↑ https://www.youtube.com/watch?v=Hfedwc_aB9E
- ↑ https://www.youtube.com/watch?v=BNE_q53H_jc
- ↑ https://www.youtube.com/watch?v=IoTESZKQzuw
- ↑ https://www.youtube.com/watch?v=IoTESZKQzuw
- ↑ https://www.youtube.com/watch?v=BNE_q53H_jc
- ↑ https://www.youtube.com/watch?v=BNE_q53H_jc
- ↑ https://www.youtube.com/watch?v=IoTESZKQzuw
- ↑ https://www.youtube.com/watch?v=yEW7tueG6Qs
- ↑ https://www.youtube.com/watch?v=z8jEA60UuTg
- ↑ https://www.youtube.com/watch?v=xQQe8Jzsb5Q
- ↑ https://www.youtube.com/watch?v=z8jEA60UuTg
- ↑ https://www.youtube.com/watch?v=xQQe8Jzsb5Q
About This Article