This article was co-authored by Amy Guerrero. Amy Guerrero is an Arts and Crafts Specialist and the Owner of Sunshine Craft Co., a crafting studio based in Phoenix, Arizona. Amy specializes in macrame, DIY crafting, and teaching fiber arts. She offers monthly in-person and online workshops along with having developed a range of DIY craft kits for at-home projects. Amy holds a BS in Industrial Design from Philadelphia University. She worked as a graphic designer before starting her own business. Sunshine Craft Co. is a creative hub that offers a wide range of workshops, tools, and resources for any craft project to inspire creativity and community engagement.
This article has been viewed 365,135 times.
Folded paper fans are one of the simplest origami creations, yet their charm and elegance make them perfect party favors, place settings, or details for gift wrapping. You can also create fans of any size: tiny fans for dolls or stuffed animals, or larger ones to cool off in the summer. Customize them by using any type of paper in any print. Their versatility and ease make them ideal rainy-day activities for any age.
Steps
Folding the Fan
-
1Pick your paper to determine the size and color of your fan. You can use thin plain paper or card stock, as long as it is the appropriate thickness.
- Plain copy paper is used for many styles of beginner origami. When choosing copy paper, look for a thinner option as it will fold and crease nicely, whereas a thicker version will be lumpy and unsightly after folding.[1]
- Card-stock, or craft paper is another popular paper choice for folding. The advantage to card stock is that it comes in endless amounts of shapes, and colors; however, sometimes it can be too thick and rigid leading to cracking within your design.
- The best way to determine if the paper is too thick is to try a few quick folds. If the paper does not have an even, smooth crease or tears under the pressure of your folds, it is likely too thick for origami.
-
2Lay the paper down on its decorative side. It should be back-side up, with the non-decorative or plain side facing you.Advertisement
-
3Fold down the top edge by one third. Think of folding it like a hot dog bun; you want to fold along the longer edge to produce a long, skinny fold. Line up your corners of the top of the sides of the paper to ensure a straight fold, then crease from the center outwards.[2]
- With the paper folded closed, you can use your fingers to set the crease by pushing directly down it with your fingers.
- Pick the folded paper up and look at its profile from the side view, ensuring that the decorative side is downwards. Note the “V” shape in the fold. This is called a “valley fold.”
-
4Fold the paper in half, vertically, keeping your initial fold from the previous step. You want to do a second “hamburger fold.” That is, you want it to be short and wide, like a hamburger bun (versus the long and slim, hot dog fold.) Fold the left side of the paper onto the right side, align the corners and crease from the center for an even valley fold, then open the fold again. Now you will have a sharp vertical crease in the center.[3]
-
5Fold the left and right edges in towards the center crease. You want to make two vertical flaps meeting at the center, not overlapping. This is called a "gate fold." Think of it as two closing doors meeting in the middle, like a gate.[4]
-
6Continue making vertical gate folds. Fold the two vertical edges in twice more, or until you have two inward-folding flaps about 1 cm or 0.5 inch wide. The sides will be folded over themselves, making two slim flaps. Make sure your folds are straight with sharp creases at each step.
-
7Unfold all of the previously made vertical folds. Be gentle while unfolding to prevent tearing your hard work. Now you will have several vertical creases. Each crease should be approximately 1 cm in width. Do not unfold the horizontal fold from step two.
-
8Rotate the paper 90 degrees. The fold from step two will be running vertically on the left. Now the creases that were previously vertical are horizontal.
- Depending on which hand is your dominant, it may feel more comfortable to have your thick vertical fold on the right. Try laying your paper with the fold on each side, and see what feels most comfortable for the upcoming steps.
-
9Make one valley fold along the bottom crease. Starting from the bottom, fold the horizontal edge upwards. From a side profile, the fold should maintain a “V” shape. Don't forget to keep your edges lined up to create an accurate, tidy fold.
-
10Fold the bottom edge outwards along the next crease. Hold your previous fold and crease underneath the paper. There will be decorative paper on decorative paper in this fold. This is called a "mountain fold.” From the side profile, the peak of the mountain will be at the top, opposite to the downwards “V” fold.[5]
- From the bottom of the paper there should be first a valley fold, and above that will be a mountain fold.
-
11Repeat alternating folds with the remaining horizontal creases. Fold a valley, then a mountain, and repeat. This series of folds resembles an accordion. You will immediately start to see a pattern in your folding.[6]
- If you make a mistake, be patient and keep trying. It may seem overwhelming at first, but the process will seem easy after the first few tries.

Making the Handle
-
1Cut a piece of string to a length appropriate for your fan. A suitable length is approximately 15 cm which the length of the original paper before folding. When it comes to choosing the string for the handle, you can pick yarn, string, cord, or anything similar. Pick a color to complement your fan but don't let traditional color pallets limit you. Get your creative juices flowing.
-
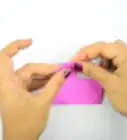
2Hold the fan and tie off a handle with string. When looking at your fan, the handle will be the portion that does not contain the horizontal fold. Choose the length of the handle you want by holding different locations and seeing whats comfortable. While pinching the bottom of the fan, wind the yarn, thread or cord around it several times. Tie a knot and cut away the excess after you have tied the knot off. [7]
- If you feel your fan is too large, the bottom, unfolded edge can be trimmed off in a straight line. Do this by tying your handle further up than desired, and trimming off the excess bottom piece below the yarn or string. like.
- When it comes to tying the string, a shoelace bow gives a simple but cute touch. If you're looking for something more hearty, try double knotting it by tying the loops of your knot into each other a second time.
- You can decorate your handle as well. Tie on beads, charms or feathers to add dimension to simple yarn or cord.
-
3Attach your fan to gift wrapping, give it to a doll, use as a place setting, or find another creative use for it. Now that you know how easy it is, you can make several more.
- If you want to alter your fan, simply unwrap the handle and unfold. After your mountain and valley folds are present you may want to do extra decorating within the folds, such as glitter glue or stickers. When you reassemble your fan, it will fit together easily as the folds have already been creased.

Using Origami Paper
-
1Pick your paper to determine the size and color of your fan. If you're a beginner at origami, origami-specific paper can be picked up at your local craft store.
- Origami paper, also known as kami, is what is traditionally used in this famed Japanese practice. Kami is advantageous because it is thin, flexible, and often pre-cut into squares. However, kami was invented to be a less expensive option to Western paper, meaning it can be low quality.
-
2Trim your paper size to reflect your desired fan size. When you desire a longer fan, use a rectangular shaped paper. Your fan will be approximately two thirds the length of the longer side of the rectangle. Otherwise, you can stick with a square piece of paper. A square piece will yield a fan approximately two thirds the length of the square's sides.
- Paper that is 15 cm x 15 cm (6” x 6”) is good for beginners. but you can also use a larger piece if you desire a longer fan.[8] The 15 cm x 15 cm paper choice will allow for a small, handheld fan. If you desire a larger fan, try starting with 20 cm x 20cm (8” x 8”).
- Feel free to use a ruler or guide to help you cut your paper in a straight line.
-
3Cut your square piece of paper into a rectangle. If you are using a rectangular piece of paper, skip this step. With the paper front-side up, fold down a portion of one side and crease. Unfold the crease and use scissors to cut along the crease. Now you have a rectangular piece of paper.[9]
- If you have access, use a paper cutter. A paper cutter allows for a quick and straight cut by placing the paper on the mount, aligning it up the corners and pulling the blade down in one quick motion. This is effective for cutting several pieces of paper at once.
- Cut slowly. You want to do your best to cut a straight line in order to have an even fan. If you're struggling to get a straight cut, try using larger cuts to ensure the smoothness.
Community Q&A
-
QuestionIs there another way to make a fan?
 Community AnswerYes. You can just fold the paper in by an inch and then turn the paper over and repeat until all of the folds are crisp. Then, if you would like, you can glue them together.
 -
QuestionHow long do I cut the wallpaper if I want both sides to be decorative?
 Community AnswerAs long as you like, as the fan length doesn't not really matter. It's all down to what you'd like, whether a smaller one would fit in your bag or pocket or if a bigger one would cool you quicker.
 -
QuestionHow do you hang a decorative hand fan without harming the fan?Community AnswerTape the bottom where you hold the fan, then get a hole punch and put a hole through the part you hold. Get a long piece of string tie it through the hole then hang it.
Things You'll Need
- Paper (rectangular or square, origami)
- Yarn, cord or thread
- Scissors or paper cutter
- Paints, colored pencils, markers, stencils, etc. (optional)

References
- ↑ https://origamiusa.org/thefold/article/paper-review-4-printer-paper
- ↑ http://www.activityvillage.co.uk/origami-fan
- ↑ http://www.activityvillage.co.uk/origami-fan
- ↑ http://www.activityvillage.co.uk/origami-fan
- ↑ http://www.activityvillage.co.uk/origami-fan
- ↑ http://www.origami-make.com/origami-fan-simple/page-10.php
- ↑ http://www.activityvillage.co.uk/origami-fan
- ↑ http://www.origami-make.com/origami-fan-simple.php
- ↑ http://www.activityvillage.co.uk/origami-fan
About This Article

To make a paper fan, start by cutting a piece of paper into a rectangle and folding the top edge by one third. Next, fold the paper in half vertically and use your finger to crease the edge. Unfold the vertical fold, and fold the left and right edges in toward the crease you just made and continue making vertical folds. Once the paper is folded, unfold everything, rotate the paper 90°, and pinch the creases into you upward “V” shapes. To learn how to add a handle to your paper fan, read on!