This article was co-authored by wikiHow Staff. Our trained team of editors and researchers validate articles for accuracy and comprehensiveness. wikiHow's Content Management Team carefully monitors the work from our editorial staff to ensure that each article is backed by trusted research and meets our high quality standards.
This article has been viewed 260,757 times.
Learn more...
If you like surfing and skateboarding, you might be considering getting into snowboarding. While snowboarding is quite the balancing act, you can become good at it and have fun with it if you get the basics down. Carving is one of the most important things to learn as a snowboarding beginner. To perform a carve on a snowboard, first learn the positions, practice the positions, and then tweak your form in order to gain control.
Steps
Learning Positions
-
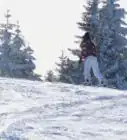
1Get into an athletic stance on flat land. You first need to learn how to properly stand on your snowboard. Get to a flat, snow-covered surface and stand on your board. Keep your knees slightly bent, your back straight, and your hands by your sides over the snowboard’s nose and tail.[1]
-
2Practice leaning forward. To get an idea of the movement, lean forward and balance on your toe edge while remaining stationary. Focus on keeping your knees forward and your weight centered. Hold this for as long as you can without falling forward to the ground. Take a quick break and repeat this leaning motion until you feel comfortable doing it.[2]Advertisement
-
3Practice leaning backward. Lean back on your heel edge. To balance this way, you’ll need to bend your knees and stick out your backside like you’re sitting in a chair. Hold this for as long as you can and then take a quick rest. Repeat this until you feel confident in balancing on your heel edge.[3]


Practicing
-
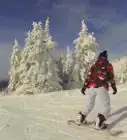
1Lean forward to pick up some speed on a moderate run. Once you’ve practiced stationary leaning, it’s time to move onto mobile leaning. Start at the top of a moderate run and pick up some speed by leaning forward. You’ll need some momentum built up before you begin carving.
- Pay attention to what’s going on around you and make sure that there’s room to work on your carving before getting started.[4]
-
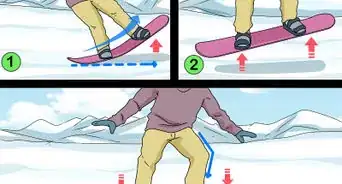
2Edge your snowboard forward by driving your knees into the hill. As you pick up some speed, bend your knees and ankles and tip your board forward. Lean into the hill with your knees in order to cut into the snow with your board.
-
3Edge your snowboard backward by sticking your backside out. Shift your weight backward while continuing to move down the run. Cut into the snow with your heel edge by keeping your body centered but sticking your backside out behind you and toward the hill.
-
4Adjust your pressure to smooth out skidding. As you transition back and forth between leaning forward and backward, experiment with how much pressure you apply. Not enough pressure may result in uncontrolled speed and turning while too much pressure can create unsteady skidding.
- To apply more pressure to your heel edge, tilt your heels back farther. To apply more pressure to your toe edge, tilt your toes further forward.
- Once you’ve completed a run, look behind you and check your track to assess your smoothness. If it’s a thin, smooth, curved line, your pressure is right. If it’s choppy and inconsistent, keep experimenting with your pressure.


Gaining Control
-
1Steer with your front knee and shoulder. To steer yourself effectively, make movements that are quick and aggressive. Your front shoulder and front knee have a lot of power when it comes to steering while carving. Point your front shoulder and front knee in for the toe carve and out for the heel carve.[5]
-
2Bend your knees during turns to absorb pressure. Focus on bending your knees while turning as you carve. At the end of each turn, bend your back knee more than your front knee, so that the pressure is properly absorbed.[6]
-
3Flex your ankles to effectively edge your snowboard. As you edge your snowboard outward or inward, flex your ankles and knees. This should help to minimize skidding and create a smoother carve.


Warnings
- Do not attempt anything you are not comfortable with. Snowboarding can be a very dangerous sport, so it’s important to work your way up to more advanced slopes and tricks, instead of trying them without being prepared.⧼thumbs_response⧽
- Always wear a helmet when you snowboard.⧼thumbs_response⧽
- Don’t get discouraged if you struggle with carving at first. Even something as "simple" as your basic turn will take a lot of practice to get good at.⧼thumbs_response⧽
- Remember to wear warm clothing such as thick gloves, thermals, water-resistant pants, and hats to keep your body safely warm while you snowboard.⧼thumbs_response⧽
- When learning to turn, make sure to always be on the edge of your board that is going uphill. If you go on the other edge, your board will slide downhill and cut under the snow, which will flip you over.⧼thumbs_response⧽
-Step-9.webp)
References
- ↑ https://www.youtube.com/watch?v=76N7S9NdaT8
- ↑ https://www.thoughtco.com/how-to-carve-on-a-snowboard-3020464
- ↑ https://www.thoughtco.com/how-to-carve-on-a-snowboard-3020464
- ↑ https://www.thoughtco.com/how-to-carve-on-a-snowboard-3020464
- ↑ https://www.youtube.com/watch?v=76N7S9NdaT8
- ↑ https://www.youtube.com/watch?v=76N7S9NdaT8
About This Article