This article was co-authored by wikiHow staff writer, Hunter Rising. Hunter Rising is a wikiHow Staff Writer based in Los Angeles. He has more than three years of experience writing for and working with wikiHow. Hunter holds a BFA in Entertainment Design from the University of Wisconsin - Stout and a Minor in English Writing.
There are 8 references cited in this article, which can be found at the bottom of the page.
This article has been viewed 22,905 times.
Learn more...
Runner beans, also known as string beans, are long, slender bean pods that are popular in many vegetable gardens. Throughout the growing season, runner beans will ripen and be ready for you to eat. With simple harvesting techniques and kitchen prep, you can enjoy fresh vegetables at any time!
Steps
Harvesting Your Beans
-
1Start picking your beans in the middle of summer. Beans planted in the spring can be harvested in the later summer months, typically August and September in the Northern hemisphere. Keep track of when you planted your beans to determine the best time to start your harvest.[1]
- Runner beans take about 3 months to fully develop from seeds.
-
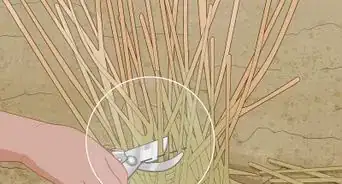
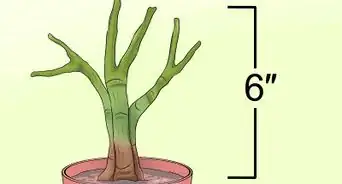
2Harvest the pods when they are 6 to 8 in (15 to 20 cm) long. Look for bean pods that still have a smooth texture. If you can see the beans through the outer pod, the beans are past their prime and may have a tough, stringy texture when you eat them.
- Larger bean pods may look impressive, but they’ll have a rougher and less desirable texture.
Advertisement -
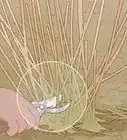
3Pull the bean pod off the stems by hand. Grab the bean where it connects to the stem with your thumb and index finger. Hold the stem with your other hand and gently pull the bean off.[2]
- Keep the beans you pick in a bag or bucket so you don’t have to carry them.
-
4Check your plant every 2 days for ripe beans. Runner beans can grow quickly and they will grow multiple times throughout the growing season. Keep checking your plant until the first frost.[3]
- If you have too many beans, ask your neighbors to see if they want to pick any for themselves.
-
5Leave some of the pods on your plant to dry. Let the seed pods turn a pale straw-color until early autumn. Once the seeds rattle inside the pods, remove them from the plants and bring them inside. Remove the beans from the pods and let them dry on a tray until they feel light and hollow. Store the beans in mason jars in a cool, dark place.[4]
- When you want to eat the beans, soak them in cool water for 8 hours before you cook them.


Storing Runner Beans
-
1Separate the good beans from bad beans. Get rid of any beans that are soft to the touch or yellowing. Also dispose of any pods where you can see the beans through the skin. Only keep beans that are smooth, firm, and a solid green color.[5]
-
2Keep fresh beans in the fridge for 1 week. Put your beans in an airtight container in the vegetable drawer of your refrigerator. Make sure they are dry before you store them or else they could develop mold.[6]
-
3


Trimming and Cooking Runner Beans
-
1Cut the ends off the beans. Before cooking, you have to prepare the beans. Rinse your beans thoroughly with water and pat them dry. Use a chef’s knife to remove the tips from each side of the bean. Cut off 1⁄2–1 inch (1.3–2.5 cm) and throw away the pieces when you’re finished.[8]
-
2Remove the strings from the sides of the beans with a vegetable peeler. Hold the bean so the inside edge faces up. Start your vegetable peeler on one end of the bean, and pull it down the length of the bean where it looks like there’s a seam. Flip the bean over and remove the string from the other side.[9]
- If you leave the string on, it will be tough to chew when you eat them.
- Fresh runner beans can be stored in the freezer for up to 8 months.
-
3Cook the beans in boiling water for 3-4 minutes. Drop the beans into water over medium heat. After 3-4 minutes, the beans should be bright green and tender. Use your knife to see if the beans cut apart easily.[10]
- Salt your water before you add the beans so they can absorb the flavor.


Things You’ll Need
- Bucket or bag
- Chef’s knife
- Cutting board
- Vegetable peeler
- Stove
- Pot
- Freezer-safe bag


References
- ↑ https://www.growingyourownveg.com/runnerbeans.php
- ↑ https://youtu.be/csIQAA9IgUk?t=2m
- ↑ https://www.growveg.co.uk/guides/how-to-grow-runner-beans/
- ↑ https://www.growveg.com/guides/growing-beans-for-drying/
- ↑ https://www.growveg.co.uk/plants/uk-and-europe/how-to-grow-runner-beans/
- ↑ https://www.eatbydate.com/vegetables/fresh-vegetables/green-beans/
- ↑ http://www.stilltasty.com/fooditems/index/16471
- ↑ https://www.goodhousekeeping.co.uk/institute/cookery-videos/peas-beans-and-pods/how-to-cook-runner-beans
- ↑ https://www.goodhousekeeping.co.uk/institute/cookery-videos/peas-beans-and-pods/how-to-cook-runner-beans
About This Article