This article was co-authored by Laura Martin. Laura Martin is a Licensed Cosmetologist in Georgia. She has been a hair stylist since 2007 and a cosmetology teacher since 2013.
wikiHow marks an article as reader-approved once it receives enough positive feedback. In this case, several readers have written to tell us that this article was helpful to them, earning it our reader-approved status.
This article has been viewed 537,361 times.
Plaits are a great basic hairstyle. Functional as well as pretty, plaits are easy to learn and come in a wide variety of styles that will let you express your personal tastes. In this article, you'll learn how to make different types of plait, each useful for different occasions.
Note: If you were looking for decorative plaiting, see this entry.
Steps
Creating a Basic Plait
-
1Brush out all of the hair. Your hair will need to be smooth and without knots so brush or comb it out to remove all the tangles. It might also help to use some dry shampoo on your hair as you brush it to remove any excess oil from your hair, since this can make your hair slippery when you are braiding it.
-
2Divide the hair. You can part your hair if you’d like and gather the hair so that the braid will fall in a specific area, such as the back or side of your head. Take all of your hair and divide it into 3 equal-sized sections: left, middle and right.Advertisement
-
3Cross the right section. Carefully holding all three strands, cross the right section over the top of the middle section. Now it should look like the right section is the middle section and the middle section is the right section.
-
4Cross the left section. Next, cross the left section over the new middle section. They should now be switched, as they were with the previous section.
-
5Repeat the process. Alternate the right and left sections over the center, repeating until you get to the ends of your hair.
-
6Tie off the hair. Using a hair band, ribbon, clip or other styling choice, tie the hair off at the end, where the hairs become too short to fit in the plait.


Doing a French Plait
-
1Brush out all of the hair. Have smooth hair for this hairstyle, so brush it out before you start. You might also want to spray on a bit of dry shampoo to remove any excess oils from your hair while you brush it.
-
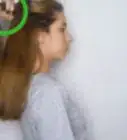
2Separate the top section of your hair. Using your hands or a hair pick, separate the top section of your hair from the top of the front hairline.
-
3Divide the hair into 3 even sections. Each section should be about 1 to 2 inches (2.5 to 5.1 cm). Make the sections as even as possible.
-
4Cross over the left and right sections. Start by crossing the left section over the center and then cross the right section over the new center section. Continue to alternate crossing the right section and left section over the center section, but pick up a small amount of new hair from beneath each of the side sections before each new crossover. Keep doing this until you have incorporated all of the hair into the braid.
-
5Continue with a 3-strand braid to the ends. After all of the hair has been incorporated, finish the braid by continuing with a regular 3-strand braid all the way to the ends of the hair.
-
6Tie off the hair. Using a hair band, ribbon, clip or other styling choice, tie the hair off at the end, where the hairs become too short to fit in the plait.


Creating a Plaited Headband
-
1Start with smooth tangle-free hair. Brush or comb all of your hair well. You might also want to use some dry shampoo to remove excess oils and add a bit of texture.
-
2Separate the hair to plait. Using a hair pick or pencil, separate the hair you will use to make the headband. Pull out a 1 to 2 in (2.5 to 5.1 cm) wide section of hair from the area that is just behind your ear.[1]
-
3Plait as normal. Hold the section straight out to the side of your head and begin braiding it loosely as a regular 3-strand braid. Keep braiding all the way to the end of the section and then use an elastic band to secure the end of the braid.[2]
- Don’t make the braid too tight or it might be hard to get it to lay flat against your head.
-
4Secure the braid over the top of your head like a headband. Wrap the braid up and over the top of your head and then bring it down behind your other ear. Pin the braid behind your ear with a couple of bobby pins to secure it.[3]
- If desired, you can create 2 braids (1 on each side) and cross them over each other once on top of your head.

Expert Q&A
Did you know you can get expert answers for this article?
Unlock expert answers by supporting wikiHow
-
QuestionHow do you braid string?
 Laura MartinLaura Martin is a Licensed Cosmetologist in Georgia. She has been a hair stylist since 2007 and a cosmetology teacher since 2013.
Licensed CosmetologistYou can braid string using the same method you use to braid hair. Cross the outer strings over the center one, alternating sides.
Support wikiHow by unlocking this expert answer.
-
QuestionIs it good for your hair to braid it?Laura MartinLaura Martin is a Licensed Cosmetologist in Georgia. She has been a hair stylist since 2007 and a cosmetology teacher since 2013.
Licensed CosmetologistBraiding can protect the hair from environmental factors and minimize tangles. It's also a heat-free style, so it's a great way to give hair a break from styling tools.Support wikiHow by unlocking this expert answer.
-
QuestionHow do you do a Dutch braid?Laura MartinLaura Martin is a Licensed Cosmetologist in Georgia. She has been a hair stylist since 2007 and a cosmetology teacher since 2013.
Licensed CosmetologistFollow the steps for a classic French braid, but cross the outer strands under the center instead of over. This will create the 3-D effect.Support wikiHow by unlocking this expert answer.
Things You'll Need
- A hair tie (or multiple depending on the number if plaits you do)
- Medium to long hair
- Two hands
- For fun or special occasions, tie your plaits with ribbons. You can also match the ribbon colour with your outfit if desired (optional)


References
About This Article

To do a basic plait, start by brushing your hair to get rid of any knots or tangles. Once your hair’s smooth, divide it into 3 equal sections with 1 on the left side of your head, 1 in the middle, and 1 on the right. While carefully holding all 3 strands, cross the right section over the top of the middle section so it’s in the middle. Then, cross the left section over the new middle one so they switch places. Keep alternating the right and left sections over the center until you get to the end of your hair. To finish your plait, tie it off with your favorite hair band, ribbon, or clip. For more tips from our Hair and Beauty co-author, including how to do a French plait, read on!