This article was co-authored by wikiHow Staff. Our trained team of editors and researchers validate articles for accuracy and comprehensiveness. wikiHow's Content Management Team carefully monitors the work from our editorial staff to ensure that each article is backed by trusted research and meets our high quality standards.
There are 19 references cited in this article, which can be found at the bottom of the page.
wikiHow marks an article as reader-approved once it receives enough positive feedback. In this case, 83% of readers who voted found the article helpful, earning it our reader-approved status.
This article has been viewed 170,418 times.
Learn more...
Boxwood shrubs are low-maintenance plants with a dense, rounded shape. Boxwood thrives in the south and mid-Atlantic regions of the United States, but it can be planted and grown in many climates. Because of its density, glossy leaves and slow growth, boxwood is often utilized in modern hedge landscaping and bonsai gardens. Although boxwood is versatile and requires little upkeep, it must be planted correctly in order to flourish. Use these steps to plant boxwood shrubs.[1]
Steps
Picking an Effective Growing Spot
-
1Plant boxwood in the fall or spring. As long as you avoid the most extreme temperatures during the year, your boxwoods will be fine. Fall, around September and October if you’re in the northern hemisphere, is the ideal time to plant new boxwoods. However, your boxwoods will also do well if you plant them around March or April. Boxwoods can even survive when planted in late winter as long as the worst of the cold has passed.[2]
- If you’re in the southern hemisphere, plant boxwood around March for fall or September for spring.
- Planting during the spring and fall months gives boxwood time to establish itself so it can survive harsher weather.
-
2Find a growing spot that receives at least 4 hours of sunlight per day. Boxwood grows best when it receives plenty of sunlight, but a little bit of shade isn’t a bad thing. If you’re able to, select a spot that receives shade in the afternoon. The shade will protect your new boxwood shrubs from the afternoon heat, particularly in the summer.[3]
- Boxwood shrubs love sunlight, but they also grow pretty well in partial shade. It’s best to put them in spots with dappled light, such as near overhanging trees, so they don’t lose their color.
- The north side of a building is considered to be the perfect spot for boxwood. The north side gets lots of shade with dappled sunlight. The west side is the next best alternative, and the east after that.
- If you’re growing hedges, try to keep the boxwood in enough sunlight. Choose one of the most sun-tolerant varieties, like Wintergreen boxwood, to survive in full summer sunlight.
Advertisement -
3Choose an area with well-drained soil and no standing water. Avoid any spots that stay soggy hours after getting wet. Boxwood plants are prone to root rot due to wet soil. If you’re dealing with a spot that doesn’t drain fast enough, mix sand and organic compost into the soil.[4]
- To test how well your yard drains, dig a 12 in (30 cm)-wide hole 12 in (30 cm) deep, fill it with water, then refill it the next day. The water level should then decrease by at least 1 in (2.5 cm) every hour.
- Watch your yard after a strong storm comes through. The areas that don’t drain well will stay damp and even have water puddles long after the weather has cleared up.
-
4Test the soil for a pH between 6.5 and 7.2. The pH level is the acidity of the soil. Boxwood grows best in slightly acidic soil, and you can get a soil-testing kit from your local gardening center to determine if your yard is at the right pH level. If it isn’t, mix things like lime or compost into the soil to change its pH.
- If you’re putting boxwood into a pot, choose a potting mix with the right pH level.
- Add lime to the soil if the pH is too low. Acidic compost can also nudge the pH level up a little.
- Mix sulfur in if your yard’s pH is too high.


Growing Boxwood in the Ground
-
1Space boxwood at least 2 ft (0.61 m) from other plants. Plan out where you’re going to position the boxwood before you dig. Mark each spot, such as by spreading some gardening chalk, planting a stake, or digging out a small amount of soil. If you’re planning on placing several boxwood plants in a row, such as for hedges, double-check that the spots are all spaced apart and in a straight line.[5]
- Keep in mind the size you expect the boxwood to be when it’s fully-grown. There are many different kinds of boxwood, and some of them grow bigger than others.
- In general, dwarf and English boxwoods should be 2 to 3 in (5.1 to 7.6 cm) apart. Wintergreen and American boxwood grow wider, so place them about 4 in (10 cm) apart.
- Plan on keeping boxwood at least 7 in (18 cm) from your home and other structures. For hedges, space the plants out consistently so they grow together.
-
2Dig a hole that is as deep as the plant’s root ball. If your boxwood is in a container, use the container as a guide. Otherwise, if you’re transplanting grown boxwood, dig the hole so it’s depth is about ⅓ the total height of the shrub. At the right depth, the boxwood’s leaves will be right above the ground but not touching the soil at all.[6]
- If you have boxwood seeds, keep in mind that they are usually sprouted and pot-grown in a container first. After growing for up to a year, they will have strong roots enabling them to survive outdoors.
-
3Widen the hole so it’s twice the size of the root ball. To determine the root ball’s size, measure the width of the container your boxwood came in. If you’re trying to transplant a grown boxwood, then you can estimate its size with a little math. Measure the boxwood stem’s width in inches, then multiply it by 16. Dig the hole according to the result.[7]
- For example, if the boxwood’s stem is about 1 in (2.5 cm) thick: 1 x 18 x 2 = 36. Make the hole about 36 in (91 cm) wide.
-
4Pull the boxwood out of its container with a trowel. Run the spade around the container’s rim to loosen the soil. Then, tip the pot over and grasp the boxwood by the stem. Gently slide it out of the pot so you can plant it.[8]
- If you’re replanting grown boxwood, move past the plant’s branches and dig straight down so you don’t end up hitting the root ball. The root ball is usually about 8 to 10 in (20 to 25 cm) down.
-
5Spread the roots apart if they are wrapped around the root ball. You may see some roots, called girding roots, that have begun growing sideways around the edges of the root ball. Gently pull them to the side so they point straight down. Check around the entire root ball to ensure you have fixed all of them. You don’t have to remove any of the dirt covering the root ball, and it’s better to leave the other roots alone.[9]
- Girdled roots will continue growing sideways if you don’t change their direction. They won’t absorb as much water and nutrients as regular roots, and they can get tangled as well.
- If any of the roots are pointing in the wrong direction, you can gently tease them apart. Point them downward so they grow down into the soil.
-
6Place the boxwood in the center of the hole. Lift the boxwood up without breaking apart the dirt holding the roots together. You won’t have to remove it. Instead, rest the root ball squarely on top of the soil at the bottom of the hole. Step back to examine the shrub’s positioning, making sure it’s centered.[10]
- Double-check the positioning to ensure that the boxwood won’t lean to one side or end up with exposed roots.
-
7Fill in the hole with loose soil so 1⁄8 in (0.32 cm) of the roots are exposed. Shovel soil back into the hole, but don’t press down on it. Cover the root ball as much as possible. Make sure the upper 1⁄8 in (0.32 cm) of the root ball is above the soil’s surface. Boxwood roots grow at a very shallow depth, so burying the entire root ball could hurt your new plant.[11]
- If the soil is too dense or doesn’t drain quickly enough, you could mix organic compost into it. Make it about ⅓ compost to ⅔ soil.
-
8Water the ground thoroughly until the soil is wet all the way down to the root ball. Spray the soil with the hose, but don’t get the boxwood wet. Keep watering until the soil is damp all the way down. To test it, stick a metal gardening pole down to the depth of the root ball, then pull it back out. If the soil is moist, it will leave a mark on the pole.[12]
- Watering the soil compacts it, pushing out any air bubbles left from when you covered the roots.
- Freshly-planted boxwood needs about 1 in (2.5 cm) of water per week over the first 2 years. The best way to water boxwood is by placing a dripping hose near it.
-
9Spread about 2 in (5.1 cm) of organic mulch around the boxwood. Shredded pine bark is a great choice that also looks good in most yards. Distribute the mulch in a ring around your new plant. Make sure the ring stretches out 2 to 3 in (5.1 to 7.6 cm) beyond the boxwood’s branches on all sides. However, leave a 3 in (7.6 cm) space between the mulch and the plant’s stem.[13]
- Mulch is useful for sealing in heat and moisture boxwood. Boxwood roots dry out very easily without mulch.
- Mulch prevents grass and weeds from growing too close to boxwood roots. If you see other plants growing, they could steal water and nutrients from the shallow roots, so remove them right away.
- You do not have to add fertilizer to the soil during the first growing season. Mulch is enough. The additional nutrients could damage the roots.
-
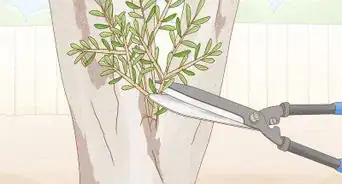
10Prune boxwood after 1 year of growth to shape it. The best time to prune boxwood is in early spring before the new growth comes in. Use shears to trim back overgrown branches. If you’re landscaping or growing hedges, trim the entire plant to maintain its shape. Also, thin out the plant by removing old or sickly branches, since that will encourage new growth.
- For hedges, cut boxwood back to 3 to 5 in (7.6 to 12.7 cm) above the ground for the first 3 years. After that, you can let the plant grow and remove up to ⅓ of it each spring so it grows strong.


Potting Boxwood
-
1Select a pot with effective drainage holes at the bottom. Clay and terracotta pots are usually a good choice since they drain well and also keep soil nice and warm. However, any type of pot is fine for boxwood as long as it drains quickly. Make sure the pot has at least several drainage holes.[14]
- Clay and terracotta pots tend to drain a little more quickly than plastic pots. Be aware of possible moisture retention if you use plastic.
- When you use the pot, don’t place it on a plant saucer. Boxwood can’t survive in wet soil.
-
2Choose a pot that is roughly as big as the boxwood. If you have to, measure the plant’s height and diameter to estimate the best pot size for it. You can use the container it came in as a reference. The new pot should be at least as tall and as wide as the boxwood. Get the next biggest pot size available, preferably, so your new plant has some room to spread out.[15]
- Boxwood can usually be kept in the same pot for up to 3 years. When it gets too big and stops growing as quickly, transfer it to something bigger.
-
3Use a quality outdoor tree and shrub potting soil to fill the new pot. Check your garden center for a potting mix that boxwood will thrive in. Keep the pH in mind, since it grows best in soil between 6.5 and 7.0. You could make your own potting mix with garden soil, peat moss, and other additives.[16]
- For example, mix together equal amounts of soil, peat moss, and then sand, perlite, or vermiculite.
- Don’t use soil from outside your home. It won’t be sterile, so it could harm the growing boxwood.
-
4Fill the pot until the soil is about 1⁄2 in (1.3 cm) below the rim. To make this part easier, place the boxwood, including its container, inside the pot. Position it directly in the center of the pot, then pack the soil in around it. When you’re done, pull it back out. It will leave a shapely hole that you can slot the boxwood’s root ball into.[17]
- Make sure that the soil won’t touch, let alone cover, the boxwood’s leaves, or else they will rot. The extra 1⁄2 in (1.3 cm) at the top prevents the leaves from getting wet or dirty.
-
5Dig the boxwood out of its original container with a trowel. Work around the edges of the container so you don’t accidentally shear off your plant’s roots. Once you’re sure the soil is loose in the container, tip it over. Hold onto the boxwood’s stem close to the soil as you pull the plant forward. Slide it out of the container with the root ball intact.[18]
- When you remove the plant, you will see a big ball of dirt with all the roots mixed in. You won’t have to break apart this root ball.
-
6Transfer the boxwood into the new pot. Leave the root ball intact. Simply lower it down into the fresh potting soil. Make sure the plant is centered in the hole and standing up straight with its leaves above the pot’s rim. Then, spread the remaining soil over the root ball to lightly cover it.[19]
- Fill in the hole so the soil level is consistent. It should be 1⁄2 in (1.3 cm) below the rim with the roots well-covered.
-
7Water the boxwood twice by hand until the soil is moist. Fill a watering can with lukewarm water, then pour it directly onto the soil. Make sure you don’t pour it on the boxwood’s stem or leaves. Watch for the water to run through the drainage holes at the bottom. When you see this happen, wait for it to stop, then water the soil a second time to ensure it stays moist.[20]
- Since you don’t have anything below the pot, you could end up with a mess if you’re not careful. Be aware that a torrent of water will flow out the drainage holes if you want to stay dry!
- Boxwood does not need to be watered often. If you water it thoroughly about once a week in the summer, it will be fine. It does not have to be watered as often in the colder months.


Community Q&A
-
QuestionWhy is my newly planted boxwood turning yellow?
 Community AnswerMaybe it's not draining properly -- over-watering causes this in diets or really dense soil. This could also be due to lack of sunlight. Boxwood needs two to four hours of solid sunlight daily.
 -
QuestionCan I plant a boxwood tree in the northeast area?
 Community AnswerYes, in full sunlight. I have them in central Massachusetts, if that is far enough northeast for you.
 -
QuestionHow far apart should they be planted?Community AnswerI'd say about 1-2 feet so they don't grow into each other and make a clumped mess.
Warnings
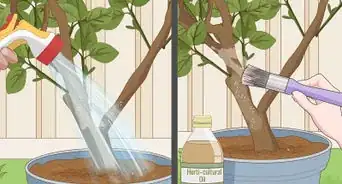
- Boxwood is prone to boxwood blight, which leaves brown spots and even a white fungus on the leaves and branches. You can use a fungicide and shear off infected spots, but you will have to get rid of the entire plant if the infection is bad.[23]⧼thumbs_response⧽
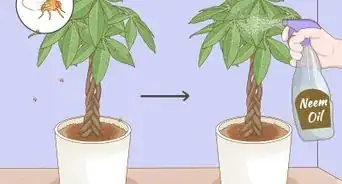
- Some common boxwood pests include leafminers and spider mites. They make holes in the leaves and can be cleared out with an insecticide.[24]⧼thumbs_response⧽
Things You'll Need
Picking an Effective Growing Spot
- Soil pH test
- Soil amendments (optional)
Growing Boxwood in the Ground
- Gloves
- Mulch
- Trowel
- Spade
Potting Boxwood
- Pot
- Outdoor tree and shrub potting soil
- Trowel
- Gardening gloves


References
- ↑ https://www.uaex.edu/yard-garden/resource-library/plant-database/shrubs/common-boxwood.aspx
- ↑ https://www.gardenersworld.com/how-to/grow-plants/how-to-plant-box/
- ↑ https://www.pubs.ext.vt.edu/content/dam/pubs_ext_vt_edu/426/426-603/HORT-290.pdf
- ↑ https://plants.ces.ncsu.edu/plants/buxus-sempervirens/
- ↑ https://hortnews.extension.iastate.edu/2002/3-22-2002/hedges.html
- ↑ http://www.englishboxwoods.com/?p=128
- ↑ https://www.gloucesterva.info/DocumentCenter/View/4243/Boxwoods-PDF
- ↑ https://www.southernliving.com/garden/grumpy-gardener/transplanting-b
- ↑ https://www.ncptt.nps.gov/blog/planting-boxwood-hedges-in-historic-gardens/
- ↑ http://www.englishboxwoods.com/?p=128
- ↑ https://hgic.clemson.edu/factsheet/boxwood/
- ↑ https://extension.psu.edu/boxwoods-for-pennsylvania-landscapes
- ↑ https://hgic.clemson.edu/factsheet/boxwood/
- ↑ https://extension.oregonstate.edu/sites/default/files/documents/12281/containerplanting.pdf
- ↑ https://www.southernliving.com/home-garden/gardens/boxwood-pots
- ↑ https://extension.psu.edu/homemade-potting-media
- ↑ https://www.southernliving.com/home-garden/gardens/boxwood-pots
- ↑ http://www.bbc.co.uk/gardening/basics/techniques/patiogarden_shrubintub1.shtml
- ↑ http://www.bbc.co.uk/gardening/basics/techniques/patiogarden_shrubintub1.shtml
- ↑ https://columbiametro.com/article/boxwoods-2/
- ↑ https://extension.psu.edu/boxwoods-for-pennsylvania-landscapes
- ↑ https://www.extension.purdue.edu/extmedia/BP/BP-203-W.pdf
- ↑ https://extension.psu.edu/boxwood-diseases
- ↑ https://www.canr.msu.edu/news/boxwood_insect_pests
About This Article