X
wikiHow is a “wiki,” similar to Wikipedia, which means that many of our articles are co-written by multiple authors. To create this article, volunteer authors worked to edit and improve it over time.
This article has been viewed 41,480 times.
Learn more...
“Don't Stop Believing” is a widely known song released by the rock band Journey in 1981. It follows a typical four-chord progression and features a piano riff that is instantly recognizable. "Don't Stop Believing" is sure to get an audience at any party or karaoke bar, and it is just fun to play. The piano part is on the intermediate level, but anyone can learn it with the right amount of practice (even beginners).
Steps
Part 1
Part 1 of 4:
Understanding the Basic Chords and Song Structure
-
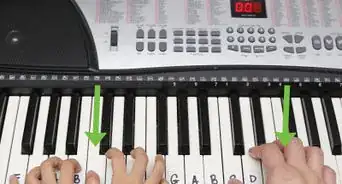
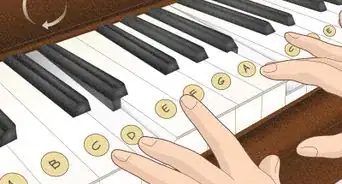
1Familiarize yourself with the basic chords in the song with your right hand. This song follows a four-chord progression, which means that it only has four main chords, with one other leading chord. The song only has 5 different chords: E, A, B, G#m, and C#m.
-
2Understand the breakdown of the song. There are a few main sections to this song: the intro, 4 verses, chorus, instrumental sections, and the fade-out ending. In the intro/ verse/ instrumental/ ending sections, the piano plays the same chord progressions, so it is crucial to know all these chords.

Advertisement
Part 2
Part 2 of 4:
Mastering the Riff
-
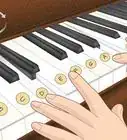
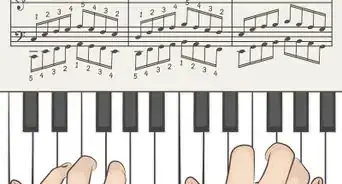
1Begin learning the left-hand melodic riff. Keep in mind the finger number to use, which are the numbers on the right. 1 = thumb; 2 = index; 3 = middle; 4 = ring; 5 = pinkie. This riff is played in the intro/ verse/ instrumental/ ending sections. The notes that you need to play are in this order as follows:
- E2, F#2, G#2, B3 (5, 4, 3, 2)
- C#3, D#3, C#3 (3, 2, 3)
- D#3, E3, A3 (2, 1, 5)
- D#3, E3 (2, 1)
- E2, F#2, G#2, B3 (5, 4, 3, 2)
- C#3, D#3, G#2 (3, 2, 5)
- G#2, A3 (5, 5)
-
2Practice this riff until it becomes second nature, as it is used for most of the song. Make sure you memorize which finger to use for each note. (Advanced players should play this riff using octaves for a more rich bass-line sound).
-
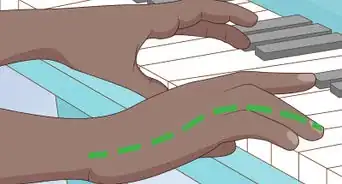
3Begin learning the right-hand accompaniment that plays over the left-hand riff. Learn and master this part separately before trying to play it on top of the left hand.
-
4Familiarize yourself with this following right-hand chord progression, which is used during the intro/ verse/ instrumental/ ending sections:
- E major
- B major
- C# minor
- A major
- E major
- B major
- G# minor
- A major
-
5Focus on the technique and style of the right-hand part. If you listen to the song, you will notice that the right hand is bouncing back and forth between notes, while the left hand is playing the melody. It will take time and practice to play both hands together, but for now, focus only on the style of the right hand.
-
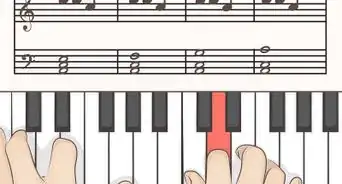
6Play the following notes for each respective chord:
- For the E major chord, you will be bouncing back and forth between E4 and B4 (fingers 2 and 5 respectively) and B3 (finger 1).
- For the B major chord, you will be bouncing back and forth between F#4 and B4 (fingers 3 and 5 respectively) and B3 (finger 1).
- For the C# minor chord, you will be bouncing back and forth between E4 and B4 (fingers 2 and 5 respectively) and B3 (finger 1).
- For the A major chord, you will be bouncing back and forth between E4 and A4 (fingers 2 and 5 respectively) and A3 (finger 1).
- The next E and B major chords are similar as the previous ones.
- For the G# minor chord, you will be bouncing back and forth between D#4 and B4 (fingers 2 and 5 respectively) and B3 (finger 1).
- For the last A major chord, you will be bouncing back and forth between E4 and A4 (fingers 2 and 5 respectively) and A3 (finger 1).
-
7Practice this right-hand accompaniment alone for as long as needed. Play slowly at first, then gradually work up to faster tempos.
-
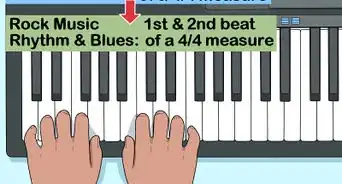
8Put both hands together and work on the synchronization. This will be difficult, and maybe even frustrating at first for beginners, but the only way to learn is through practice. Start slowly, then work up to a faster tempo when you feel comfortable.
-
9Listen to the song and try to sync up both parts just how keyboardist Jonathan Cain plays it. This will prove to be a big help, especially for beginners. Listening to the style and technique will help you grasp a better understanding of the style of the eight notes in the right hand.
-
10Make sure you play 4 sets of eight notes for each chord in the right-hand before moving on to the next chord. This means that, starting with the upper two notes with fingers 2 and 5 followed by the bottom note with finger 1, you must bounce back between the top 2 notes and bottom note 4 times per chord. When you finish each set of 4, the last note of the chord you should be playing is the bottom note with finger 1.
- If you understand written music, read the following sheet to help.


Advertisement
Part 3
Part 3 of 4:
Playing the Chorus
-
1Follow this following chord progression for the right-hand part in the chorus. (When he sings “Strangers, waiting, up and down the boulevard…”):
- A major
- E major
- A major
- E major
- A major
- E major
- A major
- B major
- E major
- B major
- E major
- A major
-
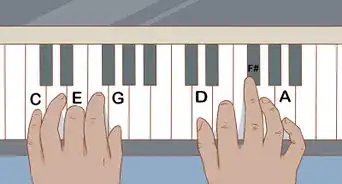
2Play these chords as triads in the right hand. A triad is a chord which uses the 1-3-5 structure, which is the first (tonic), third (mediant), and fifth (dominant) note of the scale. For example, a triad for the A major chord is A, C#, E. A triad for the E major chord is E, G#, B, and so on.
-
3Learn the left-hand part of the chorus. In the left hand, you can just play the root note of the chord in a lower octave. A root note is the note the chord is based on. For example, the root note for the A major chord is just A, and for the E major chord it is E, and so on.
-
4Play this root note as single note, or, if you want to challenge yourself a bit more or are a more advanced player, play the notes as octaves with fingers 1 and 5. Playing octaves means that you play 2 of the same notes together that are separated by one octave. For example, to play an A octave you would play A2 and A3, or any pair of As on the keyboard that are 7 notes apart.
-
5Begin playing the chorus with both hands. Sing or hum along so you know when to change chords. It will be obvious where the chord changes are, but if you are struggling just listen to the song and play along with it. In the chorus of this song, there isn't really a defined style, so you can just play the chords in the right hand with the single note or octaves in the left hand. Practice using the provided sheet music if it helps.

Advertisement
Part 4
Part 4 of 4:
Taking It a Step Further
-
1Be creative! Now that you have learned the song, it is time to get fancy if you'd like. For more advanced players, make sure to add little flourishes in the music.
- Be creative and make it your own. Add glissandos and arpeggios where you feel they would fit. Solo during the instrumental sections if there is no guitarist. Experiment with different octaves, and most importantly, have fun.
-
2Play the song whenever and wherever you can! After learning the song, don't be afraid to play it at any social gathering or outing you go to. You've worked hard to learn it, now let your friends and family sing along and enjoy the music you make!
Advertisement
.webp)


About This Article
Advertisement