This article was co-authored by wikiHow Staff. Our trained team of editors and researchers validate articles for accuracy and comprehensiveness. wikiHow's Content Management Team carefully monitors the work from our editorial staff to ensure that each article is backed by trusted research and meets our high quality standards.
There are 18 references cited in this article, which can be found at the bottom of the page.
This article has been viewed 16,024 times.
Learn more...
If you’re into miniatures, painting them can be a fun hobby and a great way to bring those characters to life. But before you can get to the painting process, you have to first clean up the miniature and assemble all the pieces! Whether you simply enjoy painting miniatures as a pastime or use your miniatures to play games, learning how to prep them from start to finish will really enhance your experience.
Steps
Trimming and Assembling Miniatures
-
1Work in a well-ventilated area to protect yourself from inhaling resin particles. As you work, you’ll be cutting and filing small bits of resin that will get into the air. You don’t want to breathe these in, so make sure there’s an open window or fan nearby.[1]
- You may also want to consider wearing a face mask for extra protection.
-
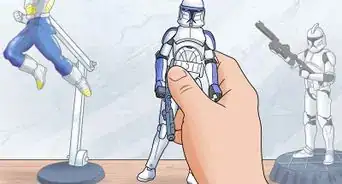
2Remove the miniature from the frame with a pair of metal clippers. Some miniatures may be connected to a small base while others might be in a plastic frame. There are generally several pieces per miniature that need to be detached. Cut close to the miniature, but not so close that you risk cutting the figure itself.[2]
- The frame is the casing or jacket that the miniature is attached to, and it’s often also called a “sprue”.[3]
- To stay organized, work on one miniature at a time. Cut off all the pieces for that particular figure and complete it before moving on to another one.
Advertisement -
3Wash the miniature in warm, soapy water to remove any release agents. Fill a small bowl with warm water and add a few drops of dish detergent. Dip the miniature in the bowl and use a toothbrush to gently scrub it all over. Make sure to get into all the cracks and crevices so no spray is left behind.
- Use an old toothbrush or one that is designated for miniatures. You don’t want to accidentally brush your teeth with a brush that was covered in soap!
- When miniatures are manufactured, they’re sprayed with a release agent that makes them easy to remove from the packaging. But, this spray can make it difficult to glue and paint the miniature, so it needs to be removed.
-
4Let the miniature air-dry for 4-5 minutes before moving on. Lay it out on a paper towel or dishtowel. Because miniatures are so small, it shouldn’t take very long to dry. You could dab away excess water to speed up the process if you want to.[4]
- Avoid blowdrying the miniature. The heat could warp the resin and misshape your figurine.
-
5Trim away any excess resin from the miniature with a hobby knife. Try to hold the miniature in one hand and cut away from yourself with the other. Work on removing thin layers of resin rather than trying to slice through the entire piece all at once.[5]
- Be careful during this process. Hobby knives are very sharp and it would be easy to slip and cut yourself.
- You may notice some resin along the sides of the miniature from where it was cast—you can gently scrape these mold lines away with your hobby knife, too.
Tip: Protect the surface you’re working on by laying down a cutting mat first. If you don’t have a cutting mat, you could use a thick piece of cardboard or even a cutting board for the same effect.[6]
-
6Smooth any ragged edges with a filing knife. If there are areas you couldn’t get completely flat with the hobby knife, you could use a filing knife instead. This could be particularly useful for feet or parts that will need to sit flush against the miniature’s base. Just gently rub the filing knife back and forth until the area is smooth.[7]
- A metal filing knife will work the best for this step.
-
7Superglue the pieces together for any unassembled miniatures. Miniatures, especially for fantasy games, often come with small parts that need to be attached once they’ve been unpackaged, like arms, swords, tentacles, and other features. They’re usually grouped together in the frame, or your miniature may come with instructions. Use a tiny drop of superglue on one part and then firmly press it together where it needs to join the rest of the miniature.[8]
- For example, if you’re attaching a sword to an arm, place a dot of superglue on the sword and then press it against the arm so it’s in the right position.
-
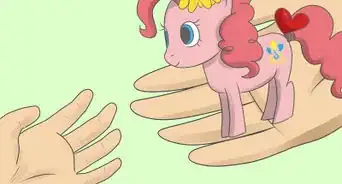
8Glue the miniature to its base and let it set for 2-3 minutes. Most miniatures come with small bases so that you can set them up without worrying about them toppling over. Simply apply a thin layer of superglue to the bottom of the miniature and press it to its base for a few seconds. Then let it rest while you get your primer and paints ready for the next part.[10]
- As you get more and more into miniatures, you’ll discover that you can even decorate and design the base to match the landscape for the miniature. For example, you could put a layer of glue on the base and then add sand or small rocks for a desert landscape.[11]


Applying Primer and Paint
-
1Set up your painting station with brushes, acrylic paints, and a cup of water. For painting miniatures, acrylic paints work the best. You can buy a variety of colors from your local art store, gaming store, or online. Fill a cup with water to use to rinse your brushes. You’ll need a few different brushes so that you can get all the right detailing on your miniature:[12]
- Buy an inexpensive set of synthetic or sheep hair paint brushes for your basic painting needs.
- Get a dry brush to highlight large areas.
- Use a fine brush for detail work.
-
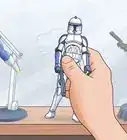
2Spray the miniature with primer and let it dry for 15-30 minutes. Use white primer if you’ll be painting with light or bright colors. Use black primer if you’ll be painting with darker shades. Shake the can of primer really well, then spray the miniature with a thin coat from about 12 inches (300 mm) away. Continually move the can so the primer isn’t too thick on any one part of the miniature. Leave it to dry until it’s smooth to the touch.[13]
- If the primer is tacky when you touch it, it isn’t dry yet.
Tip: If at all possible, spray the primer onto the miniature outdoors. Place it on a piece of cardboard and walk around it to spray it from every angle. This will keep paint from getting all over your stuff. If you have to work inside, try placing the miniature inside a large cardboard box so the sides will catch all the spare primer.[14]
-
3Select 3-4 paints for your color scheme based on the miniature. While you could use dozens of colors, most experts recommend just choosing a few for the main colors so that your miniature looks more cohesive in the end. You can add more detail with various colors, like red lips or green eyes, later on, if you want to.[15]
- For example, royal blue, purple, and brown would go well together for a basic character.
- Brown, dark green, and orange could work well for a warrior’s outfit.
- Grays and black are good choices for any character that is wearing armor.
- In the end, you can mimic something you’ve seen before or use your creativity to paint something completely original.
-
4Paint in thin layers so colors don’t bleed into one another. Thin layers will also maintain the detail of the miniature. Gently dab your paintbrush into the paint, then wipe the sides of the brush against the bottle or a palette to remove excess paint. Use one color at a time and apply it everywhere it needs to go.[16]
- It can help to put all the paint you’re going to use on a palette beforehand. This way, you won’t have to stop and open up bottles while you’re working.
-
5Let the paint dry for 1-2 minutes between layers and colors. If you’re working in thin layers, it’ll just take a few minutes for the paint to dry. Each color may need 2-3 layers, just depending on how deep or bright you want it to be.[17]
- Don’t forget to rinse your brushes between each color!
-
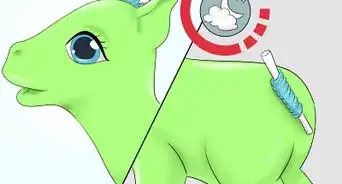
6Add shading with a special wash if you want more depth to your miniature. You can purchase different shades and tones of washes from the same place you bought your paints. Use your dry brush to gently wipe the wash over your miniature, especially in areas where you want to create depth and shading, like on armor or a cloak.[18]
- Washes are made to kind of seep into cracks and crevices. They won’t add much color to the body of your miniature, but they’ll make those cracks look darker. It’s a great way to make your miniature appear more dynamic.
-
7Finish your miniature with fine detailing. Small details can really help bring your character to life! What you add will be different for each miniature, but you may want to detail their eyes, mouth, shoes, sword, clothing, hair, or other aspects.[19]
- For example, you could make the laces on their boots black or change the color of the hilt of a sword.
- Don’t neglect the base of your miniature. For a classic look that’ll make the miniature pop, paint the rim of the base black. For a more eclectic style, choose a color that matches one of the character’s primary colors and use that to paint the rim.


Warnings
- Work in a well-ventilated area while you’re cutting and filing your miniatures, as well as when you're spraying the primer.[22]⧼thumbs_response⧽
Things You’ll Need
- Face mask
- Small bowl
- Dish soap
- Metal clippers
- Hobby knife
- Superglue
- Filing knife
- Toothbrush
- Paper towels
- Primer
- Cardboard
- Acrylic paint
- Paintbrushes
- Cup


References
- ↑ https://youtu.be/gZXmDC5VS5U?t=319
- ↑ https://youtu.be/gZXmDC5VS5U?t=196
- ↑ https://youtu.be/ZA2wSe86DJU?t=257
- ↑ https://youtu.be/gZXmDC5VS5U?t=177
- ↑ https://youtu.be/gZXmDC5VS5U?t=246
- ↑ https://youtu.be/JzuEL3bhcn0?t=590
- ↑ https://youtu.be/gZXmDC5VS5U?t=305
- ↑ https://youtu.be/gZXmDC5VS5U?t=367
- ↑ http://www.how-to-paint-miniatures.com/how-remove-super-glue.html
- ↑ https://youtu.be/ZA2wSe86DJU?t=696
- ↑ https://youtu.be/zYIQi-M0es0?t=118
- ↑ https://youtu.be/JzuEL3bhcn0?t=408
- ↑ http://www.how-to-paint-miniatures.com/miniature-painting-apply-primer.html
- ↑ https://youtu.be/2AcJCWk4YqQ?t=442
- ↑ http://www.how-to-paint-miniatures.com/miniature-painting-color-scheme.html
- ↑ http://www.how-to-paint-miniatures.com/miniature_painting_washing.html
- ↑ http://www.how-to-paint-miniatures.com/miniature_painting_washing.html
- ↑ http://www.how-to-paint-miniatures.com/miniature_painting_washing.html
- ↑ https://youtu.be/JzuEL3bhcn0?t=886
- ↑ http://www.how-to-paint-miniatures.com/how-remove-super-glue.html
- ↑ https://youtu.be/JzuEL3bhcn0?t=907
- ↑ https://youtu.be/gZXmDC5VS5U?t=319
About This Article