This article was co-authored by wikiHow staff writer, Eric McClure. Eric McClure is an editing fellow at wikiHow where he has been editing, researching, and creating content since 2019. A former educator and poet, his work has appeared in Carcinogenic Poetry, Shot Glass Journal, Prairie Margins, and The Rusty Nail. His digital chapbook, The Internet, was also published in TL;DR Magazine. He was the winner of the Paul Carroll award for outstanding achievement in creative writing in 2014, and he was a featured reader at the Poetry Foundation’s Open Door Reading Series in 2015. Eric holds a BA in English from the University of Illinois at Chicago, and an MEd in secondary education from DePaul University.
There are 13 references cited in this article, which can be found at the bottom of the page.
The wikiHow Video Team also followed the article's instructions and verified that they work.
This article has been viewed 31,065 times.
Learn more...
Traditional drying methods often remove the color from beautiful leaves. To keep the colors of your leaves as close to their original shade as possible, you’ll need to seal the leaves with wax, remove the moisture with borax, or replace the moisture with glycerin. Using wax is the best way to do this, but the wax will leave the leaves in a thick, shiny, texture. Drying your leaves in borax is the easiest method, but your greens may get washed out a little. Soaking leaves in glycerin is a great way to preserve colors, but it’s labor intensive and the shades of green may become darker. Choose a method based on how much time you have and what kind of texture you’re trying to achieve.
Steps
Using Wax to Preserve Leaves
-
1Iron your leaves between 2 sheets of wax paper to remove the moisture. Lay a pillowcase down on a table and set a sheet of wax paper on top of it. Set your leaves on top of this sheet of wax paper and put a second layer of wax paper on top. Cover the wax paper with a second pillowcase. Set an iron to low heat and run it across your leaves for 3-5 minutes to remove the moisture trapped in your leaves.[1]
- This is the best way to naturally preserve the colors of a leaf. It will change the texture dramatically, though. The wax will dry on top of the leaves, leaving them with a slick, reflective texture.
-
2Melt 1 tablespoon (14 g) of wax for each of your leaves in a double boiler. Depending on their size, your leaves will need roughly 1 tablespoon (15 ml) (14 g) of wax to coat them on each side. Cut a small block of beeswax or paraffin wax off from a larger piece as needed and set it in the center of your double boiler’s upper pot. Heat the double boiler over medium heat for 5-8 minutes until the wax melts.[2]
- If you don’t have a double boiler, fill a nonstick pot halfway with water. Then, place a large glass bowl on top of the rim of the pot so that it isn’t touching the water.
- For example, if you’re preserving 3 leaves, 3 tablespoons (44.4 ml) (42 g) of wax should be plenty. Adjust the amount of wax you use as needed.
- The result will be the same regardless of whether you use paraffin wax or beeswax.
Tip: You can heat your wax directly in the pot if you prefer, but it can be quite difficult to remove wax residue from a nonstick skillet.
Advertisement -
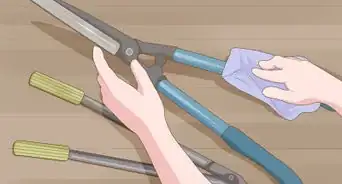
3Remove the upper pot in your double boiler and set it on a cloth. Set a towel down on a stable work surface. Put on oven mitts and set the bowl of melted wax on top of the towel. Set your leaves on top of a sheet of wax paper and set it next to the towel.[3]
-
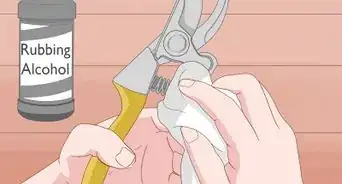
4Use a pair of pliers to dunk the leaves in your wax for 1-2 seconds. Grab your first leaf gently by the stem with needle-nose pliers. Then, dunk the leaf into the wax for 1-2 seconds. Slide the stem around in the wax to submerge it completely. If you melted a small amount of wax, flip the leaf over in the melted wax to coat both sides.[4]
-
5Transfer the leaves to wax paper and let them dry for 3-5 minutes. Move your first leaf over the top of the wax paper and let any excess wax drip off. Then, set the leaf down on the wax paper. Repeat this process for every leaf that you’re preserving by dipping it in the wax and setting it out. Wait 3-5 minutes for your leaves to dry.[5]
- You can air dry your leaves by hanging the stems from clothespins if you prefer.
- You can repeat this process to add another layer of glycerin if you want it thoroughly protected.


Drying Leaves with Borax
-
1Mix 1 part borax with 2 parts white or yellow cornmeal. Add 1 part pure powdered borax and 2 parts white or yellow cornmeal to a glass bowl and stir them with a wooden spoon. You need enough of this mixture to completely cover your leaves, so weigh your ingredients as needed. You need to completely cover your leaves with this mixture. If you’re only preserving 3-5 leaves, you can use 1/2 cup (65 g) of borax and 1 cup (130 g) of cornmeal. Adjust your measurements as needed based on the number of leaves and the shape of your container.[6]
- You can get cornmeal and borax at a grocery store. Borax is a cleaning agent commonly found in laundry detergents.
- This method works best with bright flowers and leaves. Green plant matter will become slightly duller using this process.
- It doesn’t matter if you use white or yellow cornmeal.
-
2Coat the bottom of a glass pan or paper box with your borax mixture. Grab a glass pan or large cardboard box that is big enough to hold your leaves. Use a ladle or large spoon to pour a 2–3 in (5.1–7.6 cm) layer of your borax mixture. Spread the mixture out with the flat bottom of your spoon or ladle to create a level base.
Tip: Borax isn’t toxic, but it will irritate your skin if you get it all over your hands and don’t wash them. Avoid using your fingers to smooth the borax out.
-
3Add the leaves that you want to preserve to the top of the borax. Take your leaves and gently drop them on top of the borax. Spread out your leaves so that they aren’t overlapping one another. Use needle-nose pliers to gently pick up individual leaves and reorient them as needed.[7]
- So long as each leaf is surrounded on all sides by the borax, you should be fine.
-
4Cover the leaves completely with another layer of borax. Grab your spoon or ladle and add another layer of borax. Pour the borax and cornmeal gently over the leaves until they’re completely covered.[8]
- You can create multiple layers if you’re drying a lot of leaves. For example, you can put 5-10 leaves on the first layer, cover them, then add another layer of 5-10 leaves and cover those.
-
5Let the leaves dry in the borax mixture for 2 weeks. Cover the box or pan and let it sit. Wait at least 2 weeks for the leaves to dry out. The cornmeal and borax will absorb the moisture in the leaves without lifting a lot of the color out. After 2 weeks have passed, use a slotted spoon to gently lift the leaves out.[9]


Preserving Leaves with Glycerin
-
1Mix a solution of 2 parts warm water and 1 part glycerin. Grab a pitcher or bowl and fill it with your glycerin. Add twice as much warm water to the pitcher or bowl. Mix the glycerin and water together using a metal spoon or mixing stick. At first, the mixture will appear cloudy. Continue mixing until the cloudiness disappears and the glycerin and water become completely clear.[10]
- Unless you’re preserving more than 10 leaves, you only need about 1 cup (240 mL) of glycerin and 2 cups (470 mL) of water.
- You can buy glycerin online, although some larger pharmacies may carry it. It is a thickening gel and preservative agent used in skin care products and food.
- This is the most labor-intensive method. It is a great way to preserve the texture and colors, though. However, green shades will likely darken using this method.
-
2Fill a plastic container halfway with the glycerin mixture. Grab a food-safe plastic container. It doesn’t need to be disposable, but cleaning glycerin can be kind of a pain. The plastic to-go containers you find at some restaurants are perfect for this. Pour your glycerin and water into the empty container until it is halfway full.
- You can use a glass container if you’d like, but you’ll need to do some serious cleaning after you’re done. Glycerin leaves an oily residue behind.
Tip: If you want to dye the leaves, mix some food coloring into the glycerin until you achieve the color that you’re looking for before doing this.
-
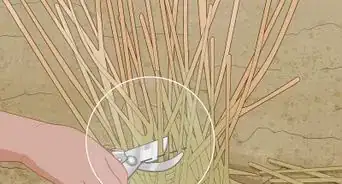
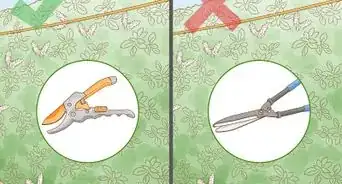
3Cut the stem of your leaves using garden shears or clippers. Trim your leaves at the stem so they’re as long as you want them to be. If there isn’t much stem left, cut the final 0.25 inches (0.64 cm) of the stem off. This wound will give the glycerin a way to seep into the leaf and replace the moisture.[11]
- This process will not work if you don’t cut the stem.
-
4Drop your leaves into the glycerin and press them down a little. Take your leaves and set them on top of the glycerin. Use a mixing stick or the flat side of a spoon to gently press the leaves down into the glycerin. Push them down 0.5–1 in (1.3–2.5 cm) to ensure that they are fully covered.
-
5Cover the leaves and weigh them down if they won’t stay submerged. If your leaves aren’t staying under the surface of the glycerin mixture, grab a plastic lid. Put the lid on top of the leaves and weigh it down using some small rocks or pebbles. This will keep the leaves from popping back up.[12]
-
6Leave your leaves in the glycerin for at least 24 hours. The longer you leave the leaves in the glycerin, the more effective this process will be. However, the longer you let the leaves soak, the more likely the color is to change. Let the leaves soak for at least 24 hours and no longer than 2 weeks to ensure that you preserve them without damaging the colors.[13]
- Keep the leaves in a dark area to ensure that the sun doesn’t dye the leaves while they’re soaking.
-
7Dry your leaves with paper towels and flatten them for 3-5 days. Remove your leaves by gently lifting the stems out with your needle-nose pliers and set them on top of a dry paper towel. Set another paper towel on top of the leaves. Then, flatten the leaves by setting the towels between panes of glass or the pages of a book. Set a heavy object on top of the glass or book and leave your leaves for 3-5 days to flatten them out and dry the excess glycerin off.[14]


Things You’ll Need
Using Wax to Preserve Leaves
- Pillowcase
- Iron
- Glass bowl
- Wax
- Spoon
- Pot
- Water
- Needle-nose pliers
- Oven mitt
- Wax paper
- Cloth
Drying Leaves with Borax
- Borax
- Cornmeal
- Slotted spoon
- Box or pan
- Ladle or spoon
Preserving Leaves with Glycerin
- Glycerin
- Water
- Spoon
- Mixing Stick
- Needle nose pliers
- Bowl or container
- Glass panes or book

References
- ↑ https://youtu.be/XV4gdN_9xYw?t=106
- ↑ https://www.marthastewart.com/917692/hanging-leaves
- ↑ https://youtu.be/XV4gdN_9xYw?t=210
- ↑ https://youtu.be/XV4gdN_9xYw?t=210
- ↑ https://youtu.be/XV4gdN_9xYw?t=220
- ↑ https://youtu.be/zJFpV6Al6KQ?t=19
- ↑ https://youtu.be/zJFpV6Al6KQ?t=48
- ↑ https://youtu.be/zJFpV6Al6KQ?t=56
- ↑ https://youtu.be/zJFpV6Al6KQ?t=65
About This Article

To keep the color of leaves you want to preserve as close to the original shade as possible, you have a few different options. One easy option is to preserve the leaves in wax. Just iron the leaves between 2 sheets of wax paper to remove any moisture, melt 1 tablespoon of wax for each leaf, and dip the leaves into the wax for a couple of seconds. Let the leaves dry, and voila! Another option is to dry the leaves with borax. Coat the bottom of a glass pan with 1 part borax and 2 parts cornmeal, add the leaves on top, and sprinkle another layer of borax and cornmeal on the leaves. Let them dry for 2 weeks. Your final option is to submerge the leaves in 2 parts water and 1 part glycerin for 24 hours. Then let them dry for around 5 days. For in-depth, step-by-step instructions for each method, keep reading!