This article was co-authored by wikiHow staff writer, Hunter Rising. Hunter Rising is a wikiHow Staff Writer based in Los Angeles. He has more than three years of experience writing for and working with wikiHow. Hunter holds a BFA in Entertainment Design from the University of Wisconsin - Stout and a Minor in English Writing.
This article has been viewed 27,360 times.
Learn more...
Pruning a nectarine tree can seem like a daunting task at first. Doing so, however, is key to encouraging healthy growth. Without pruning, the tree will most likely produce small or malnourished nectarines, or may produce none at all. By creating a Y-shaped branch pattern when planting your tree, pruning smaller branches in the first 3 years to help the tree distribute nutrients, and removing unhealthy growth, your tree will produce healthy nectarines for years to come.
Steps
Pruning Your Tree Immediately after Planting
-
1Sterilize your pruning tools. Soak your pruning tools in a solution of 1 part chlorine bleach to 9 parts water for 30 minutes to prevent the spread of plant pathogens to your tree. Do this before every pruning.[1]
- The effectiveness of the chlorine bleach-water solution is halved within two hours. Make a new batch for every sterilization.[2]
-
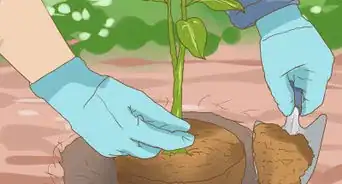
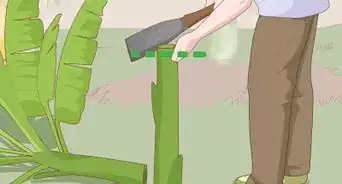
2Cut the leader (trunk) to a height of 24–30 inches (61–76 cm). Cut the leader at a 45° angle with your lopping shears. This helps to encourage lower branching and will force the tree to distribute nutrients more equitably between the top and root system.[3]
- Paint the leader with white latex paint to protect it from too much sunlight or insects.[4]
Advertisement -
3Trim back all branches except the two highest scaffold branches. Scaffold branches are branches that grow out from the leader. Trim back all but the two highest scaffold branches with your pruning shears. Make the cuts at 45° angles just above the branch collars (rings of new growth at the base of the branch).[5]
- Removing all but the two highest scaffold branches will help to ensure that sunlight is distributed evenly throughout the tree.[6]
-
4Use wooden slats and wire to form the scaffold branches into a Y-shape. Align the wooden slats along the two scaffold branches and attach them with wire. Then stretch wire between the two branches to hold them in the desired Y-shape.[7]
- Make sure not to attach the wire too tightly to the branches. Doing so can inhibit branch growth.


Pruning New Branches in the First 3 Years
-
1Prune new branches in January. Prune lateral branches (branches that grow out from the scaffold branches) back to the branch collar using cuts made at 45° angles.[8]
- You should prune young trees fairly heavily for the first 3 years so that they distribute less nutrients for fruiting growth and more for vegetative growth.
- Pruning vertical branches helps to encourage vegetative growth, pruning horizontal ones helps to encourage fruiting growth.[9]
- Leave small horizontal branches intact for future fruiting growth, but cut longer ones to prevent short-term fruiting.
- Focus on pruning higher branches to evenly distribute sunlight to lower ones.
- Don’t prune branches in the spring or summer. It can remove leaves that help to not only supply the tree with sunlight, but protect the tree from too much sunlight as well.[10]
-
2Cut the leader immediately above the branches you decide to keep. Every year for the first 3 years, cut the leader at a 45° angle just above the scaffold branches using your lopping shears.[11]
- Cutting the leader can help to encourage vegetative growth by forcing the tree to distribute nutrients to the lower parts of the tree.[12]
-
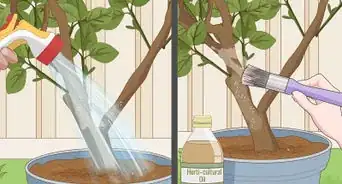
3Renew the protective layer of white latex paint on the leader. Repaint the leader with a layer of white latex paint after every pruning. Over the course of a year outside, the paint will start to flake. Keep repainting the leader to protect it from insects and disease.


Encouraging Healthy Growth after the First 3 Years
-
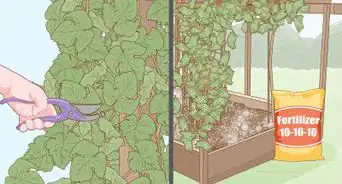
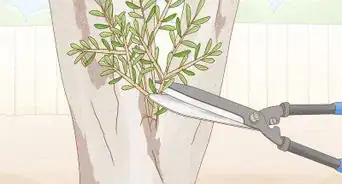
1Cut out branches that show signs of gumming. Gumming is hardened sap that oozes from lesions or cankers on the tree. It is an early indication of disease. Cut out any branches showing signs of gumming by making a 45° angle cut at the branch collar.[13]
- If you mow around the tree, be careful not to nick the leader. Gumming occurs at the site of open wounds on the tree, and gumming on the leader can be hard to remove.[14]
-
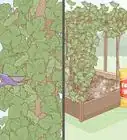
2Cut out suckers that grow near the bottom of the trunk. Suckers are small branches underneath the main branch system of the tree. Cut suckers back to the branch collar at a 45° angle using your pruning shears.[15]
- Suckers sap nutrients from the fruit-bearing branches at the top. Over time, they can keep your tree from fruiting.[16]
-
3


Community Q&A
-
QuestionI found a tree growing out of nectarine seed in my yard (I think a squirrel planted it). It has grown to about 18" tall with 3 main stems. Should I cut 2 stems off, or let it grow larger first?
 Sunny MahanandCommunity AnswerNo, you should not, because the younger the stems on which fruits grow, the more stems must be shortened. At one extreme are peach and nectarine trees. They produce fruit only on stems that grew during the last season. So they need a lot of pruning each year to launch new shoots for the next year's crop.
Things You’ll Need
- Hand pruning shears
- Lopping shears
- Pruning saw
- Orchard ladder
- Wooden slats
- Wire


References
- ↑ http://gardeningsolutions.ifas.ufl.edu/care/tools-and-equipment/disinfecting-tools.html
- ↑ http://gardeningsolutions.ifas.ufl.edu/care/tools-and-equipment/disinfecting-tools.html
- ↑ https://pubs.ext.vt.edu/430/430-456/430-456.html
- ↑ https://pubs.ext.vt.edu/430/430-456/430-456.html
- ↑ https://pubs.ext.vt.edu/430/430-456/430-456.html
- ↑ https://pubs.ext.vt.edu/430/430-456/430-456.html
- ↑ https://pubs.ext.vt.edu/430/430-456/430-456.html
- ↑ https://pubs.ext.vt.edu/430/430-456/430-456.html
- ↑ http://homeorchard.ucanr.edu/The_Big_Picture/Pruning_&_Training/
- ↑ https://pubs.ext.vt.edu/430/430-456/430-456.html
- ↑ https://www.stuff.co.nz/life-style/homed/garden/79416088/how-and-when-to-prune-peach-nectarine-apricot-and-plum-trees
- ↑ https://www.stuff.co.nz/life-style/homed/garden/79416088/how-and-when-to-prune-peach-nectarine-apricot-and-plum-trees
- ↑ https://www.weeklytimesnow.com.au/country-living/gardening/peter-cundall-time-to-cut-back-summerbearing-fruit-trees-for-bumper-crop-next-year/news-story/cd76cf40bec8a5a0675e91869a569282
- ↑ http://www.missouribotanicalgarden.org/gardens-gardening/your-garden/help-for-the-home-gardener/advice-tips-resources/pests-and-problems/diseases/cankers/gummosis-of-fruit-trees.aspx
- ↑ http://homeorchard.ucanr.edu/The_Big_Picture/Pruning_&_Training/
- ↑ http://homeorchard.ucanr.edu/The_Big_Picture/Pruning_&_Training/
- ↑ http://homeorchard.ucanr.edu/The_Big_Picture/Pruning_&_Training/
- ↑ http://homeorchard.ucanr.edu/The_Big_Picture/Pruning_&_Training/
- ↑ http://homeorchard.ucanr.edu/The_Big_Picture/Pruning_&_Training/
- ↑ http://homeorchard.ucanr.edu/The_Big_Picture/Pruning_&_Training/
About This Article