This article was co-authored by wikiHow Staff. Our trained team of editors and researchers validate articles for accuracy and comprehensiveness. wikiHow's Content Management Team carefully monitors the work from our editorial staff to ensure that each article is backed by trusted research and meets our high quality standards.
There are 7 references cited in this article, which can be found at the bottom of the page.
This article has been viewed 17,217 times.
Learn more...
Climbing roses are a great way to enjoy abundant blooms year after year. Using a trellis will help the roses grow horizontally and vertically, rather than just in its traditional bush form. Keep your climbing roses pruned to encourage air circulation, healthy growth, and to keep those beautiful blooms appearing every year.
Steps
Pruning in Winter to Encourage New Growth
-
1Prune your roses in mid- to late-winter to encourage new spring growth. Do this for both single-blooming and repeat-flowering roses. If you live in a warmer climate, wait until after the first frost of the season to prune your roses. If you live in a colder climate, anytime from January to March should be fine for you to do your pruning.[1]
- Even though your roses are dormant in the winter, they still have thorns. Wear protective gear, like a long-sleeved shirt, pants, gardening gloves, and close-toed shoes.
-
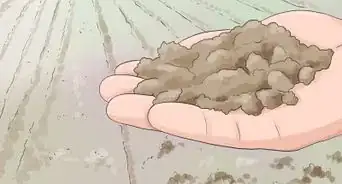
2Rake up debris, dead leaves, and old mulch to view the base of the plant. Cleaning up the ground will help you see which canes (the main stems from which the other branches grow) are the oldest, which are often the ones that need to be removed. It’ll also be important for the ground to be clear when spring comes around so that the base and the roots aren’t blocked from new rainfall.[2]
- To help keep things clean as you work, bring a paper bag with you and use it to collect the cleared-away debris.
Advertisement -
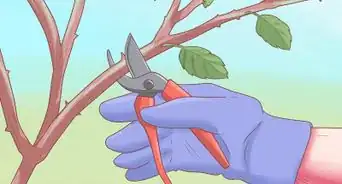
3Cut back old canes and ones that are growing away from the trellis. Use your pruning shears to cut the canes at a 45-degree angle as close to the base as you can get. This will give the new spring growth a chance to get more sunlight.[3]
- It may seem counterintuitive to cut away the oldest stems, but those are often the ones that are most susceptible to pests and diseases.
Tip: Disinfect your shears with a 1:10 bleach-to-water solution before you start pruning.
-
4Work from the bottom-up to remove dead and diseased branches. Use your pruning shears and cut the dead canes at a 45-degree angle above a bud eye. Look for dead branches, spotted leaves, or open sores in spaces where they might have been rubbing against the trellis.[4]
- A bud eye is a small, latent bump that will later bloom into a rose.
-
5Trim away crossed and spindly canes to make room for new growth. After you’ve cut away the old canes and dead branches, you can start pruning your roses to help them keep their shape on the trellis. Start at the bottom of the plant and look for thin, spindly canes that are getting in the way of more mature ones. Cut them back at the root.[5]
- For newer roses that are pruned annually, you can expect to cut back about 25% to 50% of the plant. For wilder roses that haven’t been pruned in 2 to 3 years, you could even go as far as to prune back about 75% of the growth.
-
6Secure the canes to the trellis to continue encouraging horizontal growth. Use strips of thin, stretchy material, like pantyhose cut into strips, to tie the branches close to the trellis. This will help them continue growing close to the trellis rather than expanding outwards as a rosebush does.[6]
- Add enough ties to keep the branches close to the trellis. Tying them every 15 inches (38 cm) or so will provide more than enough security.


Tidying Roses in Summer and Fall
-
1Determine if your roses are single-blooming or repeat-flowering. This will simply help you to know what to expect during the growing season. Single-blooming roses, or ramblers, bloom once per year. Repeat-flowering roses, or climbing roses, bloom repeatedly from summer through the fall.[7]
- If you know what kind of roses you have, you can more easily spot problems when they arise. For example, if you have repeat-flowering roses and notice they’re not producing as often as they should, there may be a problem with the soil or with how much water the plant is getting.
-
2Cut back diseased leaves and branches to keep your plant healthy. During the summer and early fall, check on your roses every couple of days and look for signs of disease. Catching these issues early will enable you to prune those sections back so that the disease doesn’t spread to the rest of your plant.[8]
- White, powdery spots or black spots indicate that there is an issue with your roses. Remove the infected sections. If the disease continues spreading, use a fungicide spray to help get your plant back to health.
-
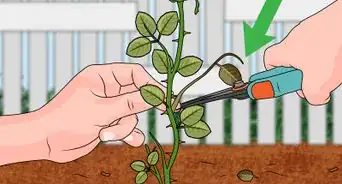
3Deadhead blooms once they start to wilt to encourage new growth. When the petals start to fade, get limp, or go brown, the bloom is ready to be deadheaded. Cut the bloom off at a 45-degree angle where the stem meets the branch. Use clean pruning shears to ensure you’re not introducing any bacteria to your plant.[9]
- Avoid simply pinching off the heads of dead blooms, as this can actually create wild new growth that is too thin to sustain future blooms.
- Some types of roses are “self-cleaning,” meaning the dead bloom will drop off on its own. If you’re not sure of what you have, keep an eye on the first set of blooms to see if they do come off on their own once they start to wilt. If not, deadhead them yourself.
Did You Know: Stems that have minimal leaves make the biggest blooms because they have don’t have to divert as much energy to the production and feeding of leaves.
-
4Clear away dead leaves and petals from the ground so the base is clear. Too much debris on the ground will make it harder for rainwater to reach the soil. Damp debris can also introduce rot and disease to your plants. Every week or so, do a quick sweep of the ground near your roses to keep it clear.[10]
- If you stay on top of this task by addressing it every week, it should never take you longer than 5 to 10 minutes, just depending on how big your trellised area is.
-
5Water your roses every week if there hasn’t been any rain. Your roses need roughly 1 inch (2.5 cm) of rainfall every week, whether that comes from the actual rain or from a watering can. Disperse the water at the soil level and avoid getting the leaves and blooms overly wet, since that can cause them to get mildewy.[11]
- Use a watering can rather than a hose so that the waterfall is gentle. A too-direct stream could erode the soil near the base of the plant. Or, if you do use a hose, use one that has a “watering” option so that the stream isn’t too strong.
-
6Combat pests with insecticidal soap to keep them off of your roses. Spray your roses every 5 to 7 days for 3 treatments in total when you notice aphids, mites, and most other types of pests. Spray the leaves and canes on both the tops and the bottoms.[12]
- Insecticidal soap is a great option because it’s non-toxic to humans and animals, and it isn’t going to hurt your roses, either.


Things You’ll Need
Pruning in Winter to Encourage New Growth
- Long-sleeved shirt
- Pants
- Gardening gloves
- Close-toed shoes
- Rake
- Paper bag
- Pruning shears
- Long-handled shears
- Strips of pantyhose or something similar
Tidying Roses in Summer and Fall
- Pruning shears
- Gardening gloves
- Close-toed shoes
- Fungicide spray (optional)
- Watering can or hose
- Insecticidal soap


References
- ↑ https://www.flowerpatchfarmhouse.com/prune-train-your-eden-climbing-rose/
- ↑ https://youtu.be/gNiOW1kBNGo?t=70
- ↑ https://youtu.be/gNiOW1kBNGo?t=28
- ↑ https://youtu.be/gNiOW1kBNGo?t=70
- ↑ https://www.flowerpatchfarmhouse.com/prune-train-your-eden-climbing-rose/
- ↑ https://www.flowerpatchfarmhouse.com/prune-train-your-eden-climbing-rose/
- ↑ https://www.flowerpatchfarmhouse.com/prune-train-your-eden-climbing-rose/
- ↑ https://gardenerspath.com/how-to/pruning/roses/
- ↑ https://youtu.be/cG3z6Amu1_I?t=105
About This Article