This article was co-authored by wikiHow Staff. Our trained team of editors and researchers validate articles for accuracy and comprehensiveness. wikiHow's Content Management Team carefully monitors the work from our editorial staff to ensure that each article is backed by trusted research and meets our high quality standards.
There are 20 references cited in this article, which can be found at the bottom of the page.
The wikiHow Video Team also followed the article's instructions and verified that they work.
This article has been viewed 84,675 times.
Learn more...
Instead of throwing away that beautiful bouquet of roses, use them to create a keepsake you can enjoy for a long time to come. By preserving roses in resin, you can make paperweights, decorative accents, or personal gifts to give to others. It’s best to use dried roses so their coloring stays vibrant, and it takes about 5-10 days to dry them by hanging them upside down. After you’ve dried the roses, you should be able to complete this project from beginning to end within 4-5 hours.
Steps
Drying the Roses
-
1Choose roses at the peak of their bloom for the most vibrant color. Avoid picking roses that haven’t opened up yet or that are already starting to brown or droop. You can either buy roses from a store or cut them from a rose bush.[1]
- If you’re cutting your own from a rose bush, it’s a good idea to wear garden gloves to protect your skin from the thorns.
-
2Trim away the majority of the leaves from the roses’ stems. Either pull the leaves off by hand or use a pair of scissors to cut them off where they intersect with the stem. You could also shave off the thorns if you’re worried about getting pricked by them.[2]
- Leaving a few leaves in place will give you the chance to incorporate them into your design if you want. They can add a nice pop of color against the rose.
Advertisement -
3Wrap a piece of twine around the stem of each rose and tie it in a bow. Use a 6 to 8 inches (15 to 20 cm) piece of twine and wrap it around 3-4 times before tying the bow. Make the bow as tight as possible so the bundle of roses won’t come apart once it’s hanged.[3]
- If you don’t have twine, a rubber band will work just as well. Just wrap it around several times until it’s tight against the stems.
-
4Hang the roses upside down in a dry, airy place. Keep them out of sunlight so their color doesn’t fade. Put them in a closet or cupboard where there isn’t a lot of moisture in the air, and simply hang them from a hook or nail.[4]
- Excessive moisture could keep the roses from drying and could even cause them to grow mold.
-
5Check the roses every 5-10 days to see if they are dry to the touch. Roses don’t take very long to dry, so you should be ready to move on with your project within 1-2 weeks. When you touch the roses, they should feel crispy and the petals should no longer be soft or pliable.[5]
Using Dried Roses versus Fresh Roses: The color of dried roses will remain just as vibrant after they’ve been preserved in resin. You can use fresh roses, but keep in mind that the coloring will fade and look extremely washed out.
-
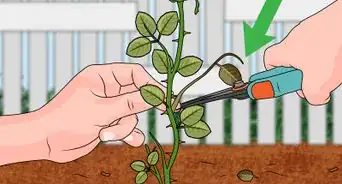
6Cut the stem away from the bud of the roses after they have fully dried. Once you’re ready to start the preservation process, trim away the stem. If you want to use any of the leaves, cut them off and set them to the side along with the rosebuds.
- The stem would most likely just get in the way and be too long to fit in the mold properly.
-
7Use a convection oven to dry roses in 3-4 hours. Lay the roses out on a clean baking sheet and preheat the oven to 100 °F (38 °C). Place the baking sheet on the lowest rack and leave the roses in the oven for 2-3 hours. Check them after that time and add an additional hour if they aren’t dry yet.[6]
- A normal oven may not be able to go as low as 100 °F (38 °C) and often has more moisture than a convection oven. You can still try this method with a normal oven, but be aware that you may not get the same results.
-
8Dry roses in 1-2 days with desiccant in the microwave. Bury roses in a microwave-safe container filled with desiccant. Microwave the container along with a mug full of water for 2 minutes. Poke through the desiccant with a toothpick to check the roses, and continue microwaving them in 1-minute intervals until they’re fully dry. Carefully remove the container and let it sit for 24 hours before removing the roses.[7]
- A desiccant is any substance that can be used as a drying agent. There are several options you can use, but silica gel is the fastest. You can buy it at most garden supply stores.


Preparing the Resin
-
1Use clear polyester casting resin for the cheapest option. This type of resin will dry clear so you’ll be able to see the rose inside really well. It also dries a little slower than epoxy resin, which means you have a little more time to arrange the rose and perfect your craft.[8]
- You can find this product at most craft stores or you can order it online.
-
2Choose an epoxy resin if you want an amber cast to the finish. Epoxy resin is typically a little faster-drying and longer-lasting than polyester resin, though both options should create keepsakes that will last for years. If you like the idea of a lightly tinted finish, epoxy resin is the way to go.[9]
- You can also buy clear epoxy resins, but the cost is much higher than what you would pay for a clear polyester resin.
-
3Work in a well-ventilated area to combat the resin’s strong odor. Once your roses are dry and you’re ready to complete your project, set up your tools outdoors if possible. If you do have to work inside, open up as many windows as you can and use a fan to circulate the air faster.[10]
- If you’re sensitive to strong smells, consider wearing a face mask while you work.
-
4Wear rubber gloves to protect your hands from the resin. If you do happen to get resin on your fingers, simply rinsing them with water won’t get it off completely and the resin will leave a sticky residue. Safely remove resin without using harmful chemical products by doing the following:[11]
- Mix 1/2 tablespoon (4.5 grams) of poppy seeds with 1 tablespoon (15 mL) of dish soap. Rub the mixture into your hands for 60 seconds without adding water. Then add water, wash your hands, and scrub away any remaining resin. The poppy seeds act as an exfoliant to rough up the resin and get it to detach from your skin.
- If you don’t have poppy seeds, coffee grounds would also work.
-
5Measure how much resin your mold will hold. Your mold may have this information printed on it, but if not, you can figure it out yourself. Simply pour water into the mold and then pour that water into your measuring cup to see how much liquid there is.[12]
- You can buy molds at most craft stores or online.
- Plastic molds work just fine, but you could also invest in latex-rubber molds, which are more flexible and easier to remove once the resin is set..
Tip: Make sure the mold you chose is deep enough to contain the rose you want to preserve. Choose one that is at least 1.5 to 2 inches (3.8 to 5.1 cm) deep
-
6Pour enough resin into the disposable measuring cup to fill the mold. You can buy disposable measuring cups online, at craft stores, or at most local grocery stores. Look for ones that include measurements on the side so that it’s easy to pour the right amount of resin.[13]
- Because the resin is so hard to clean off, disposable measuring cups guarantee that you won’t accidentally ruin your normal measuring cups.
-
7Add the catalyst to the resin per the instructions on the resin container. In general, the catalyst makes up 1-2% of the total volume of the resin, so if your mold holds 4 ounces (110 g), you would need to add about 16 drops of resin. The resin container should have a chart on the back that gives you a breakdown of how much to use.[14]
- The catalyst heats the resin and helps it harden, or cure. Without it, your mold would never harden into a beautiful keepsake.
-
8Stir the resin and catalyst with a wooden skewer for 60 seconds. If you don’t have a wooden skewer, use something else that is also disposable, like a plastic spoon or popsicle stick. It’s important you mix things well so that the catalyst gets activated.[15]


Creating the Mold
-
1Pour the stirred resin into the mold. After stirring together the catalyst and resin for 60 seconds, carefully pour the mixture into the mold you’ve chosen for your roses. Be careful to not drip the resin onto your work surface or get it onto the edges of the mold itself.[16]
- If you’re worried about spills, lay some old newspaper underneath your work station.
-
2Place the rose into the resin in the design that you want. Depending on the type of mold you chose, be aware of which side will be the top. For example, if you’re using a domed mold, you’ll want to insert the rose into the resin facedown so that it’ll be visible once it’s right-side up. Use the wooden skewer to push the rose into place.[17]
- The rose will most likely rise to the top of the resin, and that is okay. Right now, focus on getting it into a general placement. You’ll have a chance to push it deeper in a little while.
- This is also the time to add the dried leaves if you saved any. You could also add other dried flowers.
-
3Set a timer for 10 minutes and let the resin set to a gel-like consistency. If after 10 minutes the resin is still very liquid-like, set the timer for an additional 10 minutes. You want the resin to be pliable so you can push the rose in further without it popping back up but not so hard that you can’t make any adjustments.[18]
- If you’re working indoors or in a humid climate, it may take closer to 30 minutes for the resin to get to the right consistency.
-
4Finalize the positioning once the resin is the right consistency. Use your wooden skewer to push the rose deeper into the resin. If it floated off to the side, you can also push it back into place. Use this time to arrange any other flowers or leaves that are in the mold.[19]
- It’s very hard to make roses look bad. Even if things are off-center a little, the end result will still look beautiful.
-
5Let the resin set for about 4 hours or until it is completely hardened. Consult the back of the resin container to see how long they recommend for the curing process. It usually takes several hours, but if you made a really large or deep mold, it could take longer.[20]
- If the resin is still sticky to the touch, it’s not done. When it’s fully dry, it should be smooth and hard.
-
6Remove the mold from the resin to reveal your creation! Loosen the mold from around the resin to pop it out, or peel away the mold if you used a flexible one. Use your mold as a decorative accent around your home, as a paperweight, or give it away as a gift.[21]
- The molds should come away clean, which means you can reuse them to make even more!


Things You’ll Need
- Scissors
- Twine
- Rubber gloves
- Clear polyester casting resin
- Catalyst liquid
- Disposable mixing cup
- Resin mold
- Wooden skewer
- Dried roses
- Paper towels


References
- ↑ https://www.fs.fed.us/wildflowers/kids/activities/preservewildflowers.shtml
- ↑ https://youtu.be/gVDnQOKP8kA?t=72
- ↑ https://youtu.be/gVDnQOKP8kA?t=138
- ↑ https://youtu.be/gVDnQOKP8kA?t=163
- ↑ https://www.fs.fed.us/wildflowers/kids/activities/preservewildflowers.shtml
- ↑ https://edis.ifas.ufl.edu/ep004
- ↑ https://edis.ifas.ufl.edu/ep004
- ↑ https://youtu.be/AAr2wijpISA?t=114
- ↑ http://www.sollercomposites.com/EpoxyResinChoice.html
- ↑ https://youtu.be/AAr2wijpISA?t=180
- ↑ https://youtu.be/rg04x5vvRF4?t=29
- ↑ https://youtu.be/AAr2wijpISA?t=150
- ↑ https://youtu.be/AAr2wijpISA?t=173
- ↑ https://youtu.be/AAr2wijpISA?t=196
- ↑ https://youtu.be/AAr2wijpISA?t=206
- ↑ https://youtu.be/AAr2wijpISA?t=213
- ↑ https://youtu.be/AAr2wijpISA?t=231
- ↑ https://youtu.be/AAr2wijpISA?t=244
- ↑ https://youtu.be/AAr2wijpISA?t=249
- ↑ https://youtu.be/AAr2wijpISA?t=318
- ↑ https://youtu.be/AAr2wijpISA?t=328
- ↑ https://youtu.be/AAr2wijpISA?t=308
About This Article

To preserve roses in resin, the first thing you'll need to do is dry them so their color stays beautiful and vibrant. Tie the stems of the roses together with twine and hang them upside down in a dark, dry place for 5-10 days until they're dry to the touch. Once they're dry, cut the stems away from the buds. Mix some clear polyester casting resin with a resin catalyst in a bowl, then pour the mixture into a plastic mold. Place the roses into the resin. Wait 10 minutes, then make any final adjustments to the position of the roses before the resin fully hardens. It should take about 4 hours for your preserved rose to fully cure. To learn how to quickly dry roses in the oven or microwave, keep reading!