This article was co-authored by Tannya Bernadette. Tannya Bernadette is the Founder of The Closet Edit, a Seattle-based personal styling service. She has been in the fashion industry for over 10 years and has been recognized as Ann Taylor’s LOFT brand ambassador and Seattle Southside’s official Rockstar Stylist. Tannya received her BA in Fashion Marketing and Business from The Art Institutes.
wikiHow marks an article as reader-approved once it receives enough positive feedback. In this case, 88% of readers who voted found the article helpful, earning it our reader-approved status.
This article has been viewed 1,103,491 times.
Cufflinks actually pre-date the button, safety pin, zipper and Velcro. Luckily, advancements have been made since the first cufflinks to make them completely customizable. Cufflinks are a great way to add a personal touch to a suit or dress shirt. With so many new styles, they can also be a way to support your favorite teams, display your unique sense of style, or simply complete a look.
Things You Should Know
- Choose a shirt that can hold your cufflinks and fold back the cuff. Then, align the cufflink holes.
- Insert cufflinks into the holes and secure them. Let the decorative face of the cufflink be displayed outwardly.
- You can use bullet back, whale back, fixed back, chain link, reversible, ball return, or locking closure cufflinks.
Steps
Prepping The Shirt For Cufflinks
-
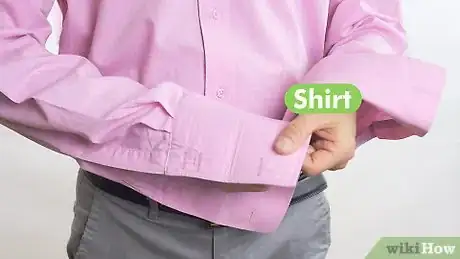
1Wear the correct shirt. Cufflinks are most commonly worn with French cuff (also known as double cuff) dress shirts. This sort of shirt has extra long cuffs that fold back on the cuff material, creating layers. French cuffs don’t have buttons on the sides to connect the cuff. Instead, there are small holes on each side of the cuff, where cufflinks are added. Wearing cufflinks with this shirt means that the cufflink will be securing four layers of shirt fabric. This is a dressier look, and the most classic style of shirt to wear with cufflinks.
- Cufflinks can also be worn with single cuff shirts, the variety typically found at department stores. Wearing cufflinks with this style of shirt is a more casual look.
-
2Fold back the cuff. With your arm extended, use your opposite hand to fold your French cuffs back. Make sure that the end edge of the cuff (closest to your fingers) folds back to form a neat and even lining.
- If you are wearing a single cuff shirt, there is no need to fold back your cuffs.
Advertisement -
3Hold the cuffs together. Pinch the two open edges of the shirt cuff together so the two edges lay flat, away from the wrist. The inside fabric of the cuff edges should be pressed against each other. This will create the classic “kiss cuff” most commonly worn with cufflinks. The two open edges of the cuff will be pinched together as if they are kissing.
- A single cuff shirt will not use the “kiss cuffing.” Instead, the two cuff edges overlap one another, making a barrel shape.
- Again, you can wear cufflinks with single cuff shirts, but it is considered to be a far more casual look. Traditionally, cufflinks are paired with French cuff shirts for formal occasions.
-
4Align the cufflink holes. Make sure the cufflink holes are even and aligned. This will make inserting the cufflinks a lot easier, and can reveal if your fold is even and aligned where it should be.
- For a single cuff shirt, align the cufflink holes by making the overlapping of the cuffs looser or tighter, until the holes match up.
Attaching Different Styles of Cufflinks
-
1Insert and secure the cufflink. When your arms are at your sides, the decorative face of the cufflink should be outwardly displayed.[1] Aside from the face of the cufflink, the rest of the cufflink material is inserted through the layers of cuff fabric, and is secured on the other side of the cuff.
- The way you secure the cufflinks will vary slightly depending upon the style of cufflinks.
-
2Attach a set of bullet back cufflinks. This style of cufflink has a bullet shaped capsule that is held in place between two posts. Flip the bullet on its axis to align with the post of the cufflink. This will allow you to maneuver the cufflink through the aligned holes in the layers of cuff fabric. Hold the cufflink with your thumb and pointer finger. Use your middle, ring, and pinky finger to hold the top portion of the cuff in place, and insert the cufflink post through the holes on the top section of the cuff. Then, bring the bottom portion of the cuff up to meet the cufflink, and fit the post of the cufflink through the bottom portion of the cuff. Flip the bullet shaped capsule back horizontally to secure the cufflink on the shirt.
- This cufflink style is the most common of all cufflinks, and one of the easiest to put on.
-
3Attach a set of whale back cufflinks. Whale back cufflinks have a straight post combined with a flat, solid whale tail backing, similar to bullet back cufflinks. Flip the whale backing straight so it is flush to the post. Grasp the cufflink with your thumb and pointer finger, and use the rest of your fingers to hold the top portion of the cuff still. Push the cufflink post through the holes on the top section of the cuff, then bring the bottom portion of the cuff up to meet the cufflink. Push the cufflink post through the bottom portion of the cuff. Once the post and backing are completely through all of the cuff fabric, flip the backing perpendicular to the post to secure the cufflink.
- This style is similar to bullet back closures, but offer a more secure backing that locks into place once flipped.
-
4Attach a set of fixed back cufflinks. Fixed backings are an extension of the cufflink face. This means that the post and backing are formed from the same piece of metal as the front face of the cufflink. The backing does not bend or move in any way. Grip the cufflink with your thumb and pointer finger, and use your other fingers to hold the top of the cuff steady. Maneuver the back of the cufflink to fit through the top cuff’s holes. It will fit through the holes the same as a button would. Then push the back of the cufflink through the bottom portion of the cuff.
- This cufflink style may require a bit more work to put on, but can be beneficial in the long run from not having moving parts.
-
5Attach a set of chain link cufflinks. Chain link cufflinks are the original form of cufflinks, and feature a connecting chain linking the two ends of the cufflink together. Hold the top portion of the cuff with your middle, ring, and pinky fingers, and use your thumb and pointer finger to push the back of the cufflink through the top cuff’s holes. Then bring the bottom cuff up to meet the top cuff, and again, use your thumb and pointer finger to push the back of the cufflink through the holes of the bottom portion of the shirt cuff.
- These cufflinks are normally a bit more difficult to put on. However, the benefit of wearing these cufflinks is that the flexible chain between the front and back of the cufflink typically allows for a more relaxed cuff fit.
- An additional benefit of this style is that there is something to look at on both sides of the cuff.
-
6Attach a set of reversible cufflinks. These styles of cufflinks have a fixed backing, featuring a design on the back end, rather than a plain fixed disc. Attach these cufflinks the same way you would attach fixed back cufflinks. Use your thumb and pointer finger to fit the entire back end of the cufflink through the holes in the top layer of the cuff fabric, while your other fingers hold the cuff steady. Then, bring the bottom portion of the cuff up to meet the top portion, and push the back of the cufflink through the holes in the bottom cup. The cufflink will be secured when the back is held in place on the bottom portion of the cuff like a button.
- This cufflink style allows for an appealing design on both sides of your cuff, and enables you to switch what is shown as the face of the cufflink. It’s like having two pairs of cufflinks in one.
-
7Attach a set of ball return cufflinks. This style of cufflink is similar to fixed backing cufflinks. Usually, the backing is composed of an attached ball. Use your thumb and pointer finger to insert the balled backing of the cufflink through the holes on the top layer of the cuff. Then bring the bottom portion of the cuff up to meet the top portion, and push the post of the cufflink through the bottom portion’s cuff holes.
- The upside of these cufflinks is that they are very easy to put on and you get the slackened cuff fitting.
- The backing ball also serves as a more appealing backing than a bullet or plain fixed backing.
-
8Attach a set of locking closure cufflinks. Unfold these hinged cufflinks (so they’re opened and have a straighter form) and insert the small, back end of the cufflink through the holes on the top layer of the cuff. Once the back end of the cufflink is completely through the top layer of cuffing, bring the bottom portion of the cuff up to meet the cufflink backing. Then push the backing of the cufflink through the holes of the bottom portion of the cuff. Hinge the cufflink back into place, folding it, to close and lock the cufflink into place.
- This style of cufflink is one of the most secure varieties, and offers a tighter fit to the cuff.
Expert Q&A
Did you know you can get expert answers for this article?
Unlock expert answers by supporting wikiHow
-
QuestionHow do I choose cufflinks?
 Tannya BernadetteTannya Bernadette is the Founder of The Closet Edit, a Seattle-based personal styling service. She has been in the fashion industry for over 10 years and has been recognized as Ann Taylor’s LOFT brand ambassador and Seattle Southside’s official Rockstar Stylist. Tannya received her BA in Fashion Marketing and Business from The Art Institutes.
Professional Stylist
-
QuestionCan I wear a shirt with cuff links without a coat or a jacket?
 Community AnswerYou certainly can, but fashion standards say not to. Cufflinks are usually for more formal settings and should be worn with a suit or tux.
 -
QuestionCan I wear cuff links with a shirt that had buttons?
 Community AnswerTypically, no, since there would be no facing (bottom side) hole or holes to receive the link fastening part. A good seamstress could, however, remove the button and create a buttonhole in its place if (and only if) the cuff were long enough to accommodate the shirt wearer's wrist with the cuff ends overlapped for insertion of the cuff link. For the typical shirt wearer of casual, not formal, dress wearer, the more practical solution for lost buttons would be to obtain and sew on replacement buttons as needed, or to purchase a new shirt.
References
- ↑ https://www.jimsformalwear.com/advice/cufflinks-and-studs
- ↑ Tannya Bernadette. Professional Stylist. Expert Interview. 10 May 2019.
- Videos provided by CWHouseMenswear
About This Article
To put cufflinks on a shirt with French cuffs, fold the top cuff back and line up the cufflink holes. For bullet back and whale back cufflinks, there is a piece you will need to flip in order for the cufflink to slide through the holes in the cuff. Fixed back cufflinks, chain link, ball return, and reversible cufflinks have no moving parts and can just be slid into the cuffs, similar to fastening a button. If you have locking closure cufflinks, unfold the hinge, push the cufflink through the cuff, and hinge the cufflink back into place. Keep reading if you want more tips on how to fold your sleeves so they're ready for cufflinks!
