This article was co-authored by wikiHow staff writer, Christopher M. Osborne, PhD. Christopher Osborne has been a wikiHow Content Creator since 2015. He is also a historian who holds a PhD from The University of Notre Dame and has taught at universities in and around Pittsburgh, PA. His scholarly publications and presentations focus on his research interests in early American history, but Chris also enjoys the challenges and rewards of writing wikiHow articles on a wide range of subjects.
There are 7 references cited in this article, which can be found at the bottom of the page.
This article has been viewed 40,531 times.
Learn more...
A gait belt is a useful tool when you need to lift and move a semi-mobile patient or other person who requires your assistance. To put the belt on, wrap it around the patient's waist, just above the hips, while they are seated upright. Then, secure the buckle and tighten the belt until it is snug but not uncomfortable. There are minor differences in securing standard and quick-release gait belts, but the overall process—and end goal—is very similar.
Steps
Positioning the Patient and Belt
-
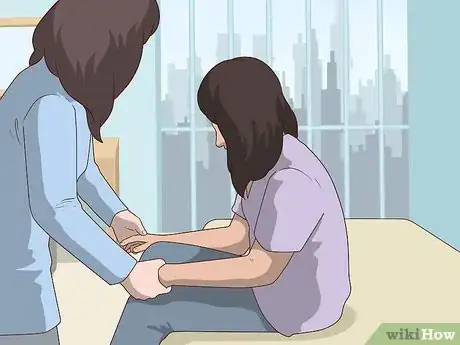
1Have the patient sit upright on the edge of the bed or chair. It's easier to put the belt on properly if the patient is seated upright with their feet flat on the floor and their arms to their sides (but not right up against their body). This is also the best position for using the gait belt to help move a patient from a bed or chair to a wheelchair or other seat.[1]
- Gait belts are most effective when used on patients who are able to sit upright, but who need assistance standing and moving to a nearby seat.
-
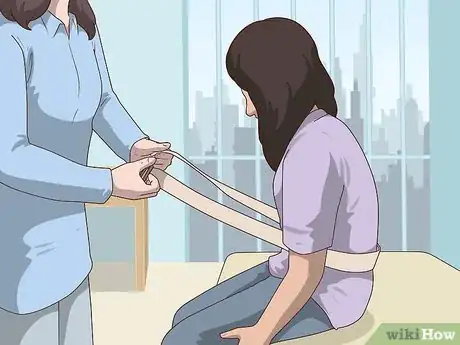
2Wrap the belt over clothing but not any tubes or wires. Ask the patient to lift their arms slightly if necessary, then wrap the belt around their midsection, right over their clothing. However, make sure there are no medical tubes or wires—for instance, an oxygen tube—running underneath the belt.[2]
- If there are any wires or tubes in the way, carefully feed the belt underneath them, so the belt is between the tube/wire and the patient's clothing.
Advertisement -
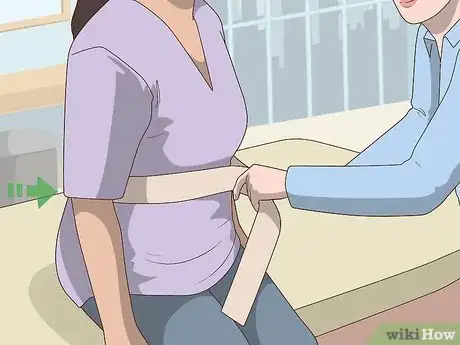
3Position the belt at the waist, just above the hips. The belt should not wrap right over the patient's hip bones, or around the bottom of their ribcage. Make sure it's wrapped over their waistline, so that the bottom of the belt is just at the tops of their hip bones.[3]
- Feel for the hip bones to confirm the belt is in the right location.
-
4Make sure the teeth of a standard belt are in the right spot. Standard gait belts use a metal buckle with a loop at each end, one of which has gripping teeth inside the loop. Position the belt and buckle so that, when the strap is wrapped around the patient's body, the first loop it encounters is the one with the teeth.[4]
- The teeth should also be pointing outwards, away from the patient's belly, not inwards towards it.
- Not all gait belts have metal buckles with teeth. Quick-release belts, for instance, often have plastic buckles that snap together.
Buckling a Standard Belt
-
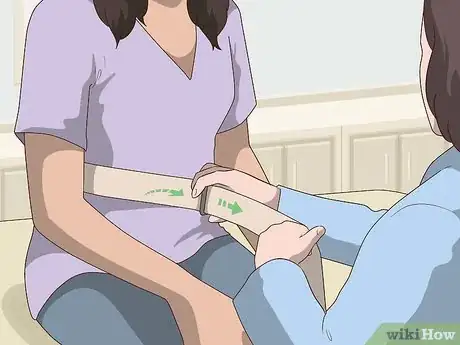
1Feed the belt strap through the teeth of the buckle. Thread the strap into the buckle from behind, so that the emerging strap is pointing away from the patient's body. Keep feeding the strap through the loop and over the teeth until the belt is secured but not yet snug around the patient's body.[5]
-
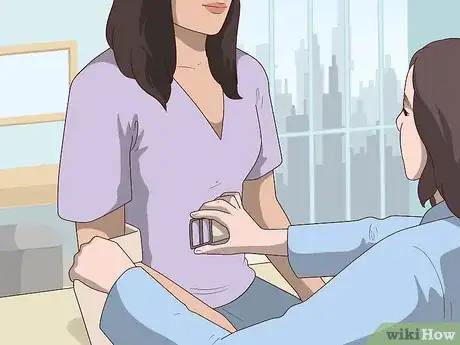
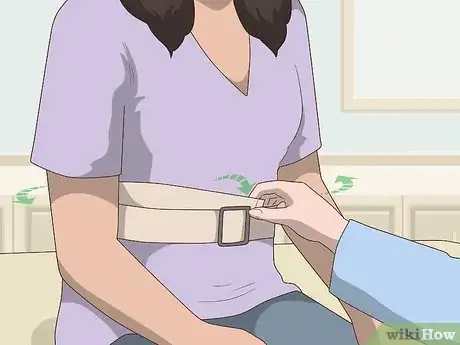
2Slide the buckle left or right of the center of the patient's belly. If the buckle is centered right over the patient's belly button, it's more likely to cause discomfort or even pain when you tighten it. Instead, move the buckle to one side or the other so that it's halfway between the belly button and hip bone.[6]
- Ask the patient if they have a side preference—they may have a tender spot on one side of their abdomen, for instance.
-
3Pull the strap until the belt is tight but not painful. With the buckle moved to the side, pull on the free end of the strap to cinch the belt around the patient's abdomen. Make the belt tight enough that you can barely fit your fingers between the belt and the patient's clothing and body.[7]
- If you can't feed your fingers beneath the belt strap, or if the patient says the belt hurts, it's too tight and should be loosened a bit.
- If you can pinch the fabric of the belt strap between your fingers, it's too loose and should be tightened.
-
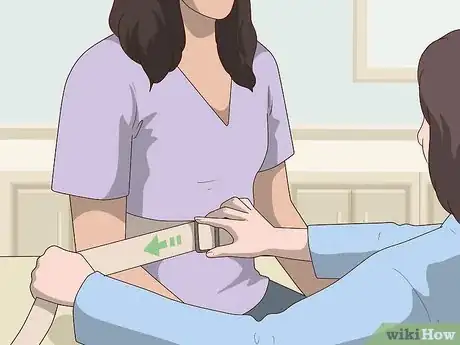
4Feed the strap through the other buckle loop and pull it tight. Thread the strap into the opposite loop (the one without teeth) from the front, so that it passes over the center of the buckle. Continue to feed it through the loop until the strap is fully tightened between the two buckle loops.[8]
-
5Tuck in any excess belt strap so it's not a tripping hazard. In most cases, you'll end up with a fairly substantial length of belt strap hanging free. To get this loose belt material out of the way, tuck it once or multiple times into the belt where it wraps around the patient's waist.[9]
- This is especially important if the excess belt strap hangs down to the floor. It could easily become a tripping hazard in this case.
Buckling a Quick-Release Belt
-
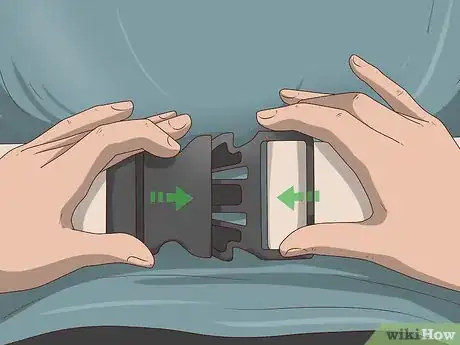
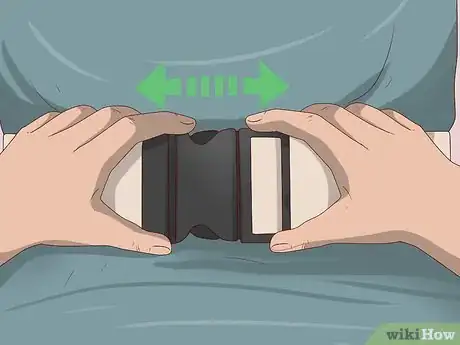
1Snap the two sides of the plastic buckle together. Quick release gait belts have 2-piece buckles located on either end of the belt strap. To secure the buckle, push the “male” side into the “female” side until you hear a snap, then tug on the closed buckle to make sure it's secure.[10]
- To unbuckle the belt, simultaneously press down on the tabs at the top and bottom of the closed buckle, and pull the 2 buckle components apart at the same time.
-
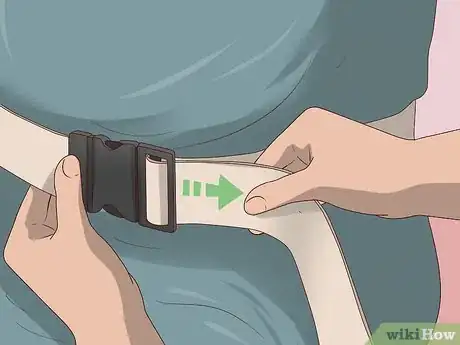
2Move the buckle to the right or left of the patient's belly button. As with a standard gait belt, the buckle can cause discomfort if it's positioned directly over the center of the patient's abdomen. Slide it a little to the right or left of center, based on the patient's preference.[11]
-
3Pull the loose end of the belt strap to secure the belt tightly. Some excess belt strap will already be looped through and hanging free from one of the sides of the buckle—typically the “male” side. Pull on the strap until the belt is at the proper tightness around the patient's waist, with the bottom of the belt just touching the tops of the hip bones.[12]
- You should be able to slide your fingers behind the belt, but not be able to pinch the fabric between your fingers.
-
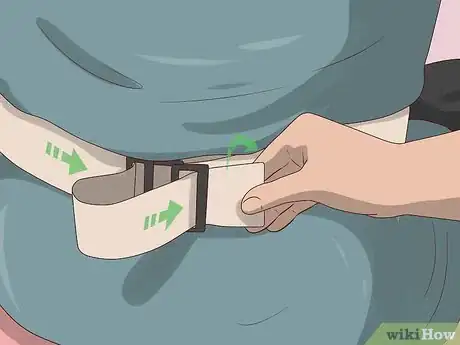
4Tuck the loose strap end into the belt for safety reasons. The excess belt strap can be a tripping hazard, so get it out of the way by tucking it once or more behind the fitted belt. If there is an excessive amount of strapping left, wrap it loosely around the patient's body once or twice (above the fitted belt), then tuck it in.[13]
Warnings
- Never use a gait belt that appears to be frayed or otherwise damaged.⧼thumbs_response⧽
- If the patient is too heavy or otherwise too difficult for you to move on your own, ask for assistance. Never attempt to move a patient unless you feel confident in your ability to do so without causing injury to yourself or to the patient.⧼thumbs_response⧽
References
- ↑ https://www.drugs.com/cg/how-to-use-a-gait-belt.html
- ↑ https://youtu.be/qcp0B7E1uh8?t=50
- ↑ https://youtu.be/SJPfasAs5FI?t=5
- ↑ https://youtu.be/qcp0B7E1uh8?t=35
- ↑ https://www.med.umich.edu/1libr/FallsPreventionCommittee/UsingAGaitBelt.pdf
- ↑ https://www.familymed.uci.edu//geriatrics/GWEP/PDFs/fall-prevention/gait-belt-safe-use.pdf
- ↑ https://www.familymed.uci.edu//geriatrics/GWEP/PDFs/fall-prevention/gait-belt-safe-use.pdf
- ↑ https://youtu.be/qcp0B7E1uh8?t=50
- ↑ https://www.med.umich.edu/1libr/FallsPreventionCommittee/UsingAGaitBelt.pdf











Medical Disclaimer
The content of this article is not intended to be a substitute for professional medical advice, examination, diagnosis, or treatment. You should always contact your doctor or other qualified healthcare professional before starting, changing, or stopping any kind of health treatment.
Read More...