This article was co-authored by Nick Yahoodain. Nick Yahoodain is a General Contractor and the CEO of Advanced Builders & Contractors in Los Angeles, California. With over 16 years of experience, Nick specializes in large residential projects such as new construction, developments, major renovations, additions, and hillside construction. Advanced Builders & Contractors is a member of the BBB, is licensed by the Contractors State License Board, and is fully bonded and insured. Advanced Builders & Contractors has been featured on NBC News, Elle Decor, Architectural Digest, and Voyage LA.
There are 11 references cited in this article, which can be found at the bottom of the page.
wikiHow marks an article as reader-approved once it receives enough positive feedback. In this case, 91% of readers who voted found the article helpful, earning it our reader-approved status.
This article has been viewed 283,953 times.
Replacing an old kitchen or bathroom countertop is an easy way to upgrade the room. You can hire someone to do the job, but it isn't necessary to do so in most cases. Instead, cut renovation expenses by carefully removing old fixtures yourself. We'll show you how to remove a kitchen countertop by removing the adhesive and screws that hold the countertop in place.
Steps
Disconnecting Fixtures and Lines
-
1Shut off the supply lines to the countertop fixtures. To safely remove your old countertop, you'll first have to disconnect the water lines to the sink and gas lines to the stovetop. Turn the emergency shut-off valves for each fixture clockwise to the off position. Disconnect the supply lines from the valves using an adjustable wrench.[1]
- Have a bucket ready for draining water.
-
2Disconnect the drain line under the sink. Use your adjustable wrench to loosen the large nuts that hold the J or U-shaped trap to the sink's main drain line. Hold the trap in place with channel locks. If you have a PVC connection, you should be able to loosen the connection by hand.[2]
- If you have a garbage disposal, disconnect it from the sink as well.
Advertisement -
3Remove your drop-in fixture sink. If you have a drop-in fixture sink, use a chisel or putty knife to pry the sink away from the countertop. Chop away at the layer of dried adhesive under the rim of the sink to free it. If the sink is fastened to a tile countertop, chisel away the quarter tiles along the sink's perimeter. Remove any remaining mortar or adhesive with a caulk remover or chisel.[3]
- Get help to lift out the fixture, especially if it's large or heavy.
-
4Pull out the undermount-style sink. If the sink is an undermount type, unfasten the screws holding it to the countertop. While someone supports the sink, remove the brackets underneath the sink. Use a flat chisel to remove the caulk that acts as a seal between the countertop and sink. The sink should come out easily once it is freed from the counter. Have another person help you pull out the sink, particularly if it's an unwieldy double-bowl configuration[4]
- Be careful not to damage a sink or cooktop that you plan to re-install in your new countertop.


Taking off the Countertop
-
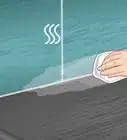
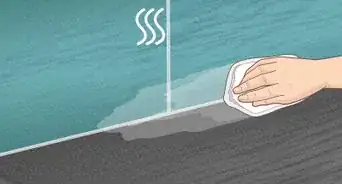
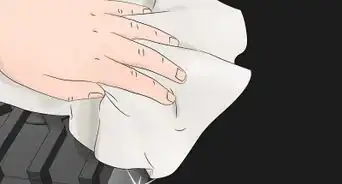
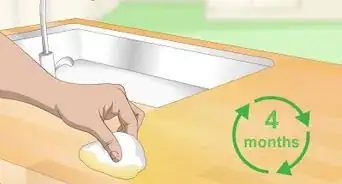
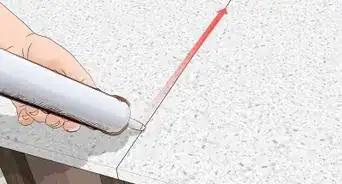
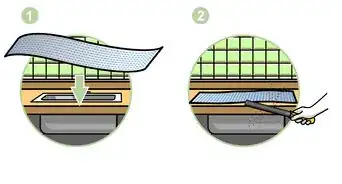
1Loosen the adhesive on countertops with a softener. Most counters are attached with an adhesive. Spray the adhesive with a caulk softener. Let the softener sit for one hour. Then, pry the adhesive away from the backsplash with a putty knife. Simple work the putty knife under the countertop, and work all the way around until the counter is loose enough to lift up.[5]
- Caulk softener can be found at most home improvement stores.
-
2Unfasten the screws from your countertop. Some countertops are held in place with screws that go all the way through to the base cabinets. If this is the case, open up the cabinets and look inside. Locate all of the screws. Use a screwdriver to remove the screws. Then, lift off the countertop.[6]
-
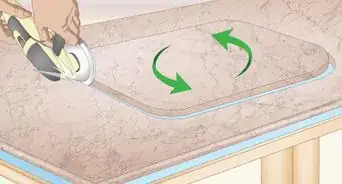
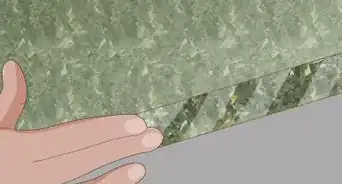
3Use a pry bar to remove the countertops. Most countertops are bracketed to the base cabinets. If the counter is attached to the base cabinet with nails or an adhesive, use a pry bar to remove it. Put the claw of the pry bar under the rim of the counter, and press down on the free end until the countertop begins to lift up. Work slowly around the counter and use only the minimum amount of force needed to remove the adhesive in order to avoid damaging the base cabinets.
- Laminate backsplashes can be removed at this time as well. Use your chisel and a hammer to remove the laminate coating from the backsplash. Underneath, there should be a board screwed into the wall. Use a drill or screwdriver to remove the board.[7] [8]
- Take your time and try to be careful when you're removing the existing countertop so you don't damage the cabinets, backsplash, appliances, or the flooring.[9]
- Be especially careful when you're working around plumbing or gas lines. You don't want to bump the pipe and create a leak. Similarly, use extra caution around electrical outlets or switches.[10]
-
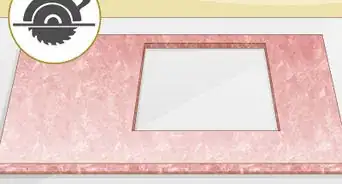
4Remove each tile from a tile countertop. Remove the tile from the surface of the countertop with a flat chisel. This frees the countertop and also reduces its weight, making it much easier to lift out. First, carefully pry the tile running up the backsplash away from the wall. Remove the rounded, bullnose tile along the front of the countertop. Repeat the process on the tile glued to the countertop, slicing between the mortar and wood underlayment. When the tile is removed, go under the counter and use a screwdriver to take off the brackets holding the countertop to the base cabinets. Lift the countertop off.[11]
- Some tile countertops have an underlying layer of wood. After removing the top layer, check to see if there is any wood. If so, use a pry bar to remove the remaining wood.
-
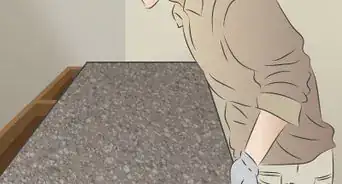
5Call in a professional for a granite countertop. Most natural-stone countertops are heavy, and therefore difficult to remove. They are either attached to particle-board underlayment or epoxied directly onto the base cabinets. The base cabinet can easily be damaged during the procedure. It's usually best to have a contractor do this type of removal.[12]
-
6Check for cracks in the shelves before completing the removal. During the removal process, check for cracks or damage in the shelves. Unless they are being removed as well, you will not want to damage them. It is best to call in a professional to complete the removal if you do see damage.[13]
- Check for any damage to the plywood that supports the countertop, as well. If it's damaged, you'll need to replace it, but if it isn't damaged, you can put the new countertop right on top of it.[14]
-
7Get rid of the countertops. You will likely not want to leave the old countertops laying around. If they are not damaged, you can put try to give away the countertops for free. Or, take the remains of the countertop to the dump.[15]
- You can put an ad on Craigslist for someone to pick up the countertops, but be very careful about giving strangers your information.
- It's also an option to reuse the material as countertops in your garage or laundry room.


Expert Q&A
Did you know you can get expert answers for this article?
Unlock expert answers by supporting wikiHow
-
QuestionWhat should I watch out for when I'm removing the countertop?
 Nick YahoodainNick Yahoodain is a General Contractor and the CEO of Advanced Builders & Contractors in Los Angeles, California. With over 16 years of experience, Nick specializes in large residential projects such as new construction, developments, major renovations, additions, and hillside construction. Advanced Builders & Contractors is a member of the BBB, is licensed by the Contractors State License Board, and is fully bonded and insured. Advanced Builders & Contractors has been featured on NBC News, Elle Decor, Architectural Digest, and Voyage LA.
General ContractorIf you're trying to remove just the countertop, take your time and work very carefully so you don't damage the cabinets, appliances, backsplash, or flooring. You also need to be especially careful around pipes, gas lines, and electrical outlets or switches.
Support wikiHow by unlocking this expert answer.
Warnings
- Work slowly and carefully when removing your old countertop and avoid damaging the backsplash or adjacent cabinets.⧼thumbs_response⧽
- Wear work gloves and protective eyewear when doing any renovation project. This is especially important when you're removing tiles, which can chip and break, or using a power saw.⧼thumbs_response⧽
Things You'll Need
- Adjustable wrench
- Channel locks
- Chisel
- Hammer
- Screwdriver
- Pry bar
- Putty knife
- Reciprocating saw
- Work gloves
- Protective eyewear


References
- ↑ https://www.hunker.com/12608064/how-to-remove-old-countertops-without-damage-the-backsplash
- ↑ http://sweetteaproper.com/2014/03/how-to-remove-laminate-countertops/
- ↑ http://www.easy2diy.com/cm/easy/diy_ht_3d_index.asp?page_id=35743484
- ↑ https://www.youtube.com/watch?v=xLXudPmuwMI
- ↑ https://www.hunker.com/12608064/how-to-remove-old-countertops-without-damage-the-backsplash
- ↑ http://www.easy2diy.com/cm/easy/diy_ht_3d_index.asp?page_id=35743484
- ↑ https://www.charlestoncrafted.com/2017/03/23/remove-old-laminate-countertops-backsplash-without-damaging-cabinets/
- ↑ http://www.easy2diy.com/cm/easy/diy_ht_3d_index.asp?page_id=35743484
- ↑ Nick Yahoodain. General Contractor. Expert Interview. 6 October 2020.
- ↑ Nick Yahoodain. General Contractor. Expert Interview. 6 October 2020.
- ↑ http://www.easy2diy.com/cm/easy/diy_ht_3d_index.asp?page_id=35743484
- ↑ http://www.easy2diy.com/cm/easy/diy_ht_3d_index.asp?page_id=35743484
- ↑ https://www.hunker.com/12298580/how-to-remove-a-glued-on-countertop
- ↑ Nick Yahoodain. General Contractor. Expert Interview. 6 October 2020.
- ↑ http://sweetteaproper.com/2014/03/how-to-remove-laminate-countertops/
About This Article

After you've disconnected your fixtures and lines around your countertop, start removing it by spraying the adhesive holding it in place with a cork softener. Then, leave it to sit for 1 hour before using a putty knife to pry the adhesive away. If your countertop is attached with screws, open up the cabinets and pull the screws out. To lift the countertop, place a pry bar under the rim of the counter and pull down slowly on the other end until the counter lifts. If your counter is tiled, remove the tiles with a chisel to lighten the counter before trying to lift it with the pry bar. For tips on how to properly dispose of your countertop, keep reading the article!