This article was co-authored by Chad Zani. Chad Zani is the Director of Franchising at Detail Garage, an automotive detailing company with locations around the U.S. and Sweden. Chad is based in the Los Angeles, California area and uses his passion for auto detailing to teach others how to do so as he grows his company nationwide.
wikiHow marks an article as reader-approved once it receives enough positive feedback. In this case, 100% of readers who voted found the article helpful, earning it our reader-approved status.
This article has been viewed 2,091,527 times.
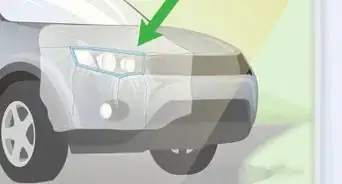
Over time, the headlights on your car may become cloudy due to oxidation.[1] This can cause your headlights to become dim, which can be dangerous. Luckily, it’s easy to restore your headlights yourself with a headlight cleaner!
Steps
Using a Glass Cleaning Solution
-
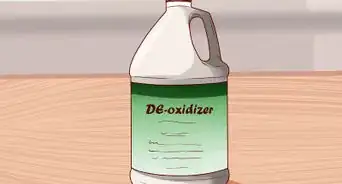
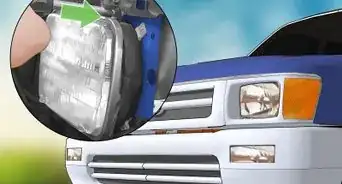
1Determine whether the damage to the lens is on the outside or on the inside (if inside you may notice moisture,[2] and you may need to remove the lens, if possible and/or drain and dry it). Before trying any of these steps, try a "Headlight Deoxidizer" which will save time and is non-abrasive. Some of these steps may be unnecessary depending upon the damage or oxidation of your headlight lenses.[3] Some headlights will require more work and some may be so bad that replacement is a better option.
-
2Try cleaning the lens with a glass cleaning solution like Windex if damage is on the outside of the lens. You can also use a watered-down degreaser to clean the headlight lenses.Advertisement
-
3Follow this with a car polish or plastic polish available anywhere. Use a microfiber pad to polish the headlights.
-
4Follow directions on the polish bottle and do not apply in sunlight. Be sure not to get it on black, rubberized plastic parts as it will make a white film that is hard to remove.
-
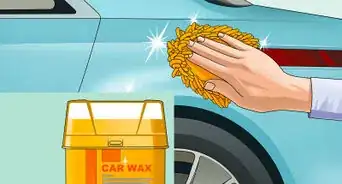
5Use a rotary buffer to make this process faster and obtain better results. To make this repair last longer seal with car wax or silicone sealer.


Using Masking Tape
-
1Get a lens repair kit. Easy-to-use kits like the lens repair kit from 3M are available at local automotive retailers. Tape, sandpaper, lens polish and directions are included, and there's an online video that shows you how to do it.
-
2Mask around the headlight. Protect your car's finish with masking or painting tape. Don't use duct tape as it can ruin or lift the paint off your car.[4]
-
3Clean the headlight lens.
- You can use sandpaper, but remember sandpaper scratches. If your lens has heavy/severe discoloration with apparent scratches/imperfections, this requires a rougher grit sandpaper, like the 600 grit. If the headlight lens has light discoloration with no apparent scratches, start with at 2500 grit. Whichever grit you use, you want to wet the sandpaper in a bucket or cup of soapy water.[5]
- Wet the rag with a commercial plastic lens cleaner or degreaser. Make sure you wet the rag instead of spraying the headlight; this keeps the spray from getting on the paint. Wash the lens with a clean rag or a shop towel.
-
4Remove oxidation.
- Dip one finger into a plastic polish or a compound designed for plastic. With the lens still wet, apply the polish evenly over the entire headlight.
- Grab a sanding sponge or a soft hand pad and take out the starting sandpaper which you decided earlier, in most cases, the 600 grit sandpaper.
- Fold the sandpaper in three around the Soft Hand Pad Or Sanding Sponge.
- Dip the sponge and sandpaper into the soapy water.
- Sand, using a side to side motion, applying even pressure, periodically wetting the sponge and the sandpaper in the soapy water. (Avoid contacting paint and other surrounding surfaces.)
-
5Sand while keeping the surface wet.
- Continue the sanding process using a 1200 grit paper, then even finer 2000 grit and finally 2500 grit sandpaper to remove scratches left by the previous grit.
- Apply the plastic polish/ compound after sanding with the 2500-grit sandpaper. This time, let it haze, then buff/wipe off with a shop towel.
- Clean the lens with a plastic lens cleaner or soap and water. This is to remove any polish residue.
-
6Apply wax (protectant) to the headlight lens when the lens is clear. If you are not satisfied with the clarity of the lens, repeat Steps 1 – 5 until the lens is clear.[6]
- Seal the lens with wax or silicone sealer.
- Fold a shop towel into four and squeeze a quarter-sized amount of wax or polish onto it and let it soak in for a few seconds.
- Apply to the lens using a single stroke going from left to right gradually working your way down the entire lens.
-
7Check for clean headlights. Remove the masking tape. The headlight repair is complete and you should now have clean headlights that look as good as new and restored optical clarity for safe night driving.


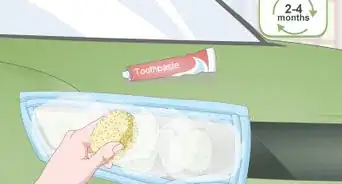
Using Toothpaste
-
1Try any toothpaste, including a gel type; wear rubber gloves. Almost any kind — especially whitening ones — have an abrasive such as silica, other fine grit or soda.[7]
-
2Wash your headlight lenses to clean of grit and road film.
-
3Avoid getting any of the cleaner or polish on paint, chrome, plastic or rubber.
- Be careful and consider masking tape and plastic sheet over the other surfaces to be protected.
-
4Rub on dabs (not great gobs) of toothpaste with a dampened soft cloth or towel to the cool lens, rubbing in a circular motion in part of the headlight that needs it. Remember to work on the edges if dulled or scratched.
-
5Add toothpaste as needed. Use enough paste and enough pressure to rub out the scratches; so, don’t rub too lightly. As you work you will notice the plastic getting clearer.
-
6Increase the amount of water to toothpaste and cloth, as it begins to appear better. For each headlight you need to spend about 3, 4 or 5 minutes.
-
7Notice if it seems about as clear as it will get; stop rubbing, wash off and rinse with clean water and dry with a paper towel, or cloth.
-
8Wax or polish to seal the plastic, protecting and making it glossy.


Community Q&A
-
QuestionCan I use bug/tar remover on headlights?
 Blues.Guitar.Lessons. .Jim.BruceCommunity AnswerIt's best not to use tar remover, as these products are designed for the much more durable car body finishes. Most headlights are made of polycarbonate plastic, which tends to oxidize and go cloudy. Toothpaste cleans away tiny objects and insects stuck onto the surface while gently polishing the plastic.
 -
QuestionI used Wipe New and my one headlight seems streaky. Can I redo the process?
 Community AnswerYes. After doing my first headlight I had a better grasp of what I was doing and the second came out great, so I went back and redid the first one.
 -
QuestionHow do I clean moisture on the inside of the lens cover?
 Jared GossCommunity AnswerIf you have moisture on the inside of your lens, the whole light assembly will need to be replaced. That means that the seal around the lens to the housing is not good any more. There is no good way to reseal it.
Things You'll Need
Using a Glass Cleaning Solution
- Clean rag or towel
- Bucket of soapy water
- Spray bottle (optional)
- Clean water
- Latex gloves
Using Masking Tape
- Lens repair kit
- Masking tape
- A plastic lens cleaner or soap and water
- A polish/compound--preferably plastic polish designed for plastic
- At least four grades of wet/dry finishing paper: 600, 1200, 2000, & 2500 grit
- Water
- High quality shop towels
- Car wax or similar compound
Using Toothpaste
- Toothpaste
- Soft paper towels or cloth
- Clear water
- Latex, rubber or vinyl gloves
- Car wax or silicone (furniture) polish


-Step-27.webp)
References
- ↑ https://glassdoctor.com/blog/why-your-headlights-get-foggy
- ↑ https://glassdoctor.com/blog/why-your-headlights-get-foggy
- ↑ https://www.consumerreports.org/cro/headlight-restoration-kits/buying-guide/index.htm
- ↑ https://www.popularmechanics.com/cars/how-to/a10346/how-to-make-your-headlights-shine-like-new-16649941/
- ↑ https://www.familyhandyman.com/automotive/car-maintenance/restore-and-polish-auto-headlights/
- ↑ https://www.popularmechanics.com/cars/how-to/a10346/how-to-make-your-headlights-shine-like-new-16649941/
- ↑ https://glassdoctor.com/blog/why-your-headlights-get-foggy
- Videos provided by AMMO NYC
About This Article

Before you clean your headlights, protect the paint around the lights with masking tape. Dab a small amount of toothpaste onto a damp, soft cloth, then use the cloth to scrub the headlight in a circular motion. Add more toothpaste to the cloth as needed, taking care not to get toothpaste on the car's paint. When the headlight appears clear, rinse the toothpaste off of the headlight and dry it with a paper towel or a cloth, then apply wax or polish to seal the plastic. Keep reading to learn how to clean your headlights with a lens repair kit!