This article was co-authored by Charlie Payne. Charlie Payne is an Auto Repair Expert and the Owner & Operator of Perfect Reflections Auto Body. With over 21 years of experience, he specializes in auto restorations and collision repairs. Charlie is PPG and DuPont certified and earned a Bachelor's Degree from Liberty University.
There are 8 references cited in this article, which can be found at the bottom of the page.
This article has been viewed 11,818 times.
Over time, plastic headlights can become hazy and yellowish as UV rays gradually weaken the protective film that coats them. Luckily, making them look like new again is a fairly easy process. After cleaning them with car soap and water, you'll need to sand them with wet sandpaper, polish them, and then apply a coat of wax. Once they’re all clean, you can add a layer of UV sealant to keep them looking like new. You can make the job even easier by buying a headlight restoration kit for around $20 or so– these contain all the supplies you'll need to get your headlights squeaky clean!
Steps
Washing Your Headlights
-
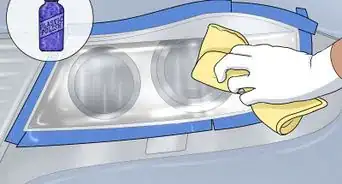
1Clean your headlights with car soap and water. Mix the car soap and water in a large plastic bucket. Then, soak a clean, lint-free cloth in the bucket of soapy suds, and thoroughly wipe the headlights and the area immediately surrounding them until they’re clean.[1]
- You can find car soap at your local automotive supply store or online.
-
2Rinse soapy suds off your car with clean water. Spray the headlights and the area surrounding them with clean water from a garden hose. Or, if you don’t have access to a hose, you can fill another bucket with clean water and then dump the water onto the area you cleaned.[2]Advertisement
-
3Dry the area you washed with a clean, lint-free towel. Drying the area you washed with a towel immediately after washing it, instead of letting it air dry, will help prevent water spots from appearing. Make sure the area is completely dry before moving on to the next step.[3]


Sanding Your Headlights
-
1Surround your headlights with painter’s tape to prepare them for sanding. If your plastic headlight lenses are hazy or yellowish, you can make them clear again by sanding them. Surrounding the headlights with painter’s tape before you start will help prevent you from accidentally sanding paint off the areas surrounding the headlights.[4]
- The wider the painter’s tape you use, the better, since it will protect a larger area.
- You can purchase painter’s tape at your local home improvement store.
-
2Begin sanding the surface of the headlights with wet 1000-grit sandpaper. Use a spray bottle to get the surface of the headlight and the sandpaper wet with water. Then, start to sand the surface of the headlight in horizontal strokes. Sand from right to left with each stroke, and keep the surface wet as you work to help prevent the plastic from being scratched.[5]
- You’ll want to spend anywhere from 3-10 minutes on each headlight. There's no need to keep sanding them back and forth infinitely.
- If your headlights are very hazy or yellowed, you may want to consider starting with a more abrasive sandpaper, like 600 grit.[6]
-
3Continue sanding your headlights with 2000-grit sandpaper. Instead of sanding horizontally, as you did with the 1000-grit sandpaper, sand in diagonal strokes. Spray the surface of the headlight and sandpaper with water periodically to keep them wet. Sand in the same direction.[7]
- Spend 5-10 minutes sanding each headlight with this finer grit of sandpaper.
-
4Finish sanding your headlights with 3000-grit sandpaper. Repeat the process in the previous step, only sand in the opposite diagonal direction. If you sanded from the upper right-hand corner to the bottom left-hand corner in the previous step, for instance, sand from the upper left-hand corner to the bottom right corner.[8]
- Switching the direction in which you sand will help give your headlight a clearer, more even finish.
-
5Wash your headlights with water when you finish sanding them. Wipe your headlights thoroughly with a wet cloth to remove all particles. Then, dry the surface with a dry towel.[9]


Putting on the Finishing Touches
-
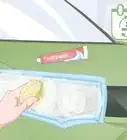
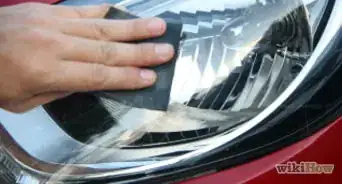
1Rub some polishing compound onto your headlights with a microfiber towel. Apply a dab of polishing compound to a clean microfiber towel. Then, use circular motions to rub the polish onto the entire surface of your headlight. Use enough compound to coat the entire surface of your headlights with a thin, even layer.[10]
- Applying a polishing compound in this way will help make your headlights clear again.
- Repeat the polishing process if parts of your headlight aren’t as clear and smooth as you’d like.
-
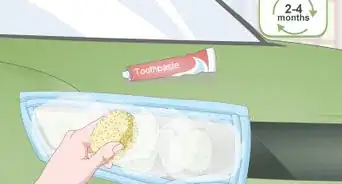
2Apply wax paste to the headlights once they’re clear for added protection. Apply a quarter-sized dollop of wax to a microfiber towel, and spread it evenly across the headlight’s surface.[11]
- You can find wax paste at your local automotive supply shop.
-
3Cover the area surrounding the headlights with paper or plastic. Before you spray UV sealant on your headlights, you’ll want to protect the surrounding area. You can cut up paper grocery bags and tape them down on your car’s surface with painter’s tape. Cover an area around a 1 foot (0.30 m) from the edge of the headlight.[12]
-
4Spray on a coat of UV sealant to prevent your headlights from hazing over. Position the nozzle of the spray container 4–5 inches (10–13 cm) from the surface of the headlight. Then, spray a light coat of UV sealant over every part of the headlight.[13]
- Be sure to closely read and follow the instructions printed on the specific container of UV sealant you’re using, as application processes may vary.
-
5Keep your headlights in direct sunlight for 10 minutes. Leaving the headlights in direct sunlight after you apply the UV sealant will give the sealant time to dry and bond with the surface of your headlights. Alternatively, you can shine a UV light on the headlight for 90 seconds or so.[14]


Things You’ll Need
- Headlight restoration kit (optional)
- Car soap
- Water
- Bucket
- Two clean towels
- Painter’s tape
- Wet/dry sandpaper (1000, 2000, and 3000 grit)
- Polishing compound
- Microfiber towel
- Wax paste
- Paper towel
- UV sealant


-Step-27.webp)
References
- ↑ https://youtu.be/z2ZRKPshPVM?t=45
- ↑ https://www.popularmechanics.com/cars/how-to/a10346/how-to-make-your-headlights-shine-like-new-16649941/
- ↑ https://www.popularmechanics.com/cars/how-to/a10346/how-to-make-your-headlights-shine-like-new-16649941/
- ↑ https://www.popularmechanics.com/cars/how-to/a10346/how-to-make-your-headlights-shine-like-new-16649941/
- ↑ https://www.popularmechanics.com/cars/how-to/a10346/how-to-make-your-headlights-shine-like-new-16649941/
- ↑ https://youtu.be/rknmxBb-qAE?t=20
- ↑ https://www.popularmechanics.com/cars/how-to/a10346/how-to-make-your-headlights-shine-like-new-16649941/
- ↑ https://www.popularmechanics.com/cars/how-to/a10346/how-to-make-your-headlights-shine-like-new-16649941/
- ↑ https://www.familyhandyman.com/automotive/car-maintenance/restore-and-polish-auto-headlights/
- ↑ https://www.familyhandyman.com/automotive/car-maintenance/restore-and-polish-auto-headlights/
- ↑ https://www.popularmechanics.com/cars/how-to/a10346/how-to-make-your-headlights-shine-like-new-16649941/
- ↑ https://youtu.be/rknmxBb-qAE?t=57
- ↑ https://youtu.be/rknmxBb-qAE?t=58
- ↑ https://youtu.be/rknmxBb-qAE?t=80