This article was co-authored by Audra Fordin. Audra Fordin is a Certified Automotive Technician, the Founder of Women Auto Know, and the Owner of Great Bear Auto Repair in Flushing, New York. With more than 38 years of experience, she has intensive knowledge about foreign and domestic auto repairs. Audra has been featured on numerous news and talk shows such as The Today Show, Inside Edition, and Anderson Cooper.
There are 10 references cited in this article, which can be found at the bottom of the page.
wikiHow marks an article as reader-approved once it receives enough positive feedback. In this case, 93% of readers who voted found the article helpful, earning it our reader-approved status.
This article has been viewed 116,466 times.
You might not know it, but toothpaste is good for cleaning other things besides teeth. In fact, if your vehicle’s headlights are starting to look a little foggy, one of the simplest solutions is to polish the plastic outer covers using a dab of ordinary toothpaste and a soft cloth or brush. In just a few minutes, the gentle abrasives in the toothpaste will help remove dust, dirt, grime, and light-dimming oxidation, making your headlights shine brighter and clearer.
Steps
Washing and Taping off Your Headlights
-
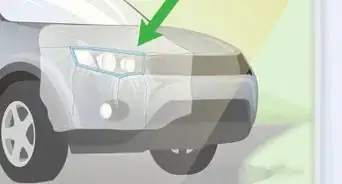
1Wash the headlights thoroughly with glass cleaner or soapy water. Spray your cleaner of choice liberally onto both headlights. Then, use a microfiber cloth or soft automobile sponge to wipe away as much dust, dirt, and stuck-on debris as possible.[1]
- Giving your headlights a quick preliminary wipedown will get rid of the worst of the mess, allowing the toothpaste to work more effectively on what’s left.
-
2Dry the headlights using an absorbent towel or chamois. Once your headlights are clean, dab them with your towel or chamois to soak up any standing streaks or droplets of moisture. Be sure to dry off the edges of the covers, as well.[2]
- If you’re using a towel, make sure it’s of the lint-free variety. Otherwise, you could end up leaving behind small fibers, which can easily become stuck on the headlight covers.
- Alternatively, you can apply the toothpaste while the headlights are still wet to produce a bubbly lather similar to soap.[3]
Advertisement -
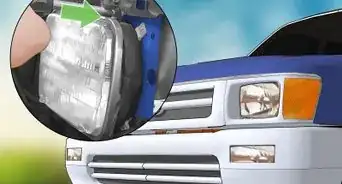
3Tape off the area around your headlights. Stick strips of automotive masking tape or painter’s tape over the paint at the top, bottom, and sides of both lights. Afterwards, inspect your work closely to make sure that there’s no exposed paint visible near the portion of the lights you’ll be cleaning.[4]
- The gritty toothpaste, combined with the pressure of polishing, could potentially damage any paint that’s not covered with tape.[5]
Warning: Avoid any type of tape stronger than painter’s tape. Duct, electrical, and other high-strength tapes could leave behind unsightly adhesive residue, or even strip small amounts of paint from your vehicle when you peel them off.


Polishing Your Headlights
-
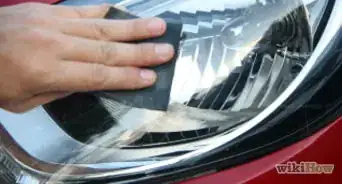
1Apply a dime-sized blob of toothpaste to each headlight. Squeeze the toothpaste directly onto the center of the plastic covers, or apply it to the cloth or sponge you’ll be using to do your polishing. Spread the toothpaste outwards in widening circles until it covers the entire surface of the headlights.[6]
- Try not to smear the toothpaste on too thick—it’s best to start with a small amount and add more later as needed.
- It’s important to use an ordinary type of toothpaste rather than a gel. Gel toothpastes don’t contain abrasives, which are what is actually responsible for chipping away at the dingy layer of oxidation making the lights appear foggy.[7]
Tip: For even more scrubbing power, equip yourself with a toothpaste that contains baking soda.
-
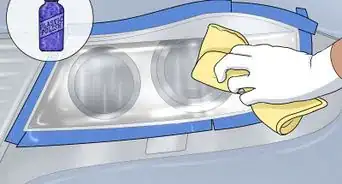
2Polish the headlights vigorously using a microfiber cloth or sponge. Scrub every inch of the covers from top to bottom, moving your cloth or sponge in tight, circular motions to wear down stubborn buildup.[8] You should notice even the heaviest gunk and grime begin to disappear within seconds.[9]
- If your headlights don’t look any cleaner after your first few passes, switch to a soft-bristled brush to increase your coverage and really work the toothpaste into the plastic.[10] An old toothbrush is perfectly suited for the task (who would’ve thought?).[11]
- Getting your headlights looking like-new may require a little bit of elbow grease. Take your time, and don’t be afraid to really dig in.
-
3Rinse both headlights with warm water. Spray the lights with a hose or spray bottle, or douse them with water from a bucket or similar container if you don’t have either of the aforementioned tools. Continue rinsing until the water runs clear to ensure that you’ve flushed away every last trace of toothpaste.[12]
- Don’t forget to remove the tape from around your headlights when you’re finished.
- Any toothpaste you miss will dry to a cloudy film, leaving you right back where you started.


Applying a Sealant
-
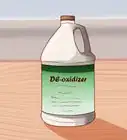
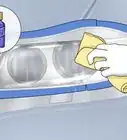
1Apply a coat of UV-resistant sealant to shield your headlights from the sun. Wet a folded paper towel with the sealant solution and wipe it onto both headlight covers. Use long, sweeping strokes and aim for full coverage. Unless otherwise specified, apply only a single coat of sealant.[13]
- You can pick up a bottle of UV-resistant headlight sealant for just a few dollars at any automotive supply store, as well as most supercenters, gas stations, and convenience stores.
- A good UV sealant will slow the formation of oxidation on your headlight covers as a result of exposure to the sun’s rays.
Tip: It's always a good idea to follow the instructions for the specific product you’re using to guarantee that you get the desired results.
-
2Allow the sealant to cure in the sun for 10-45 minutes. Park your vehicle someplace outdoors where it can receive direct or partial sunlight. Most headlight sealants dry to the touch in a few minutes and cure to full strength within about half an hour. Exact cure times can vary somewhat, however, depending on humidity levels and the amount of sunlight available.[14]
- If you happen to have a UV lamp, you can speed up the process by shining it directly on your headlights for 10-15 minutes, or until they’re completely dry.[15]
- Hold off on washing your vehicle for at least 8 hours after applying headlight sealant.
-
3Repeat the process every 2-4 months, or as needed. Using toothpaste to polish your car’s headlights is a great way to restore their original shine, but it’s not a permanent fix. In order to ensure that they stay bright and clear and provide maximum visibility, you’ll want to get in the habit of cleaning and sealing them every couple of months.
- You may need to up the frequency of your cleanings if you do a lot of driving.


Expert Q&A
-
QuestionCan you use Coke to clean headlights?
 Audra FordinAudra Fordin is a Certified Automotive Technician, the Founder of Women Auto Know, and the Owner of Great Bear Auto Repair in Flushing, New York. With more than 38 years of experience, she has intensive knowledge about foreign and domestic auto repairs. Audra has been featured on numerous news and talk shows such as The Today Show, Inside Edition, and Anderson Cooper.
Certified Automotive TechnicianYou can, but it's not very effective. You're better off using a professional product, like a headlight polish. -
QuestionDoes toothpaste really clean car headlights?Audra FordinAudra Fordin is a Certified Automotive Technician, the Founder of Women Auto Know, and the Owner of Great Bear Auto Repair in Flushing, New York. With more than 38 years of experience, she has intensive knowledge about foreign and domestic auto repairs. Audra has been featured on numerous news and talk shows such as The Today Show, Inside Edition, and Anderson Cooper.
Certified Automotive TechnicianIt can, but it requires a lot of elbow grease. You really need to scrub, scrub, scrub the surface if you want to remove the film from your headlights. -
QuestionHow long do I leave the toothpaste on there after I scrubbed it in before wiping it off?
 Community AnswerKeep it on for around two minutes then wipe it off.
Warnings
- Steer clear of toothpastes containing flavor crystals, deep-cleaning beads, or other add-ins. Oversized abrasives can scratch the plastic surface of your headlight covers, causing them to show dirt more plainly and making them harder to clean in the future.⧼thumbs_response⧽
Things You’ll Need
- Glass cleaner or soapy water
- Microfiber cloth or soft automobile sponge
- Lint-free towel or chamois
- Automotive masking tape or painter’s tape
- Regular non-gel toothpaste
- Garden hose or spray bottle
- Bucket or similar large container (optional)
- Toothbrush or similar soft-bristled brush (optional)
- UV-resistant headlight sealant
- Paper towel
- UV lamp (optional)


-Step-27.webp)
References
- ↑ https://www.today.com/home/foggy-headlights-here-s-x-easy-ways-clean-them-t141713
- ↑ https://www.thevehiclelab.com/best-way-to-dry-car/
- ↑ https://www.today.com/home/foggy-headlights-here-s-x-easy-ways-clean-them-t141713
- ↑ https://www.popularmechanics.com/cars/how-to/a10346/how-to-make-your-headlights-shine-like-new-16649941/
- ↑ Audra Fordin. Certified Automotive Technician. Expert Interview. 13 January 2022.
- ↑ https://www.themanual.com/auto/how-to-clean-foggy-headlights/
- ↑ https://www.williamsonperio.com/wp-content/uploads/2014/07/Toothpaste-Abrasiveness-Ranked-by-RDA.pdf
- ↑ Audra Fordin. Certified Automotive Technician. Expert Interview. 13 January 2022.
- ↑ https://www.youtube.com/watch?v=RQj6xdlbUsY&feature=youtu.be&t=84
- ↑ Audra Fordin. Certified Automotive Technician. Expert Interview. 13 January 2022.
- ↑ https://www.youtube.com/watch?v=rXHTXdlWw1w&feature=youtu.be&t=79
- ↑ https://www.themanual.com/auto/how-to-clean-foggy-headlights/
- ↑ https://www.popularmechanics.com/cars/how-to/a10346/how-to-make-your-headlights-shine-like-new-16649941/
- ↑ http://www.prestaproducts.com/images/MediaGallery/Headlight%20Sealant%20Tech%20Sheet%20Revised%20Rev8%20041313.pdf
- ↑ https://www.youtube.com/watch?v=aDajJmjB9Q4&feature=youtu.be&t=110
About This Article
To clean headlights with toothpaste, start by wiping away as much dust, dirt, and stuck-on debris as possible. Once the surface is clean, tape off the area around the headlights with strips of automotive masking tape or painter’s tape to protect the paint from the toothpaste's gritty texture. Then, apply a dime-sized blob of toothpaste to a microfiber cloth or sponge and spread a thin layer over the surface of the headlights. Polish the headlights from top to bottom, using tight, circular motions. Once you're happy with the results, rinse both headlights with warm water and remove the tape. For tips on applying a sealant after polishing the headlights, read on!


Medical Disclaimer
The content of this article is not intended to be a substitute for professional medical advice, examination, diagnosis, or treatment. You should always contact your doctor or other qualified healthcare professional before starting, changing, or stopping any kind of health treatment.
Read More...