This article was co-authored by Aaron Beth. Aaron Beth is the founder of Aaron’s Refrigeration Company in New York City and a factory certified installer (FCI) for Sub-Zero products. He specializes in the service and maintenance of built-in refrigerators, wine coolers and ice machines. With over 54 years of experience, Aaron is the recipient of numerous Super-Service awards from Angie’s Lists and 2019 Best-of-the City.
There are 9 references cited in this article, which can be found at the bottom of the page.
wikiHow marks an article as reader-approved once it receives enough positive feedback. This article received 22 testimonials and 92% of readers who voted found it helpful, earning it our reader-approved status.
This article has been viewed 831,722 times.
A faulty or leaking refrigerator door wastes energy, increases your energy bill, and stresses your refrigerator, shortening its life. You also risk spoiling your food. Changing the door seal (often called a gasket) may be necessary, but it's not that difficult of a process.
Steps
Assessing the Refrigerator Door Seal
-
1Understand what a gasket or door seal is. Every refrigerator has one. This is a gasket (or seal) that is made out of molded rubber.
- The function of the gasket is to keep cold in and to keep heat out of the refrigerator. Essentially, it seals the colder air in, and prevents air outside the refrigerator from seeping in.
- The reason this matters is because a bad or worn seal will allow cold air to leave the refrigerator, and warm air to enter it. This means that temperatures in the refrigerator could increase, causing the food inside it to spoil more quickly. It will also cost you more money in energy.
-
2Determine whether you need to replace the door seal after all. If there are gaps between the gasket on the door and the refrigerator gasket, it’s not sealing correctly.[1]
- One way to tell that you need a new gasket is if your refrigerator seems to be running more frequently, or you just think it seems like it’s losing cold air. You could also inspect the door gasket for condensation or blackish mold. If you see either of those things, you probably need a new gasket because the cold air is making the water in the warm air condense. If you see cracks or thinning of the gasket, it’s also probably time for a new one.
- You could also test the gasket with a dollar bill. Put the dollar bill between the refrigerator door and refrigerator, and close the door on it. Then, try to pull it out slowly. If you feel it drag slightly, your gasket doesn’t need replacing. If it slips out quickly or has moisture on it or mold, get a new gasket.
- You will need to do one of two things: repair the gaps in the gasket or replace it altogether. Replacing a faulty seal will save you money by not wasting energy. It’s not very expensive to buy a new gasket. It just costs about $50 to $75, and it should only take about 30 minutes to replace. You will save energy, so it will pay for itself fast.[2]
Advertisement -
3Consider repairing the gasket if it’s possible. *Close the refrigerator door and look at the gaps. Inspect them. How big are they and where are they?
- Use petroleum jelly on the gasket to fix small gaps. Simply pull the gasket away from the channel to expose a couple of inches (.05 meter) in the door corner. Cut small strips of weather stripping. Pack the corner with it by placing it along the channel of the door gasket.
- Push the gasket back in the channel. Repeat the process, and pack other corners if you think that’s needed.
- Close the refrigerator door again and look for gaps again. If this didn’t work, and you still see gaps, you will need to replace the seal.


Buying and Preparing the New Door Seal
-
1Research the right gasket to buy. This will depend on the type of refrigerator you have, and what its model and identification information says.[3]
- Check the owner’s manual. If you can’t find your owner’s manual, go online and research what it says.
- Go to a hardware store or manufacturer service center, and tell them the refrigerator information. Store personnel should be able to help you find the right gasket. Check the door seal size. Measure your door.
- You could also research the gasket on the website of the manufacturer. Be aware that if the door liner beneath the seal is cracked, you will need a new liner as well as seal (gasket).
-
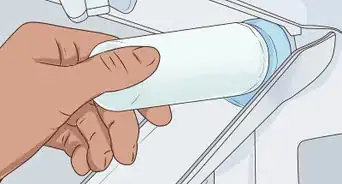
2Prepare the new gasket while you’re removing the old one. It’s a good idea to put the new gasket in warm water for a few moments before installing it. Before you remove the old one, shut off the power to the refrigerator.[4]
- This process will make it easier for you to install the new gasket. You also might find it easier to level the refrigerator if it seems off balance. Some people even remove the refrigerator door to install the gasket, but this is not mandatory.[5]
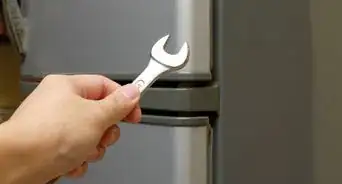
- You won’t need a lot of equipment, but you will need what is called a hex head screwdriver. You can find these at most hardware stores. If you are confused what it is, just ask a salesperson and tell him or her the purpose. You should turn the screwdriver counter-clockwise.[6]


Replacing the Refrigerator Door Seal
-
1Remove the gasket from the refrigerator door. Grab the bottom of it on the inside, and pull the gasket back. You want to be able to see the metal gasket retainer.[7]
-
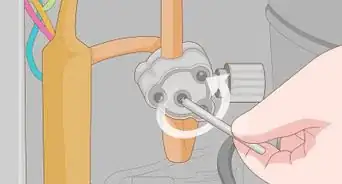
2Loosen, but do not remove, the screws that hold the metal retainer around the entire door. You should use the hex head nut screwdriver to do this. Lift the edges of the seal to find the screws underneath that are holding in the plastic liner and door seal. Often, the screws hold in a plastic liner, which in turn clamps the door seal to the door.
-
3Pull the gasket out of the door to remove it once you have loosened the retainer screws. Once all of the screws are loose, the door seal should easily slide out from behind the plastic liner. Don't be too forceful when doing this step, since some plastic liners can be quite brittle and crumble if you are too rough. [8]
-
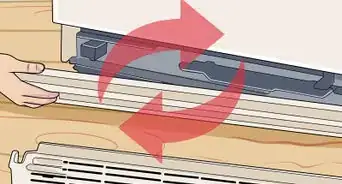
4Take the new gasket, and install it. Position one of its corners on the top of the refrigerator door. Push the lip of the new gasket over the metal retainer, and slide it behind the metal retainer and around the entire perimeter of the refrigerator door. The best method is to start in the top corners, and work your way around the door.
-
5Use the hex head driver to screw the metal retainer in. You don’t want to tighten the gasket retainer screws all the way. You want them to be snug.
-
6Apply powder. Use a bit of baby powder or talcum powder to prevent sticking.
-
7Rub some powder around the hinge side corners of the door seal and where the seal slides. This will help to prevent the door seal from twisting as it meets the metal of the fridge.
-
8If this still doesn't prevent twisting, then wedge a screwdriver under the seal as you close the door, and leave it shut for an hour.
-
9Close the refrigerator door, and open it several times to inspect the gasket. You are looking for any warped areas of the gasket. Repeat this process several times.
-
10Rub petroleum jelly along the hinged side of the door if you see some gaps. Once the gasket looks like it is properly fitted, tighten the screws more. Alternatively, you can heat the door seal up with a hair dryer to fix the gaps. This softens the door seal and allows you to stretch it.


Expert Q&A
Did you know you can get expert answers for this article?
Unlock expert answers by supporting wikiHow
-
QuestionCan you fix the seal on a refrigerator?
 Aaron BethAaron Beth is the founder of Aaron’s Refrigeration Company in New York City and a factory certified installer (FCI) for Sub-Zero products. He specializes in the service and maintenance of built-in refrigerators, wine coolers and ice machines. With over 54 years of experience, Aaron is the recipient of numerous Super-Service awards from Angie’s Lists and 2019 Best-of-the City.
Appliance TechnicianMost seals are made out of vinyl, so when they split or tear, it's difficult to repair. It's best to just replace the seal if you can.
Support wikiHow by unlocking this expert answer.
-
QuestionWhere can I shop for a door seal for my fridge?
 Community AnswerCheck at any appliance parts store. You will need the make and model number of your unit. The ID tag is usually inside the door or on the back of the unit.
 -
QuestionHow do I put a strip on the gasket on my fridge?
 Community AnswerIt depends on the brand you have. Some fridges, like Westinghouse, use screw seals.
Things You'll Need
- Appropriate screw or nut driver
- Replacement seal
- Baby or talcum powder and petroleum jelly
- Flashlight


References
- ↑ http://homeguides.sfgate.com/fix-gaps-refrigerator-door-gasket-43724.html
- ↑ http://www.familyhandyman.com/appliance-repair/refrigerator-repair/how-to-replace-a-refrigerator-door-gasket/view-all
- ↑ Aaron Beth. Appliance Technician. Expert Interview. 14 July 2020.
- ↑ http://www.searspartsdirect.com/repair-guide/refrigerator/how-to-replace-a-refrigerator-door-gasket.html
- ↑ http://www.thomasnet.com/articles/hardware/refrigerator-gasket-replacement
- ↑ http://www.sears.com/shc/s/t_10153_12605?tName=hex-head-screwdriver.html
- ↑ https://www.youtube.com/watch?v=HoT8IdrpWL8
- ↑ http://videos.hgtv.com/video/replacing-a-gasket-on-a-fridge-61375
- Videos provided by RepairClinic.com
About This Article

To replace the seal on your refrigerator door, start by submerging the new gasket in warm water so that it’s softer and more pliable. Then, remove the old gasket by lifting the edge up and turning the screws underneath. Once you’ve loosened the screws, pull off the old gasket and dispose of it. Next, take the new gasket out of the water and put it on the refrigerator door, pushing the lip over the metal retainer that holds the screws. Finally, tighten the screws in the retainer to secure the gasket. Read on to learn how to fix any gaps in the seal with petroleum jelly!