This article was co-authored by Aaron Beth and by wikiHow staff writer, Christopher M. Osborne, PhD. Aaron Beth is the founder of Aaron’s Refrigeration Company in New York City and a factory certified installer (FCI) for Sub-Zero products. He specializes in the service and maintenance of built-in refrigerators, wine coolers and ice machines. With over 54 years of experience, Aaron is the recipient of numerous Super-Service awards from Angie’s Lists and 2019 Best-of-the City.
This article has been viewed 549,833 times.
A refrigerator that’s leaking water won’t work as efficiently as it should, may not keep your food safely chilled, and can cause expensive water damage to the flooring and structure beneath the appliance. Luckily, there are several DIY fixes you can try before calling in a repair technician. Start by checking the drain pan under the appliance, then move on to confirm that the fridge is properly leveled. After that, try flushing out the drain line with hot water if needed. If the problem still isn’t fixed, unplug and pull out the fridge to inspect the drain and supply lines. At this point, either attempt repairs yourself (if you’re confident in your abilities) or call in a pro.
Steps
Replacing a Bad Drain Pan
-
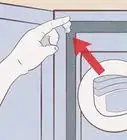
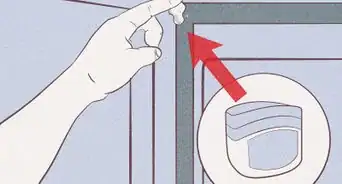
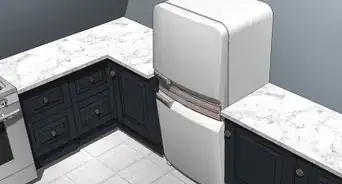
1Pull off the grille at the bottom of the refrigerator. In most cases, you can simply pull straight out to remove the grille. Some refrigerators, though, use 2-4 screws to hold the grille in place. In this case, use a screwdriver.[1]
- Consult the product manual if you’re having trouble removing the grille.
-
2Slide out and inspect the drain pan. The pan is generally square or rectangular in shape and somewhere around 10 × 10 × 2 in (25.4 × 25.4 × 5.1 cm) in size. Slowly slide it straight out from under the fridge, as it likely has some water in it. Look for any cracks, holes, warping, or other signs of damage.[2]
- The drain pan collects condensate from the freezer compartment of the appliance. When the fridge is operating properly, the collected water will evaporate before the pan comes close to filling.
- If the pan is full or overflowing, the fridge may not be leveled properly, there may be a water line leak, or there may be another issue with the fridge. Try the other troubleshooting measures described in this article, then call a repair technician if needed.
Advertisement -
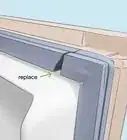
3Replace a damaged drain pan with an exact match. Take the drain pan with you to a home improvement store and see if you can find an exact match. If not, check the fridge manufacturer’s website for replacement information. You may be able to order a replacement pan directly from them, or get a part number that you can use to find the correct replacement pan online.[3]
- If you can’t get the replacement pan within a few hours, slide the old pan back in place for the time being.
- Once you get the right replacement pan, slide it into place and pop the grille back on. With any luck, your leaky fridge will be fixed!


Levelling the Fridge
-
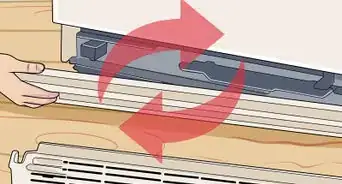
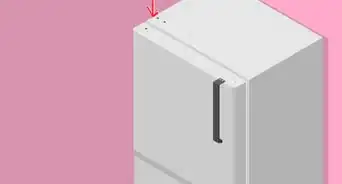
1Check the fridge’s horizontal positioning with a spirit level. Position the level side-to-side on the fridge’s interior floor. If necessary, pull out one or both of the crisper drawers at the bottom so you can access the interior floor. Don’t put the level on one of the shelves—unless it’s just not possible to access the interior floor—since these may be slightly out of level on their own.[4]
- For optimum performance, the fridge should be completely level from side to side.
- A simple spirit level (also called a carpenter’s level), which uses a bubble encased in a tube of liquid, is ideal for this task.
-
2Turn the level front-to-back and confirm the fridge leans back slightly. The back of the fridge should be 0.25–0.5 in (0.64–1.27 cm) lower than the front, as this aids both in drainage and in keeping the door closed tightly. If the bubble in the level is halfway inside and halfway outside of the near-side line on the tube that denotes perfect leveling, the fridge is probably leaning back properly.[5]
- When the level is in fact level, the bubble should be centered between the level lines like this:
- |o|
- When the level is slightly out of level to show that the fridge is leaning back properly, the bubble and level lines should look more like this:
- | ф
- If possible, check the fridge’s product guide for the ideal amount of drop from front to back.
- When the level is in fact level, the bubble should be centered between the level lines like this:
-
3Remove the grille from the bottom front of the appliance. In most cases, giving the grille a good pull should pop it out of place. Some fridges, though, may use screws to secure the grille in place. Once the grill is out of the way, you’ll be able to see the 2 front legs of the refrigerator.[6]
- Check the product guide if you’re having trouble figuring out how to remove the grille.
-
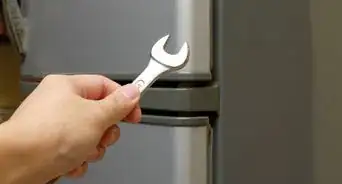
4Turn the adjustable legs and use your level to position the fridge correctly. Adjust the jaw of a crescent wrench so it fits snugly over one of the legs. Turn the leg clockwise to shorten it and counterclockwise to lengthen it. Repeat on the other side so the legs match. In most cases, you’ll be able to make the necessary adjustments with just the front legs.[7]
- For example, if the fridge isn’t leaning back enough, lifting the front legs evenly should do the trick. Regularly use your level to confirm that the fridge’s interior floor is level from side-to-side and sloped from front-to-back.
- If the fridge isn’t level side-to-side, unplug the appliance and recruit a strong friend to help you slide it out so you can access the rear legs. The rear legs adjust in the same way as the front legs, so fine-tune all 4 legs until the fridge is completely level from side-to-side and leans back slightly.[8]


Cleaning the Defrost Drain
-
1Move any food items that are blocking airflow to the defrost drain in the freezer. Practically every refrigerator model has a defrost drain located along the bottom of the back wall of the freezer compartment. It may be shielded by a piece of plastic to prevent debris from falling in, but it’s usually easy to locate. If you have a lot of frozen food items covering or blocking in the drain, do some rearranging to improve the airflow.[9]
- Create an open column from the drain to the ceiling, and an open path from the back to the front of the ceiling.
- Proper airflow helps prevent the drain line from freezing up.
- Consult the product manual if you need help finding the defrost drain.
-
2Empty the freezer and expose the drain if the fridge still leaks after 2-3 days. If you’re still getting water puddles 2-3 days after improving the airflow to the defrost drain, empty the freezer completely and move everything to ice chests. Then, pull off the plastic cap (if your model has one) that covers the defrost drain.[10]
- Don’t worry about emptying the main refrigerator compartment at this point. The food in there will stay at a safe temperature for 4 hours without power.[11]
-
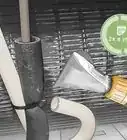
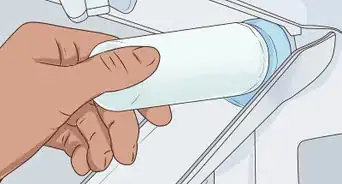
3Unplug the fridge and squirt hot tap water down the defrost drain. After you unplug the fridge, fill a cup with hot tap water, then draw some of it up into a turkey baster—which is a long plastic bulb syringe that typically holds around 2 fl oz (59 ml) of liquid. Put the tip of the baster into the drain opening and squeeze the hot water down the drain. Repeat 1-2 more times, then refill the freezer compartment with your food and plug the appliance back in.[12]
- The hot water should melt any ice in the drain line and break loose any minor clogs.
- Look for a turkey baster at any kitchen supply store or online.
-
4Check the fridge’s drain pan several times for excess water accumulation. The water from the baster will end up in the drain pan under the fridge. Due to the added water, you should check and empty (as needed) the drain pan 1-2 times per day over the next 2-3 days. Pop the cover off the grille at the bottom of the fridge, slide out the pan, and empty it into the sink if it’s more than one-third full.[13]
- If you don’t see excess water in the drain pan, the drain line must still be clogged, in which case you should move on to the next step—pulling out the fridge.
- Use your product manual for more specific information on emptying your drain pan. You can also check out the drain pan section of this article.
-
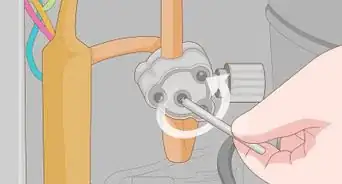
5Find the drain line and check valve behind the fridge if the problem isn’t fixed. If hot water won’t break up the clog, resort to manual methods. Unplug the fridge and have a friend help you slide it out from the wall. Use the product manual (whenever possible) to help you identify the plastic drain line that runs from the base of the freezer compartment to the bottom of the appliance. You’ll also see a plastic check valve (one-way valve) near the bottom of the drain line.[14]
- Don’t confuse the drain line with the water supply line that runs to your ice maker. The latter won’t connect to the underside of the fridge.
-
6Clean out and replace, if needed, the check valve and/or drain line. If you don’t see any blockages in the clear plastic drain line, pull the check valve free from the drain line. Use a pipe cleaner or unbent paperclip to dislodge any blockages you see inside the check valve. If you can’t break the blockage free, take the valve to a home improvement store and buy a matching replacement. Install the cleaned or replaced check valve.[15]
- If you do see stubborn blockages in the drain line, pull it free and buy a matching replacement at the home improvement store. Most drain lines install by pushing the tube firmly over the connection points, but check your product manual for specific instructions.


Fixing the Water Supply Line
-
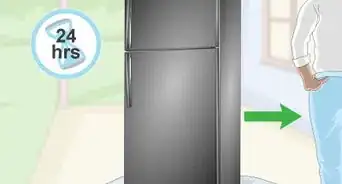
1Unplug the fridge and pull it away from the wall. Refrigerators are quite heavy, especially when filled with food, so grab a friend to help you. So long as you can conduct your repairs within 4 hours, don’t worry about emptying the refrigerator or freezer compartments.[16]
- With the door closed, refrigerated foods will stay at a safe temperature for approximately 4 hours. Frozen foods will keep for roughly 24-48 hours (the fuller the freezer is, the longer the food will keep).[17]
-
2Inspect the water supply line or lines at the back of your fridge. If you have an ice maker, ice and/or water dispenser, or both, you’ll see one or more supply lines that connect your fridge to your household water supply. In most cases, the supply line or lines are made of clear flexible plastic. Look for drips, dribbles, leaks, cracks, pinholes, or any other signs of leakage or damage.[18]
- Alternatively, your water supply line(s) may be made of non-translucent flexible plastic or, in some cases, braided metal.
-
3Tighten the connection points if that’s where you see evidence of a leak. Many water supply lines are held in place with clamps that you can tighten by twisting a screw clockwise with a screwdriver. In this case, tighten the connections and check back for any signs of leaks after 1 hour.[19]
- Check your product manual for specific details regarding how your water lines connect to the fridge.
-
4Turn off the water supply to the supply line if you still see leaks. If tightening the connections doesn’t help, or if the leak is somewhere along the supply line, move on to shutting off the water supply. Locate the point where the water supply line connects to your household water supply piping—this may be located behind the fridge, in the basement right below the fridge, or somewhere else nearby. Rotate the shutoff valve clockwise in order to turn off the water supply.[20]
-
5Replace the water line yourself only if you’re confident in your ability to do so. There are a lot of variables here, based on the type of supply line, refrigerator model, type of connection to the household water supply, and so on. If you have the product manual and feel confident that you know how all the connections work, disconnect the supply line and take it to a home improvement store to buy a matching replacement. Then, reinstall the new water line using the same procedure, turn on the water, and check for leaks.[21]
- Doing this job improperly can lead to major water damage, so call in a professional plumber or appliance repair technician if you’re not completely sure you can handle it yourself. In this case, keep the water supply turned off, slide the fridge back into place, and plug it in. You can still use the fridge and freezer, just without the ice maker or water/ice dispenser for the time being.


Expert Q&A
Did you know you can get expert answers for this article?
Unlock expert answers by supporting wikiHow
-
QuestionCan I use a hair dryer to defrost a drain line?
 Aaron BethAaron Beth is the founder of Aaron’s Refrigeration Company in New York City and a factory certified installer (FCI) for Sub-Zero products. He specializes in the service and maintenance of built-in refrigerators, wine coolers and ice machines. With over 54 years of experience, Aaron is the recipient of numerous Super-Service awards from Angie’s Lists and 2019 Best-of-the City.
Appliance TechnicianYou can, although I wouldn't recommend it. Most refrigerators have styrofoam insulation, and the hair dryer can melt that stuff if you aren't careful. It's much safer to use hot water.
Support wikiHow by unlocking this expert answer.
-
QuestionHow much does it cost to fix a leaking refrigerator?Aaron BethAaron Beth is the founder of Aaron’s Refrigeration Company in New York City and a factory certified installer (FCI) for Sub-Zero products. He specializes in the service and maintenance of built-in refrigerators, wine coolers and ice machines. With over 54 years of experience, Aaron is the recipient of numerous Super-Service awards from Angie’s Lists and 2019 Best-of-the City.
Appliance TechnicianHonestly, it totally depends on what the source of the problem is. It could be $50, or it could be $1,500. Just have an expert take a look and they'll be able to tell you what it will cost.Support wikiHow by unlocking this expert answer.
-
QuestionWhat are the signs of a bad door leak?Aaron BethAaron Beth is the founder of Aaron’s Refrigeration Company in New York City and a factory certified installer (FCI) for Sub-Zero products. He specializes in the service and maintenance of built-in refrigerators, wine coolers and ice machines. With over 54 years of experience, Aaron is the recipient of numerous Super-Service awards from Angie’s Lists and 2019 Best-of-the City.
Appliance TechnicianIce building up is going to be a big one. If the temperature isn't correct, that may be another sign. But the main symptom is going to be excess ice.Support wikiHow by unlocking this expert answer.

References
- ↑ https://www.bobvila.com/articles/refrigerator-leaking-water/
- ↑ https://www.cnet.com/how-to/you-can-fix-these-4-irritating-fridge-problems-yourself/
- ↑ https://www.cnet.com/how-to/you-can-fix-these-4-irritating-fridge-problems-yourself/
- ↑ https://www.bobvila.com/articles/refrigerator-leaking-water/
- ↑ https://www.bobvila.com/articles/refrigerator-leaking-water/
- ↑ https://www.bobvila.com/articles/refrigerator-leaking-water/
- ↑ Aaron Beth. Appliance Technician. Expert Interview. 14 July 2020.
- ↑ Aaron Beth. Appliance Technician. Expert Interview. 14 July 2020.
- ↑ https://www.bobvila.com/articles/refrigerator-leaking-water/
- ↑ https://www.bobvila.com/articles/refrigerator-leaking-water/
- ↑ https://www.foodsafety.gov/food-safety-charts/food-safety-during-power-outage
- ↑ https://www.cnet.com/how-to/you-can-fix-these-4-irritating-fridge-problems-yourself/
- ↑ https://www.bobvila.com/articles/refrigerator-leaking-water/
- ↑ https://www.cnet.com/how-to/you-can-fix-these-4-irritating-fridge-problems-yourself/
- ↑ https://www.cnet.com/how-to/you-can-fix-these-4-irritating-fridge-problems-yourself/
- ↑ https://www.bobvila.com/articles/refrigerator-leaking-water/
- ↑ https://www.foodsafety.gov/food-safety-charts/food-safety-during-power-outage
- ↑ https://www.cnet.com/how-to/you-can-fix-these-4-irritating-fridge-problems-yourself/
- ↑ https://www.cnet.com/how-to/you-can-fix-these-4-irritating-fridge-problems-yourself/
- ↑ https://www.bobvila.com/articles/refrigerator-leaking-water/
- ↑ https://www.bobvila.com/articles/refrigerator-leaking-water/
About This Article

Before you call in a pro, there are a few things you can try to fix your leaking refrigerator. Take off the grille at the bottom of the fridge and check if the drain pan is damaged. If it is, you’ll need to get a replacement tray. You should also check the defrost drain and drain line at the back to see if either of them are blocked. You may need to remove a panel to expose them. If there’s any food or debris stuck in the drain line, try pouring hot water through it. If you can’t clear the blockage, you might need to replace the line. If you have an ice maker or water dispenser in your fridge, check the water supply line for any cracks that could be leaking. If you still can’t find the problem, it might be time to call a professional. For more tips, including how to level your leaking fridge if it’s at an angle, read on.