This article was co-authored by Dave Jones and by wikiHow staff writer, Christopher M. Osborne, PhD. Dave Jones is a Professional Plumber and the Midwest Regional Vice President at Roto-Rooter Plumbing & Water Cleanup. In 1992, Jones joined Roto-Rooter as a drain service technician at the age of 18. Since then, he has risen through the ranks into positions of increasing authority. Dave served as general manager of Roto-Rooter’s Charlotte, North Carolina, and Atlanta, Georgia branches before being promoted to Contractor Area Manager and later to Regional Vice President. Dave holds Master Plumber Licenses in Pennsylvania, North Carolina, and Georgia.
There are 7 references cited in this article, which can be found at the bottom of the page.
wikiHow marks an article as reader-approved once it receives enough positive feedback. In this case, 91% of readers who voted found the article helpful, earning it our reader-approved status.
This article has been viewed 631,778 times.
According to professional plumber Dave Jones, "A toilet flange holds the vertical bolts in place that connect your toilet to the bathroom floor." When a toilet is leaking from the base, you may need to replace the toilet flange. Once you lift the toilet off the flange, you’ll usually find that flange replacement is a manageable DIY project; however, you may decide it’s best to call a plumber in some circumstances.
Steps
Removing the Toilet
-
1Place newspapers or towels on the floor next to the toilet. You will place the toilet on these after you disconnect it from the flange.[1] Leave enough room to work on the toilet flange, but lay the newspapers or towels close by so you don’t have to move the toilet too far.[2]
- You could also place the removed toilet in a nearby tub or shower stall, but there’s a chance the bottom of the toilet will scratch up the tile and/or the tub’s finish.
-
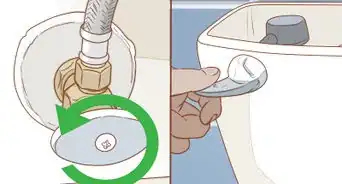
2Turn off the water supply to the toilet. Professional plumber Dave Jones suggests "turning the water valve to the right, unless it's an older-state gate valve; then, you'll need to turn the valve several times before it closes. If it's a quarter-turn ball valve, just turn the valve one-quarter of a 360-degree turn."
- If closing this valve fails to shut off the water supply completely, you’ll have to shut off the water further down the line—potentially at the main shutoff valve near your water meter.
Advertisement -
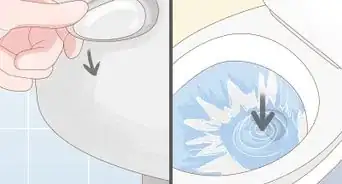
3Flush and siphon the water out of the tank and bowl. Since the water supply is shut off, the tank won’t refill when you flush once and empty its water into the bowl. Professional plumber Dave Jones suggests "flushing the toilet repeatedly until most of the water is out of the tank."[3] [4]
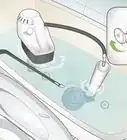
- Use a wet vac, turkey baster, or large sponge to remove any remaining water in the tank and the bowl.
-
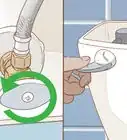
4Disconnect the water supply hose. This runs between the shutoff valve and the toilet tank, and is usually made of braided metal. Disconnect it at the coupling that attaches to the underside of the toilet tank. If you can’t loosen it by hand, use adjustable pliers or a crescent wrench to turn the coupling counterclockwise until it disconnects.
- A small amount of water will run out of the hose, so keep a towel handy to sop it up.
-
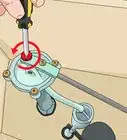
5Remove the 2 nuts that attach the toilet to the floor. Professional plumber Dave Jones advises "removing the bolt covers at the base of the toilet pedestal to reveal the bolts and nuts. From there, use an adjustable wrench to loosen the nuts on the vertical bolts that secure the toilet to the toilet flange at the floor."[5]
- Each nut should have a metal washer beneath it, and possibly a plastic one as well. Remove these also.
- The new toilet flange set should come with nuts, bolts, and washers, but keep these ones handy just in case you need them.
-
6Lift the toilet straight up and move it to the newspapers or towels. Toilets weigh between 70–120 lb (32–54 kg), so get help if you’re not sure you can lift it.[6] To lift it alone, professional plumber Dave Jones suggests "standing up and grasping the front of the bowl and the back of the tank while keeping your back straight. Then, begin lifting the toilet upward, using your legs to lift. The toilet should come free of the bolts and the old wax ring that sealed it to the toilet flange at the floor."
- Some residual water may leak out when you do this, so have a towel handy to wipe it up.
-
7Plug up the outflow pipe with an old towel or T-shirt. Push the towel or shirt securely into the pipe, but don’t stuff it down so far or in so tightly that you won’t be able to retrieve it later. Blocking the pipe will prevent unpleasant sewer gases from escaping.[7]
- Some people wait to block up the pipe until after removing the old flange. However, by blocking it now, you stop sewer gases earlier and provide protection against accidentally losing things—wax ring bits, screws, bolts, etc.—down the pipe.


Cleaning and Inspecting the Toilet Flange
-
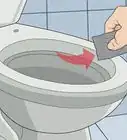
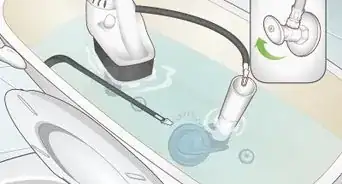
1Scrape off the old wax ring with a putty knife. The wax ring sits on top of the toilet flange and seals the connection between the flange and the toilet base. The wax ring will be deformed and discolored, but it should scrape away fairly easily with a sturdy putty knife.[8] [9]
- Keep some newspaper or an old towel nearby so you can wipe off your putty knife as you work. The wax will likely come off in sticky chunks.
-
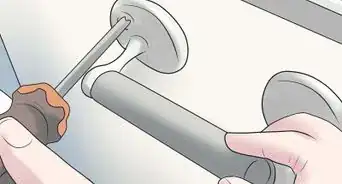
2Take off the screws that attach the flange to the floor. The screws run through the lip of the flange and into the floorboards below. You’ll usually find 4 of them. Turn the heads counterclockwise with a screwdriver to remove them.[10]
- Keep these as an emergency backup for the screws that come with your new flange kit.
-
3Remove the flange if it's made out of PVC and sealed with a gasket. If you have a gasket-sealed PVC flange, which is the most common type, you’ll be able to lift it straight up from the outflow pipe once the screws have been removed. After this, rinse it under the sink and wipe it clean with a rag so you can take a closer look at it.[11]
- If the flange has no cracks, chips, or deformations, you may choose to just reinstall it with a new wax ring.[12] However, if it doesn’t look to be in ideal condition, it’s best to just replace it.
- Even if you reuse the flange, always install a new wax ring.
-
4Call a plumber if you have a glued-in or cast iron flange. If the flange isn’t both made of PVC and held in the outflow pipe by a rubber gasket, there are 2 other likely options. It’s probably either made of PVC but glued to a PVC outflow pipe, or it’s made of cast iron and integrated into the cast iron outflow pipe. In either case, it’s best to call a plumber and have them finish the job for you.
- If the flange is PVC but is glued to the inside or outside of a PVC outflow pipe, you’ll have to carefully use a chisel and/or a drill with a hole-saw bit to work it free. If you damage the outflow pipe in the process, you’ll be facing costly repairs.[13]
- If you have an old flange made of cast iron that’s joined to a cast iron outflow pipe, you’ll have to meticulously chip away at the flange lip with a chisel and rubber mallet. Once again, any damage to the outflow pipe itself will be costly mistake.[14]


Getting the Right Replacement Flange
-
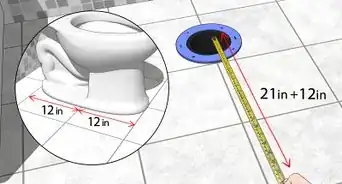
1Measure the interior diameter of the exposed outflow pipe. In most cases, the pipe should measure 4 in (10 cm) in diameter. Jot this measurement down for reference when you go to buy the new flange.[15]
- If you’re able to take the old flange with you to the hardware store, this measurement is largely for backup purposes. However, if the old flange has broken into pieces, you’ll definitely need this measurement.
-
2Take the old flange to the hardware store and buy a matching one. Find a new flange that replicates the size and shape of the old one as closely as possible. This way, you’ll be sure of a solid fit.[16]
- If you can’t find a good match or need help in general, ask an employee at the store for help.
- If you don’t have the old flange, buy a new flange that matches the outflow pipe measurement you took.
-
3Purchase a new wax ring that fits your new flange. Some new flange kits come with a wax ring, while others require you to buy the ring separately. In any case, make sure you have a new wax ring to go with your new flange.[17]
- Instead of wax, some newer rings are rubber gaskets instead. However, you can install a rubber gasket the same way you'd install a wax ring.


Installing the New Flange and Wax Ring
-
1Feed the included bolts into the new flange. Remove the nut and washers on each bolt and set them aside for final installation. The flange lip will have channels on either side, into which you can feed the heads of the 2 bolts. Position the bolts so that they are pointing straight up and are directly across from each other.[18]
- If you’ve lost the new bolts, you can likely reuse the bolts from the old flange, provided that they’re still in good condition.
-
2Push the new flange on and into the outflow pipe. The lip of the flange should rest flush on the floor all the way around, while the neck of the flange should slide snugly into the pipe. Position the flange so that the protruding bolts are at the 3 o’clock and 9 o’clock positions (presuming that the back of the toilet will be at 12 o’clock).[19]
- The neck of the flange should have a rubber gasket that creates a seal against the inside of the overflow pipe.
- If the lip of the flange won’t rest flush to the floor all the way around, the flooring is likely warped or damaged due to water. You should do any needed floor repairs (or call in a pro to do them) before proceeding.
-
3Drive screws through the flange lip and into the flooring. Use a screwdriver (turning it clockwise) to secure the screws that came in the product package. There will be pre-cut holes in the flange lip where you should drive the screws in.[20]
- Use a drill to create new pilot holes in the flooring, if needed.
- Existing holes from the previous flange may be in the same location but be too large to hold the new screws. If so, use a mallet to tap plastic wall anchors into the holes, then drive the screws through the flange lip and into the anchors.
- Most toilet flanges come with 4 screws, but yours may have more or fewer.
-
4Remove the towel or T-shirt from the outflow pipe. Pick out any pieces of wax ring, loose screws or washers, etc. before removing the towel or shirt. Otherwise they may fall down the pipe.[21]
- Don’t plan on using this towel or shirt again—just toss it!
-
5Tilt up the toilet and push the new wax ring into place. Press the rounded side of the wax ring over the pipe stub that surrounds the opening on the bottom of the toilet. Press firmly all the way around the wax ring, but don’t deform it.[22]
- Pros usually prefer to apply the wax ring this way in order to guarantee a good seal around the toilet. However, you can also lay the ring (rounded side up) on top of the toilet flange, then set the toilet on top of it.[23]
- If you’re using the newer type of “wax ring” that is actually a rubber gasket, lay it rounded side up on the toilet flange and place the toilet on top of it.


Securing the Toilet in Place
-
1Set the toilet straight down on top of the flange. Line up the holes in the toilet base with the 2 bolts that protrude from the flange. Once the toilet is resting on the flange, press down firmly near the back of the bowl rim to deform the wax ring and seal the connection.[24]
- This process is the same whether you pressed the wax ring to the underside of the toilet or placed it on top of the flange.
-
2Place the washers and nuts onto the exposed bolts. Put a plastic washer onto each bolt first, then follow with a metal one. After that, hand-tighten the nuts clockwise before using a crescent or socket wrench to tightly secure them.[25]
- If you have plastic caps that cover the bolts, just snap them in place. If the bolts are too long, however, you may need to trim them with a hacksaw so that the plastic caps will fit over them.
-
3Reconnect the water supply hose. Hand-tighten the coupling at the end of the braided metal supply hose onto the connection point on the underside of the toilet tank. Use a crescent wrench or adjustable pliers to finish tightening the coupling, if needed.[26]
- Plastic couplings are usually only intended to be hand-tightened, while metal ones can be tightened with a wrench or pliers.
-
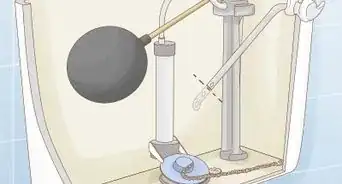
4Turn on the water supply to the toilet. Turn the oval-shaped valve counterclockwise to turn the water back on. You’ll hear the toilet tank begin to fill.[27]
- While the tank fills, check for leaks at the connection point between the supply line and the toilet tank.
-
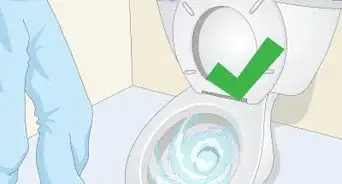
5Flush the toilet multiple times to check for leaks. Carefully check the floor around the base of the toilet. If it stays dry, you’re all set. If you see any water seeping out, you’ll need to remove the toilet and try again—or call a plumber.[28]


Expert Q&A
-
QuestionCan you put a new toilet flange over an old one?
 Dave JonesDave Jones is a Professional Plumber and the Midwest Regional Vice President at Roto-Rooter Plumbing & Water Cleanup. In 1992, Jones joined Roto-Rooter as a drain service technician at the age of 18. Since then, he has risen through the ranks into positions of increasing authority. Dave served as general manager of Roto-Rooter’s Charlotte, North Carolina, and Atlanta, Georgia branches before being promoted to Contractor Area Manager and later to Regional Vice President. Dave holds Master Plumber Licenses in Pennsylvania, North Carolina, and Georgia.
Master Plumber, Roto-Rooter Plumbing & Water CleanupWhen removing an old toilet, the flange should remain connected to the bathroom floor so that the new toilet can be attached to it. In other words, it is meant to stay in place unless it was damaged or bent during the removal of the last toilet. -
QuestionHow much does it cost to replace a toilet flange?
 wikiHow Staff EditorThis answer was written by one of our trained team of researchers who validated it for accuracy and comprehensiveness.
Staff AnswerwikiHow Staff EditorStaff AnswerAnswering a question about costs is difficult because it depends on where you live, what local plumbers charge for call-outs and work time, etc. Assuming you’re asking for a plumber to come out, this could cost roughly around US$50 to US$200, probably leaning mostly to the upper end of costs. It’s a good idea to call your local plumber and ask for a quote first, then you won’t get any nasty surprises. -
QuestionCan toilet flange be flush with floor?wikiHow Staff EditorThis answer was written by one of our trained team of researchers who validated it for accuracy and comprehensiveness.
Staff AnswerwikiHow Staff EditorStaff AnswerAs explained above, the lip of the toilet flange should sit flush on the floor all the way around. The neck of the flange should slide into the pipe snugly. An improperly fitted toilet is often caused by the flange not sitting on the finished floor but rather, sitting above it, or it is not level with the floor. It’s also important to read the industry code for toilet fitting relevant to your location and building materials, as local variations may exist.
Warnings
- Do not tighten the nuts that hold the toilet to the flange too tightly. You may cause the porcelain to crack.⧼thumbs_response⧽
Things You'll Need
- Newspapers or towels
- Wrench
- Putty knife
- Screwdriver
- Tape measure
- Towel or T-shirt
- New flange
- New wax ring


References
- ↑ Dave Jones. Master Plumber, Roto-Rooter Plumbing & Water Cleanup. Expert Interview. 13 December 2021.
- ↑ https://www.bobvila.com/articles/how-to-replace-a-toilet-flange/
- ↑ Dave Jones. Master Plumber, Roto-Rooter Plumbing & Water Cleanup. Expert Interview. 13 December 2021.
- ↑ https://www.bobvila.com/articles/how-to-replace-a-toilet-flange/
- ↑ https://home.howstuffworks.com/home-improvement/repair/how-to-replace-toilet-flange.htm
- ↑ https://www.bobvila.com/articles/how-to-replace-a-toilet-flange/
- ↑ https://www.bobvila.com/articles/how-to-replace-a-toilet-flange/
- ↑ Dave Jones. Master Plumber, Roto-Rooter Plumbing & Water Cleanup. Expert Interview. 13 December 2021.
- ↑ https://www.bobvila.com/articles/how-to-replace-a-toilet-flange/
- ↑ https://www.bobvila.com/articles/how-to-replace-a-toilet-flange/
- ↑ https://www.bobvila.com/articles/how-to-replace-a-toilet-flange/
- ↑ Dave Jones. Master Plumber, Roto-Rooter Plumbing & Water Cleanup. Expert Interview. 13 December 2021.
- ↑ https://youtu.be/mzdQpl01SNY?t=5m
- ↑ https://youtu.be/PnXezZt6OMk?t=45s
- ↑ https://www.bobvila.com/articles/how-to-replace-a-toilet-flange/
- ↑ https://www.bobvila.com/articles/how-to-replace-a-toilet-flange/
- ↑ https://www.bobvila.com/articles/how-to-replace-a-toilet-flange/
- ↑ https://youtu.be/PnXezZt6OMk?t=2m40s
- ↑ https://www.bobvila.com/articles/how-to-replace-a-toilet-flange/
- ↑ https://home.howstuffworks.com/home-improvement/repair/how-to-replace-toilet-flange.htm
- ↑ https://www.bobvila.com/articles/how-to-replace-a-toilet-flange/
- ↑ https://www.bobvila.com/articles/how-to-replace-a-toilet-flange/
- ↑ https://youtu.be/PnXezZt6OMk?t=3m
- ↑ https://www.bobvila.com/articles/how-to-replace-a-toilet-flange/
- ↑ https://www.bobvila.com/articles/how-to-replace-a-toilet-flange/
- ↑ https://www.bobvila.com/articles/how-to-replace-a-toilet-flange/
- ↑ https://home.howstuffworks.com/home-improvement/repair/how-to-replace-toilet-flange.htm
- ↑ https://www.bobvila.com/articles/how-to-replace-a-toilet-flange/
About This Article

To replace a toilet flange, lay newspaper down on the floor around the toilet, and turn off the water to the toilet before flushing and siphoning all of the water out of the bowl. Then, remove the toilet by disconnecting the hoses and unscrewing the bolts on the floor. Once the toilet has been removed, plug the outflow pipe with a towel, and then scrape off the wax ring. Unscrew the flange from the floor and lift it up to measure and inspect it. Finally, purchase a new flange and screw it over the gasket on the outflow pipe. Read on for tips on removing a glued-in flange and reinstalling the toilet!