This article was co-authored by wikiHow Staff. Our trained team of editors and researchers validate articles for accuracy and comprehensiveness. wikiHow's Content Management Team carefully monitors the work from our editorial staff to ensure that each article is backed by trusted research and meets our high quality standards.
There are 10 references cited in this article, which can be found at the bottom of the page.
The wikiHow Video Team also followed the article's instructions and verified that they work.
This article has been viewed 35,797 times.
Learn more...
Folding tissues to go in a mason jar is a great way to create your own tissue dispenser that's unique and environmentally friendly. All you'll need is a rectangular box of tissues and a mason jar to put them in. Folding the tissues is super easy and only requires two separate folds. Feel free to personalize your mason jar tissue holder by painting it or adding stickers to make it even more unique.
Steps
Creating the Lid Dispenser
-
1Trace the mason jar lid on a piece of felt. Set a piece of felt in your chosen color out on a flat surface. Unscrew the mason jar and place the round metal circle that covers the top of the jar on the felt. Trace this using a pen and cut it out so it’s the same size as the lid.[1]
- Trace the flat round piece of metal that covers the opening of the jar, not the piece that screws onto the jar.
-
2Cut an ‘X’ shape in the felt for the tissues to come through. Use a precision knife to cut a large ‘X’ into the felt circle carefully. If you don’t have a precision knife, fold the piece of felt in half and cut a slit using scissors. Then fold the felt in half going the other direction and cut another slit to form an ‘X’.[2]
- Make the ‘X’ large enough so that it almost reaches the edges of the felt.
Advertisement -
3Glue the piece of felt into the mason jar lid. Place the part of the lid that screws onto the jar on the table so that the inside is facing upwards. Squeeze out craft glue along the edge of the lid and place the felt overtop this, pressing down on it lightly so it sticks. Let the glue dry completely before you use the lid[3]
- Keep the lid off of the jar until you place the tissues in it.

Folding and Inserting the Tissues
-
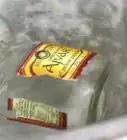
1Open the side of a box of tissues with the top of the box facing upwards. Purchase a rectangle box of tissues from a local big box or grocery store. Position the box like you would if you were going to open the top to take out tissues, and instead open the side of the box so you can easily remove the tissues without having to fold or bend them.[4]
- A brand name box of tissues is better because they tend to be higher quality, meaning they won’t rip as easily when you take them out of the mason jar.
-
2Take a 0.5 in (1.3 cm) stack of tissues out of the box. This measurement doesn’t need to be exact, just make sure you don’t take out too thick of a section, otherwise they won’t all fit in the mason jar. When you’re taking the tissues out of the box, make sure you keep the stack facing upwards just as it was in the box so the right tissue is on top.[5]
- Keeping the right tissue on top is important so that the tissues continue to pop up once you take one out of the mason jar.
-
3Fold the tissues in half crosswise so they’re standing vertically. With the tissues sitting flat in your hand, fold the ends downwards to create a crosswise fold. The folded edge, which is the top tissue, will be facing upwards.[6]
-
4Pull up the tissue on top so that it’s loose. This is the tissue that you’ll pull through the top of the mason jar lid. Hold the clump of tissues in place with one hand so they’re still standing vertically and use the other hand to pull up the top tissue so it’s slightly loose and easy to grab.[7]
- Pulling up the top tissue will make sure it doesn’t disappear when you fold the clump of tissues again.
-
5Fold the tissues in half again lengthwise. With the tissue clump standing vertically, fold them in half one more time so that the fold is on the left or right side. Keep the top tissue loose but still attached so you’ll be able to pull it through the mason jar lid easily.[8]
-
6Place the tissues in the open jar with the loose tissue facing upwards. Keep the tissues in their tight, folded clump and put them inside the empty mason jar. Make sure the loose tissue stays on top.[9]
- Wipe down the inside of the mason jar beforehand, if necessary.
- Make sure the lid to the mason jar is off before putting the tissues inside.
-
7Pull the top tissue through the lid opening and screw the lid on. With the loose tissue facing upwards, pull it gently through the felt opening you created in the lid. When the tissue is pulled halfway through, screw the lid on tightly to start using the tissues.[10]
- It's also okay to not use a lid at all and simply pull the tissues right out of the open jar.


Decorating the Jar
-
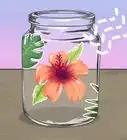
1Wipe the inside and outside of the empty jar with a damp paper towel. This will get rid of any lingering dust or dirt. Wipe down the inside of the jar first and then the outside so your tissues will be sitting in a clean container.[11]
- Decorate the jar before you put the tissues in it.
-
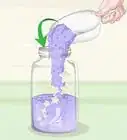
2Paint the empty jar with acrylic paint to update the color, if desired. This isn’t required—a clear mason jar tissue holder will look great too! If you’d like to paint it, use a paintbrush to apply at least 2 coats of acrylic paint to the jar. Use even brush strokes and let the jar dry in between layers.[12]
- Pick out an acrylic paint color at your local craft or big box store.
-
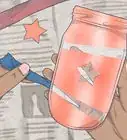
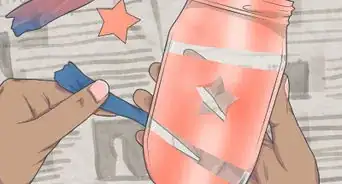
3Add extras like glitter or wording to make your jar unique if you'd like. Cover your jar in glitter, stickers, or ribbon to give it extra flair. You can even paint on wording like, "Bless You!" Add glitter while the paint is still wet or use glue so it sticks to the jar. If you're putting stickers on the jar, wait until the paint dries completely to make sure they stick.[13]
- Pick out fun extra decorations at your local craft store.
-
4Put the tissues in the jar after the jar is dry. Wait until your paint or other decorations are completely dry before putting the tissues in the jar and pulling the loose one through the lid. Once the lid is screwed on tightly, your mason jar tissue holder is ready to be used![14]
- The drying time will depend on which materials you used, but try to wait at least 2-3 hours before putting the tissues in your jar.


Things You'll Need
Creating the Lid Dispenser
- Mason jar and lid
- Felt
- Pen
- Scissors
- Precision knife
- Craft glue
Folding the Tissues
- Rectangular box of tissues
Decorating the Jar
- Damp paper towel
- Craft paint
- Glitter
- Stickers
- Ribbon


References
- ↑ https://www.goodmorningamerica.com/living/story/diy-mason-jar-tissue-box-cute-item-desk-66833950
- ↑ https://www.youtube.com/watch?v=B6abpxxccEk#t=2m20s
- ↑ https://www.goodmorningamerica.com/living/story/diy-mason-jar-tissue-box-cute-item-desk-66833950
- ↑ https://www.youtube.com/watch?v=ZRhBjZUrY_A#t=45s
- ↑ https://www.youtube.com/watch?v=ZRhBjZUrY_A#t=1m10s
- ↑ https://www.youtube.com/watch?v=ZHgs0phpdqk#t=1m29s
- ↑ https://www.youtube.com/watch?v=ZHgs0phpdqk#t=1m35s
- ↑ https://www.youtube.com/watch?v=ZRhBjZUrY_A#t=1m47s
- ↑ https://www.youtube.com/watch?v=ZHgs0phpdqk#t=1m48s
- ↑ https://www.youtube.com/watch?v=ZRhBjZUrY_A#t=2m
- ↑ https://www.goodmorningamerica.com/living/story/diy-mason-jar-tissue-box-cute-item-desk-66833950
- ↑ https://www.youtube.com/watch?v=B6abpxxccEk#t=11s
- ↑ https://www.youtube.com/watch?v=B6abpxxccEk#t=11s
- ↑ https://www.goodmorningamerica.com/living/story/diy-mason-jar-tissue-box-cute-item-desk-66833950
About This Article

To roll tissues for your mason jar tissue dispenser, start with a 1/2-inch thick stack of tissues. Fold the stack in half crosswise, then pull the top tissue up so it's slightly loose and easy to grab. Now fold the stack in half lengthwise and stick it into your mason jar so the loose tissue is coming up through the top. Finally, pull the loose tissue through the opening in the jar lid and screw the lid on. To learn how to make the lid for your mason jar tissue dispenser and how to decorate your dispenser when you're finished, keep reading!