This article was co-authored by wikiHow staff writer, Darlene Antonelli, MA. Darlene Antonelli is a Technology Writer and Editor for wikiHow. Darlene has experience teaching college courses, writing technology-related articles, and working hands-on in the technology field. She earned an MA in Writing from Rowan University in 2012 and wrote her thesis on online communities and the personalities curated in such communities.
This article has been viewed 24,045 times.
Learn more...
A Live Photo is an Apple-specific moving photo that ranges between 1.5 to 2 seconds. Live Photos were introduced by Apple in September 2015, but it wasn't until the release of iOS 13 that you could convert these photos to video files. This wikiHow teaches you how to convert your Live Photo to a video file on your iPhone or iPad.
Steps
-
1Capture a Live Photo. If you want to learn more about taking a Live Photo, you can read How to Take Live Photos on iPhone. Essentially, you need to tap the Live button at the top of the camera screen to activate Live Photos mode. [1]
- Your Live Photo will range from 1.5 to 2 seconds.
- You can enable and disable Live Photos by tapping on the Live icon at the top of the screen when viewing a photo. If the icon is yellow-orange and says "Live," then the Live Photo feature is enabled.[2]
-
2Advertisement
-
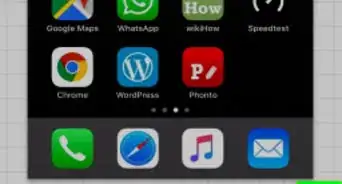
3Tap Albums. You'll see this along the bottom of your screen.
-
4Tap Live Photos. You'll see this under the header "Media Types."
-
5Tap a Live Photo you'd like to save as a video. It will open in a new window.
- If you tap and hold a Live Photo, you can then tap multiple Live Photos to add to the saved video.
-
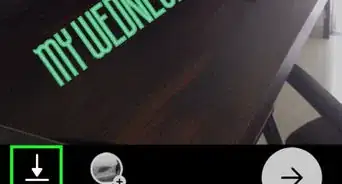
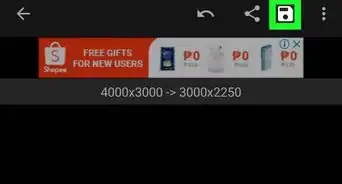
6
-
7Tap Save as Video. You'll see this next to the icon of a video camera that you'll most likely have to scroll to see.
- This might not work if you have Live Photos disabled or you've added an effect to the photo. To remove an effect, such as a Loop, tap Edit, swipe up from the bottom of the screen to access the "Effects" heading, then tap the effect to remove it.[3]


References
About This Article

1. Capture a Live Photo.
2. Open Photos.
3. Tap Albums.
4. Tap Live Photos.
5. Tap a Live Photo you'd like to save as a video.
6. Tap the share icon.
7. Tap Save as Video.