This article was co-authored by wikiHow Staff. Our trained team of editors and researchers validate articles for accuracy and comprehensiveness. wikiHow's Content Management Team carefully monitors the work from our editorial staff to ensure that each article is backed by trusted research and meets our high quality standards.
There are 14 references cited in this article, which can be found at the bottom of the page.
This article has been viewed 28,756 times.
Learn more...
Pleats are a classic finishing touch to add onto a skirt, dress, or even curtains. Pleats work best when you are working with sturdy fabrics, such as wool, cotton, and silk.[1] You can easily make basic pleats by measuring and marking your fabric, folding the fabric, and then sewing to secure the pleats.
Steps
Measuring and Marking the Fabric
-
1Make room for the pleats when you cut the fabric. Before you begin measuring and marking pleats on your fabric, make sure you have left enough fabric to create the pleats. Otherwise, you may reduce the size of your item to the point where it will not fit.[2]
- To add pleats into a pattern that does not include them, determine how many pleats you want to add and how wide each of the pleats will be. Then, multiply the number of pleats by the width of each of the pleats and add this to your total fabric length. For example, if you want to add 4 pleats that are 3 in (7.6 cm) wide each, then you would need to add 12 in (30 cm) of fabric to the total length.
- If you are following a pattern that includes pleats, then it will have already taken this into account.
-
2Spread your fabric out in 1 layer so that it is flat and smooth. Lay the fabric out on a flat work surface, such as a table or a clean area of a hard floor. Position the fabric with the right (print or outer) side facing up and smooth the fabric out with your hands so that there are no lumps or bumps.[3]
- You may want to pre-wash, dry, and iron the fabric you are using to make your item. This will help to ensure that the fabric lays flat as you mark it.
Tip: Work on the right (print or outer) side for inverted and knife pleats. If you want to create box pleats, turn your fabric over so that the wrong (non-print or inner) side is facing up. Then, follow the same process for folding and sewing the pleats.[4]
Advertisement -
3Draw a line where you want the first pleat to be. Identify the position of the first pleat by following the instructions included with your pattern or by measuring from the edge of your fabric to the desired location of the first pleat. Make a mark to indicate the position and then use chalk or a fabric marker and a ruler to draw a straight line running down from the top edge of the fabric.[5]
- It is important to use chalk or a fabric marker to avoid permanently marking your fabric.
- You can position the pleats anywhere on the fabric that you would like them to go, but always position the pleats so they are going straight down from the top edge of the fabric.
-
4Draw a second parallel line 3 in (7.6 cm) from the first. A standard-sized inverted or box pleat is 3 in (7.6 cm), but you can make your pleats wider or narrower if you prefer. Measure from the edge of the first line you drew to the desired width of the pleat. Then, draw a line that is parallel to the first line you drew.[6]
- If you want to make knife pleats, then this is the only other line you need to make to complete 1 pleat.
-
5Mark the center of the 2 lines and draw a line between them for inverted or box pleats. To create inverted or box pleats, mark the point in the center of the 2 parallel lines. Then, draw a third line that goes between them. Ensure that this line is also parallel to the first 2 lines.[7]
- This line will serve as a guide for folding the other 2 sections of fabric in to create a pleat.
-
6Continue to mark your fabric where you want the pleats to go. Repeat the process of measuring and marking as many times as needed to create the desired amount of pleats. You can make as many pleats as you have accounted for in your fabric cut.[8]
- Do not add or leave out any pleats to a pattern or you may end up with an ill-fitting item.


Folding the Fabric
-
1Pinch the top edge of the fabric along the first line you drew. Find the first line in your row of parallel pleat lines. Pinch the fabric along the line at the top of the fabric with 1 hand. Then, use your index finger and thumb on your other hand to pinch down the rest of the line to crease it. Continue holding the fabric at the top of the line.[9]
- Pleats are always secured at the top so it is important to make the fold precisely where you marked it and hold the position at the top of the fabric.
Tip: Don’t worry if the fabric does not crease well. The most important thing to do is to secure the pinched fabric. You can iron the pleats later to crease them.
-
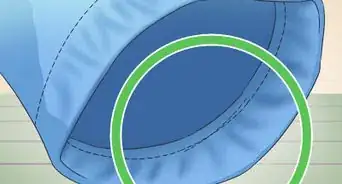
2Fold the fabric over to the middle line and pin to secure it. Find the center line of your pleat and bring the fabric that you are pinching over to this line. Press down along the folded edge to make it even with the center line. Insert a pin near the top edge of the fabric going through the folded layers of fabric.[10]
- If you want to create knife pleats, then simply bring the pinched fabric over to the second line you drew and pin it in place. Then, repeat this for the next set of lines. Keep folding the fabric in this way so that you can make pleats that all go in the same direction.[11]
-
3Repeat the process for the second line you drew. If you are creating an inverted or box pleat, then locate the second line that you drew. Pinch it at the top and crease the fabric along the line just as you did for the first line. Then, fold the fabric over to the center line so that it meets the other folded edge. Insert a pin through the folded fabric near the top edge to hold it in place.[12]
- The second fold will look like the mirror image of the first fold you made.
- Keep in mind that you do not have to do this if you are making knife pleats, which are pleats that all go in the same direction.[13]
-
4Continue to pin pleats until you have secured all of them. After you finish securing the first pleat with a pin, repeat the same process to secure the next pleat. Locate the first line, pinch the fabric, fold it over to the center line, and secure it with a pin. Repeat for the opposite side, and keep doing this until all of your pleats are secured with pins.[14]


Securing and Pressing the Pleats
-
1Set your sewing machine to the straight stitch setting. The straight stitch is all you will need to hold your pleats in place. This is usually setting number 1 on sewing machines, but check your user manual if you are unsure.[15]
- If you want to check the positioning and fit before you sew, then choose the widest stitch setting or select the baste stitch setting on your sewing machine. This will create a loose line of straight stitches that you can easily remove if the fit is off and you need to adjust your pleats.[16]
-
2Position the fabric under the needle and presser foot. Raise the needle and presser foot, and then place the fabric under the needle. Position the needle so that the stitches will be about 0.5 in (1.3 cm) from the top edge of the fabric. Lower the presser foot to hold the fabric in place.[17]
- There should be a lever near your presser foot that you can raise to lift the presser foot and lower to lower it. Consult your instruction manual if you cannot find it.
-
3Sew a straight stitch 0.5 in (1.3 cm) from the top edge of the fabric. Press gently on the pedal to begin sewing down the edge of the fabric. Sew in a straight line from 1 end to the other. When you reach the end of the fabric, raise the presser foot and needle and remove the fabric from the sewing machine.[18]
- Be careful not to sew across the pins or you may damage your machine!
-
4Press the pleats with an iron to make them look crisp and neat. After you finish sewing the pleats, lay the fabric out on an ironing board or on a towel on a table or other flat surface. Then, iron the pleats starting at the top of the fabric. Move the iron down to the bottom edge of the fabric to crease the entire pleat.[19]
- This will leave you with crisp, neat looking pleats in your fabric!
Tip: Pleating is usually done before you attach the fabric to a dress, make a skirt waistband, or create a casing for curtains. Hem the edges of the fabric if you have not done so already, or continue to follow the instructions included with a pattern to complete your project.


Things You’ll Need
- Fabric
- Ruler
- Fabric marker or chalk
- Pins
- Sewing machine
- Thread
- Scissors


References
- ↑ https://digitalcommons.unl.edu/cgi/viewcontent.cgi?article=5204&context=extensionhist
- ↑ https://digitalcommons.unl.edu/cgi/viewcontent.cgi?article=5204&context=extensionhist
- ↑ https://www.youtube.com/watch?v=X4qdIozN8BQ&feature=youtu.be&t=95
- ↑ https://www.youtube.com/watch?v=X4qdIozN8BQ&feature=youtu.be&t=284
- ↑ https://www.youtube.com/watch?v=X4qdIozN8BQ&feature=youtu.be&t=99
- ↑ https://www.youtube.com/watch?v=X4qdIozN8BQ&feature=youtu.be&t=106
- ↑ https://www.youtube.com/watch?v=X4qdIozN8BQ&feature=youtu.be&t=155
- ↑ https://digitalcommons.unl.edu/cgi/viewcontent.cgi?article=5204&context=extensionhist
- ↑ https://www.youtube.com/watch?v=X4qdIozN8BQ&feature=youtu.be&t=187
- ↑ https://www.youtube.com/watch?v=X4qdIozN8BQ&feature=youtu.be&t=200
- ↑ https://www.youtube.com/watch?v=uQ1A7IcGLNc&feature=youtu.be&t=40
- ↑ https://www.youtube.com/watch?v=X4qdIozN8BQ&feature=youtu.be&t=223
- ↑ https://digitalcommons.unl.edu/cgi/viewcontent.cgi?article=5204&context=extensionhist
- ↑ https://www.youtube.com/watch?v=X4qdIozN8BQ&feature=youtu.be&t=250
- ↑ https://www.youtube.com/watch?v=X4qdIozN8BQ&feature=youtu.be&t=390
- ↑ https://digitalcommons.unl.edu/cgi/viewcontent.cgi?article=5204&context=extensionhist
- ↑ https://www.youtube.com/watch?v=X4qdIozN8BQ&feature=youtu.be&t=405
- ↑ https://www.youtube.com/watch?v=X4qdIozN8BQ&feature=youtu.be&t=405
- ↑ https://www.youtube.com/watch?v=X4qdIozN8BQ&feature=youtu.be&t=446
About This Article