This article was co-authored by Alessio Iadicicco and by wikiHow staff writer, Jennifer Mueller, JD. Alessio Iadicicco is an Apparel Manufacturing Specialist and the CEO and Co-Founder of MarkersValley, an online apparel and manufacturer sourcing platform that connects luxury fashion brands to a network of highly-vetted, truly Italian manufacturers. He holds a Bachelor's degree in Economy and Management of Financial Enterprises from The University of Naples Federico II. MarkersValley has connected fashion brands in over 100 countries and has a network of over 100 independent Italian factories and artisans. MarkersValley has been featured in Forbes, EQ, St. Louis Business Journal, Il Mattino, and Corriere Della Sera.
There are 17 references cited in this article, which can be found at the bottom of the page.
This article has been viewed 36,506 times.
Sewing a circle might seem more challenging than stitching a straight line, but it's essentially the same thing. As long as you take your time and slowly turn the fabric, you can sew a perfectly round circle of any size. Read on to learn how to sew a basic circle, stitch 2 circular pieces of fabric together to make a circular seam, or fold the edge of a fabric circle over and stitch around it to make a circular hem. With a little practice, you'll soon be using your knowledge of sewing circles to make pillows, skirts, tablecloths, and more!
Things You Should Know
- Trace the circle you want to sew onto the fabric with a pencil.
- Turn the fabric incrementally as you feed it into the sewing machine to follow the curve.
- Cut notches in the seam allowance to get rid of excess fabric on a circular seam.
- Combine a basting stitch with a zigzag stitch to prevent fabric puckering when you make a circular hem.
Steps
Stitching a Circle in Fabric
-
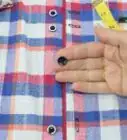
1Trace an object about the same size as the circle you want to sew. This is perhaps the quickest and easiest way to get a circle onto your fabric—just find a dish, cup, bowl, or anything else that's round. Set it on your fabric and trace around the edge with a pencil to mark your circle.[1]
- Hold the fabric tight as you trace to keep it from bunching up and ruining your line.
-
2Use a thumbtack and thread to make your own drawing compass. Put your thumbtack on a table with the point sticking up. Lapel pins work great for this too! Just poke the point through a strip of painter's tape (sticky-side down), then secure the tape to the table to hold the thumbtack in place.[2]Advertisement
-
3Press your fabric over the point of the thumbtack. Position your fabric over the thumbtack and pierce the fabric wherever you want the center of your circle to be. Then smooth out your fabric so you can draw on it.
-
4Tie off one end of the thread and cut it to match the size you want. The thread determines the size your circle will be. Since the point of the tack is the center of the circle, the thread will be the radius, or half the diameter of the circle. Tie the end of the thread to the point of the tack, then pull the thread taut to decide how large you want your circle to be.[3]
- When you cut the thread, remember to leave a little extra—you'll be tying the other end around your pencil so you can draw your circle.
- If you need an exact size, measure it out with your measuring tape and mark the thread with a pen or fabric marker so you'll know exactly how long it needs to be.
-
5Pull the thread taut to draw a circle on the fabric.[4] For small circles, it's likely easier to simply move the pencil and draw the circle. If you're making a larger circle, leave the pencil in place and rotate the fabric underneath it—applying just enough pressure with the pencil for it to make a mark.
- You might want to have someone help you by holding the fabric taut as you draw the circle. If you're drawing by moving the pencil, it might help to have someone hold the fabric taut or tape the fabric down so that it doesn't move.
-
6Line up the fabric in your sewing machine. Slide your fabric under the all-purpose foot of your sewing machine so that the needle will come down directly on the line of the circle you drew. Smooth out the fabric so that you can see the whole circle and guide the fabric with your hands.[5]
- If you want to use the thumbtack as a guide, measure the radius of your circle, then tape down your thumbtack exactly that distance away from the needle of your sewing machine. Pierce your fabric in the same spot you did when you drew the circle and as you sew, the thumbtack will hold your fabric in place.[6]
- This also works for hand-sewing or embroidery—just stitch slowly and follow the circular line that you drew on the fabric and your circle will turn out perfect.
-
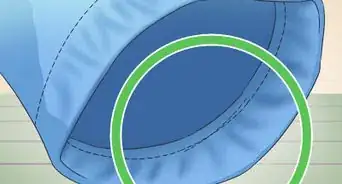
7Stitch slowly, turning the fabric as you go. Keep both hands on the fabric to guide it and keep it flat. As you feed the fabric through, turn it slightly so the needle follows the curved line. If you make incremental rotations each time the needle comes up after making a stitch, you'll stay on target. Maintain this rhythm all the way around the circle to finish.[7]
- If you're sewing a really small circle, just use 1 or 2 fingers from each hand to guide the fabric.
- With the thumbtack in place, you don't have to worry about turning the fabric—it will automatically rotate around the tack.[8]


Sewing a Circular Seam
-
1Stack 2 fabric circles together and pin around the perimeter. Lay 2 fabric circles that are the same size on top of each other so the sides you want to show are touching. Then, take sewing pins and insert them through both pieces of fabric near the circular edge. Try to place a pin every 2 to 3 inches (5.1 to 7.6 cm).[9]
- Use the pins to keep the circles from shifting off of each other as you're sewing.
- Make sure the sides of the fabric that you want to show are on the inside, touching each other. After you sew the seam, you can turn it inside out so the raw edges and stitches don't show.
-
2Straight-stitch about 1⁄2 inch (1.3 cm) from the edge of the fabric. Set your sewing machine to a short straight stitch. Place your fabric under the all-purpose foot and start sewing, leaving a seam allowance (1⁄2 inch (1.3 cm) is a good seam allowance, but you can use whatever you feel comfortable with).[10]
- If you find it difficult to follow your seam allowance, try marking it with a pencil.
- You can also use a whipstitch as a guide to keep your seam straight all the way around the circle.[11]
-
3Guide the fabric pieces around with both hands as you sew. Go slowly, turning and feeding the fabric a stitch at a time. Your machine will follow the curve as long as you're turning the fabric consistently. Once you get the hang of how much you need to turn the fabric, you can speed up a little.[12]
- If the seam is getting away from you, stop the machine and lift the foot to adjust the fabric and correct the curve.
- Feel free to take out the pins as you sew around the circle—the stitches will hold them in place.
-
4Stop sewing about 3 inches (7.6 cm) before you close the circle. The gap allows you to reach in and turn the fabric inside-out so the seam is hidden and the right face of the fabric is showing. If you're sewing a larger circle (or have larger hands), feel free to leave a larger gap to compensate.[13]
-
5Cut triangular notches about every 1⁄2 inch (1.3 cm) around the seam allowance. Cut from the edge of the fabric to the seam so that the top point of the triangle is as close to the seam as possible without cutting into it. Go slowly and be careful—if you cut into the seam, your stitches will unravel and you'll be back at square one.[14]
- The size of the notches depends on the overall size of your circle. Generally, they just make it easier for you to trim the excess fabric from the seam allowance.
-
6Trim excess fabric from the seam allowance. Taking care not to cut into the actual seam, cut out the fabric between your triangular notches. Leave about 1⁄4 inch (0.64 cm) of seam allowance. Go all the way around the circle so your fabric won't pucker when you turn it inside out.[15]
-
7Turn the circle inside-out and sew the gap closed. Set your sewing machine to straight-stitch across the gap. Remember to leave about 1⁄4 inch (0.64 cm) of seam allowance when you sew the gap closed so your circle stays even.[16]
- If you want to make a pillow, fill the fabric circle with foam or polyester, then close the gap.


Making a Curved or Circular Hem
-
1Baste the fabric on the wrong side about 1⁄8 inch (0.32 cm) from the rounded edge.[17] Slide your fabric under the all-purpose foot of your sewing machine, then baste the fabric by making a straight stitch without backstitching. This type of stitch, also called a tacking stitch, is designed to be loose and temporary.[18]
- Sew slowly, turning the fabric a little each time the needle lifts to follow the curve.
- Leave a seam allowance of about 1⁄8 inch (0.32 cm) from the edge.
-
2Make a second round of basting stitches 1⁄4 inch (0.64 cm) from the edge. Go back to where you started to add a second round of stitches inside the first. This second round isn't strictly necessary, but it provides a little insurance in case the first row of stitches breaks when you pull on them to gather the fabric.[19]
- Use the first line of basting stitches that you made as a guide for turning the fabric as you feed it into your sewing machine.
-
3Pull the ends of the threads to bunch the fabric together. Take the loose ends of the thread and pull gently to bring the stitches tighter together. The seam allowance will bunch up while the fabric itself remains smooth.[20]
- If the fabric tends to bunch up more in one area, just distribute the bunches with your fingers so it looks more even.
-
4Fold over the gathered edge and pin it in place. Fold over as much fabric as you want for the seam allowance of your hem. Insert a pin about every 1 inch (2.5 cm) or so to hold the fabric in place.[21]
-
5Use a zigzag stitch to finish the hem. Set your sewing machine for a zigzag stitch and slowly sew the fabric. Sew slowly and turn the fabric as you feed it through so the needle follows the curve of the fabric, using the two rows of basting stitches as a visual guide.[22]
- While you can use any stitch you like for the hem, the zigzag stitch prevents the fabric from fraying.
- Since your basting stitches aren't visible when the fabric is right-side out, there's no need to remove them.


Expert Q&A
-
QuestionHow do I cut a circle template?
 Alessio IadiciccoAlessio Iadicicco is an Apparel Manufacturing Specialist and the CEO and Co-Founder of MarkersValley, an online apparel and manufacturer sourcing platform that connects luxury fashion brands to a network of highly-vetted, truly Italian manufacturers. He holds a Bachelor's degree in Economy and Management of Financial Enterprises from The University of Naples Federico II. MarkersValley has connected fashion brands in over 100 countries and has a network of over 100 independent Italian factories and artisans. MarkersValley has been featured in Forbes, EQ, St. Louis Business Journal, Il Mattino, and Corriere Della Sera.
Apparel Manufacturing SpecialistTo cut a circle correctly, you must use a cutter or the tip of a dressmaker's scissors.
Things You'll Need
- Thumbtack or lapel pin
- Painter's tape
- Pencil
- Tape measure
- Fabric
- Sewing machine
- Thread
- Scissors
- Sewing pins


References
- ↑ https://youtu.be/RMIAX86tJLU?t=92
- ↑ https://nrich.maths.org/5377
- ↑ https://nrich.maths.org/5377
- ↑ https://nrich.maths.org/5377
- ↑ https://youtu.be/IjLBhwnzU1k?t=37
- ↑ https://youtu.be/w-MCCIlwg-0?t=256
- ↑ https://youtu.be/IjLBhwnzU1k?t=79
- ↑ https://youtu.be/w-MCCIlwg-0?t=256
- ↑ https://sew4home.com/tips-resources/sewing-tips-tricks/sewing-smooth-curves-every-time
- ↑ https://youtu.be/0h27ZzDKAB0?t=47
- ↑ Alessio Iadicicco. Apparel Manufacturing Specialist. Expert Interview. 20 May 2021.
- ↑ https://sew4home.com/tips-resources/sewing-tips-tricks/sewing-smooth-curves-every-time
- ↑ https://youtu.be/0h27ZzDKAB0?t=95
- ↑ https://youtu.be/uH1vDcnCPng?t=145
- ↑ https://youtu.be/0h27ZzDKAB0?t=219
- ↑ https://sew4home.com/tips-resources/sewing-tips-tricks/sewing-smooth-curves-every-time
- ↑ https://youtu.be/Vcxr-w3qkT8?t=85
- ↑ https://sewguide.com/baste-stitching/
- ↑ https://youtu.be/0h27ZzDKAB0?t=343
- ↑ https://youtu.be/0h27ZzDKAB0?t=398
- ↑ https://youtu.be/0h27ZzDKAB0?t=437
- ↑ https://youtu.be/0h27ZzDKAB0?t=513
About This Article