This article was co-authored by wikiHow staff writer, Jessica Gibson. Jessica Gibson is a Writer and Editor who's been with wikiHow since 2014. After completing a year of art studies at the Emily Carr University in Vancouver, she graduated from Columbia College with a BA in History. Jessica also completed an MA in History from The University of Oregon in 2013.
There are 11 references cited in this article, which can be found at the bottom of the page.
The wikiHow Video Team also followed the article's instructions and verified that they work.
This article has been viewed 38,017 times.
Learn more...
You might feel intimidated about sewing the crotch on a garment, but you can easily do it with a simple straight stitch. Although you should follow the specifics of your pattern, you'll get straight edges and strong seams as long as you line up the fabric. If you think the pants will get a lot of wear, you can even reinforce your stitches so they don't unravel.
Steps
Pinning the Crotch Seam
-
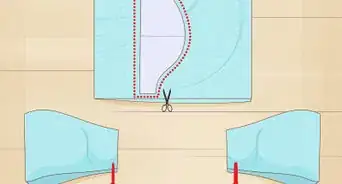
1Lay 2 fabric pants pieces so the right sides face together. Take the front and back pants pieces that you assembled from a pattern and lay 1 flat on your work surface so the right side faces up. Then, stack the other piece directly on the bottom piece so the wrong side faces up.[1]
Did You Know? The right side of the fabric has the pattern visible. Once you've stacked the pieces properly, the wrong side should face up.
-
2Pin the pieces together at the center of the inner leg seams. Line up the edges of the fabric pieces and find the middle of the crotch pieces. This is where the fabric curves into a deep U-shape. Take a sewing pin and insert it through both pieces of fabric at the vertical crotch seam.[2]
- For even more stability, you could use another pin and insert it going from the opposite side of the vertical seam.
Advertisement -
3Insert sewing pins through the top corner of the inner leg pieces. Ensure that the fabric edges are lined up along the top of the inner leg pieces so the corners are even. Then, insert a sewing pin perpendicularly through both layers of fabric at the inner corners.[3]
- It's important to insert the pins so they're perpendicular to the curved line of the crotch. This makes it easier to remove the pins as you're sewing.
-
4Push sewing pins along the entire curve of the crotch. Keep checking that the fabric pieces are perfectly lined up and continue to pin the fabric around the inner curve. Use sewing pins about every 2 or 3 inches (5.1 or 7.6 cm) so the fabric doesn't slide around.[4]
- You'll probably use about a dozen sewing pins to completely pin the crotch in place.

Stitching the Seam
-
1Set your sewing machine to straight stitch. Take your pinned pants pieces over to the sewing machine and thread the machine. Then, adjust your sewing machine to make straight stitches that are about 2.5 millimetres (0.098 in) long.[5]
- Don't flip the fabric over before you start sewing or you'll have trouble removing the pins as you stitch around the crotch.
-
2Sew along the top corner of the crotch. Leave a 5⁄8 inch (1.6 cm) seam allowance as you stitch down towards the rounded curve of the crotch. Remove sewing pins as you stitch so you don't damage your machine.[6]
- Avoid sewing the crotch seam by hand, especially if you're using heavy fabric. The machine makes strong, tight stitches that will hold up better over time.
Tip: If you're sewing pants that have an elastic waistband, follow your pattern's instructions about sewing along the top corner of the leg pieces. You may need to leave a small gap for inserting the elastic later.
-
3Stitch around and up to the straight sides of the crotch. Keep straight stitching with a 5⁄8 inch (1.6 cm) seam allowance until you reach the inner corner that's opposite to the one you started at. Guide the fabric to create a straight seam.[7]
- Hold the inner leg seam open as you sew across it at the bottom of the crotch curve.
Reinforcing the Crotch
-
1Line the center of the presser foot with the stitch line. Slide the fabric so the presser foot is just above the line of stitches where they begin to curve down into the crotch. Position the fabric until the center of the pressure foot lines up with the line of stitches that you already made. Then, lower the presser foot.[8]
- You don't have to reinforce the vertical sides of the crotch since it doesn't get as much wear and tear as the curved area of the crotch.
-
2Stitch over the curved bottom of the crotch to reinforce the stitches. Make another row of straight stitches directly of the first row of stitches you made. This creates strong, reinforced stitches that prevent the crotch from splitting.[9]
Did You Know? There's no need to backstitch when you start or finish the reinforced row because you're stitching onto the previous row. The existing stitches act as knots that stop the new row of stitches from coming undone.
-
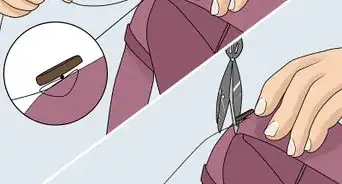
3Trim the excess fabric in the curve of the crotch. Once you've reinforced the stitches, take a sharp pair of scissors and carefully cut away the fabric of your seam allowance. Only trim the curved bottom part of the crotch where you reinforced the stitches.[10]
- Do not cut into the stitches or your thread will unravel.
Things You'll Need
- Sewing pins
- Sewing machine
- Fabric pants pieces
- Scissors
- Iron
- Ironing board
-Step-24-Version-5.webp)
References
- ↑ https://youtu.be/ODhOmYkAdes?t=32
- ↑ https://youtu.be/ODhOmYkAdes?t=46
- ↑ https://youtu.be/ODhOmYkAdes?t=110
- ↑ https://youtu.be/ODhOmYkAdes?t=154
- ↑ https://youtu.be/Y5cVWNSUDgo?t=154
- ↑ https://youtu.be/Y5cVWNSUDgo?t=140
- ↑ https://youtu.be/b8ErZ_kIB_I?t=169
- ↑ https://youtu.be/Y5cVWNSUDgo?t=285
- ↑ https://youtu.be/Y5cVWNSUDgo?t=317
About This Article