This article was co-authored by Megan Connolly and by wikiHow staff writer, Danielle Blinka, MA, MPA. Megan Connolly is a Sewing Specialist with over 40 years of sewing experience. She specializes in creating crafts and clothing garments such as face masks, scarves, and dresses. Using over 18 years of experience in software technology, Megan has served as the Director of Technology and Advisor to Robotics Teams at The Haverford School in Haverford, Pennsylvania. She has a BS in Mathematics from Temple University.
There are 23 references cited in this article, which can be found at the bottom of the page.
This article has been viewed 79,001 times.
The COVID-19 pandemic is very scary, so you're probably doing everything you can to stay healthy. As a preventive measure, you might want to wear a medical mask to protect yourself from the virus. Fortunately, it's easy to make fabric masks at home if you have basic sewing skills. However, homemade masks are not as effective as medical-grade masks, so you should only use a fabric mask if it's all you have available.[1]
Warning: Cloth masks are ineffective in preventing the spread of more infectious variants of COVID-19, like Delta and Omicron. Medical-grade masks are necessary to limit the spread and risk of infection from the current dominant variants of the coronavirus.[2]
Steps
Medical Mask Template
Choosing the Right Fabric
-
1Pick a heavyweight, tight-woven fabric for both layers of the mask. Your mask will have 2 layers to make it more effective. It's best to use different fabric for each layer so it's easy to recognize which side is which. Look for fabrics that have a fun print so your mask looks cheerful. For best results, choose a thicker fabric for your outer layer and a thinner cotton fabric for the liner.[3]
- Based on recent research, the best material for homemade masks is the sterile wrap used to protect surgical instruments. It may block up to 99% of germs and particulates.[4]
- For the outer side, you might try a non-stretch fabric like denim, twill, canvas, duck-cloth, or quilting fabric.
- For the liner, you might use cotton or cotton-blend, as long as it's non-stretch.
Tip: Fabric medical masks must be washed and sterilized often, so choose a fabric that won’t shrink or warp after washing.
-
2Use a preshrunk 100% cotton T-shirt as an easy option. You might not have fabric at home and may not want to rush out to a craft store. Fortunately, you can use an old T-shirt to make your mask. Just boil the shirt in a pot of water for 10 minutes to sterilize and shrink it. Then, let it air-dry.[5]
- For best results, pick a shirt like Hanes Heavyweight 100% preshrunk cotton T-shirts. However, you can use your old T-shirts if that’s all you have.
Advertisement -
3Cut up a pillowcase if you don’t have a T-shirt. Why not turn an old pillowcase into a medical mask? While a pillowcase isn’t an ideal option, the fabric provides some protection against germs. Pull out an old pillowcase if it's the only fabric you have.[6]
- A T-shirt will typically provide more protection than a pillowcase, so make that your first choice.
-
4Pair different colors or patterns so it’s easy to identify the front. Wearing a face mask when you go out could get annoying, but a fun print might make it more fun. Additionally, accidentally wearing your mask inside out might expose you to germs, so having 2 different fabrics provides added protection. Use a patterned fabric on at least 1 side of your mask.
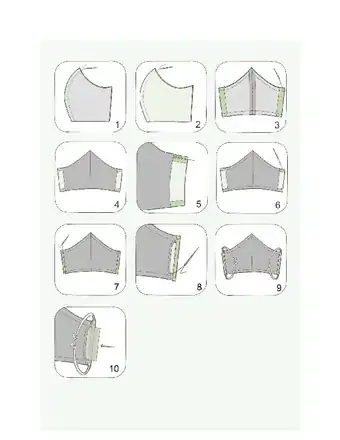
For a quick, easy design that’s approved by the CDC:
This is a simpler pattern, but it does not allow you to use a filter.


Cutting Your Fabric
-
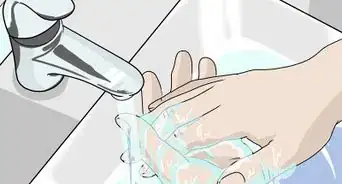
1Make sure your hands and surfaces are clean. You don't want to accidentally get dirt and germs on your mask materials, especially if you're making masks to donate. Before you get started, disinfect your sewing machine and the surfaces you’ll be using with bleach spray or bleach wipes. Additionally, wash your hands for at least 20 seconds before you start working. You may also wear 1 of your homemade masks so you don't breathe, cough, or sneeze on your supplies.[7]
- This is especially important if you're making masks to donate to health care providers.
-
2Print and cut out the face mask pattern. You can find a lot of different face mask patterns online, and many of them will work. For the highest quality mask, use a pattern that features a sturdy nose ridge that allows the wearer to fit the mask to their face. When you send your pattern to print, make sure you select “actual size” so it’s the correct scale. Then, double-check the scale with a ruler before cutting it out.[8]
- Try this mask pattern to make a large mask for a man: https://www.craftpassion.com/wp-content/uploads/2013/08/MAN_Pocket_Face_Mask_Pattern.pdf
- Use this mask pattern for women or teens: https://www.craftpassion.com/wp-content/uploads/2013/08/TEENAGER_WOMAN_Face_Mask___Pattern.pdf
- Use this pattern for kids aged 7-12: https://www.craftpassion.com/wp-content/uploads/2013/08/YOUNG_KIDS_7-12Y_Pocket_Face_Mask_Pattern.pdf
- Try this mask for kids aged 3-6: https://www.craftpassion.com/wp-content/uploads/2013/08/SMALL_KIDS_3-6Y_Pocket_Face_Mask_Pattern.pdf
-
3Fold both pieces of fabric in half with the “good” sides facing in. To sew your mask, you’ll need 2 mirrored copies of the pattern for both the outer layer and the liner. Folding your fabric before you cut it makes it easy to cut out both pieces. Line up the edges of the fabric with the “good” side facing in toward itself and the “rough” side facing out.[9]
-
4Trace the pattern onto the backside of your outer fabric piece. Place the folded fabric on a flat surface. Then, lay the pattern on the fabric. Use a pencil or fabric chalk to trace the pattern.[10]
-
5Cut out the outer pieces with an extra 1.5 in (3.8 cm) side margin. You’ll want wider margins on the side edges of the outer layer of the mask so you'll have a place to insert your elastic. Use your fabric scissors to cut out the pattern. As you cut, add an estimated 1.5 in (3.8 cm) to the outer edge of the fabric (where the mask will face the wearer’s ear).[11]
-
6Trace the pattern onto the backside of your liner fabric. With it still folded, lay your liner fabric down on a flat surface. Then, place the pattern onto the fabric. Use a pencil or fabric chalk to trace along the outside of the pattern.[12]
- When you cut out the pattern, you’ll cut through both sides of the fabric because you’ll need 2 pieces.
-
7Cut out the liner pieces using fabric scissors. Keep your fabric folded while you cut so you can cut out 2 pieces at the same time. Slowly snip around the edge of the pattern you traced, cutting through both layers of fabric. Once you finish cutting, you should have 2 copies of your pattern from the 2 sides of the fabric.[13]
- If you don't have fabric scissors, just use the sharpest scissors you have.
Making the Body of the Mask
-
1Put the liner pieces together with the smooth side facing inward. You're going to sew your 2 pieces of liner fabric together so your mask covers more of your face and contours over your nose. Line up the nose seams on the pieces of the fabric you’re using for the inner lining. Make sure the sides you want to be facing out when the mask is finished are facing each other for the sewing part.[14]
- If you like, pin the pieces in place to hold them together. However, this isn’t necessary.
-
2Sew along the traced seam on the nose edge of the liner fabric. Use your sewing machine or a hand-sewing needle and thread to stitch the seam that will go over the wearer’s nose. Follow the line you traced onto the fabric, leaving your margin as excess.[15]
-
3Line up the outer pieces with the pattern on the inside. Like with the liner, you'll sew the 2 outer pieces together. Face the decorative sides of the outer fabric pieces toward each other. Then, line up the nose seam and check that all of the edges are evenly aligned with each other.[16]
- You can pin the fabric together if you like, but it’s not necessary.
-
4Sew the outer pieces together along the traced nose seam. Use a hand-sewing needle or a sewing machine to stitch the seam that will go over the wearer’s nose. Use the line you traced onto the fabric as a guide, leaving the margins.[17]
-
5Iron the seams on each fabric piece so they lay flat. While you can skip this step if you like, ironing the seam will flatten your mask so it's easier to sew. Open up both the liner and the outer layer of fabric. Place both pieces on your ironing board or a heat-safe surface with the good side facing down. Set your iron on low heat, then gently press the seams on the outer fabric piece and the liner.[18]
- If you don't iron your fabric, the area around the seams you just made will be puffy instead of flat.
-
6Line up the outside seams on both pieces and pin them in place. Lay your outer fabric piece down on a flat surface with the good side facing down. Then, lay your liner piece over the outer piece with the good side facing up. Make sure the nose seams on both pieces are lined up.[19]
-
7Sew along the traced line on the top and bottom of the mask. Use your sewing machine or a hand-sewing needle and thread to stitch along the top and bottom of the mask to secure the outer fabric and liner together. Leave the sides of the mask open.[20]
- You should have about 1 in (2.5 cm) of excess fabric on each side for your ear loops.
Inserting the Nose Ridge
-
1Turn the mask right-side out and iron the seams flat. At this point, it's time for the "good" side of your mask to be facing out. To turn it right-side-out, start by opening the mask on 1 of the unsewn sides. Use your fingers to gently fold the sides of the flap up to reveal the “good” side of the mask. Slowly pull the remaining part of the mask through the flap you created until the mask is right-side out. Then, iron the seams on the top and bottom so the mask will be flat.[21]
- Be careful that you don’t accidentally rip the seams while you’re trying to turn the mask right-side out.
- After you turn the mask right-side out, it’ll likely be quite puffy. Ironing it will help correct this.
-
2Insert a 5.5 to 6 in (14 to 15 cm) floral wire into the top of the face mask. You're going to insert a wire at the top of the mask so it molds around the wearer's nose. Use your fingers to slide the floral wire into the opening on either side of the mask. Push the wire right up against the top seam where the wearer’s nose will go. Pin the wire in place so it doesn’t move.[22]
- The wire gives the nose of the mask some shape so it stays up over the wearer’s nose and mouth. Additionally, it helps the fit be more form-fitting.
-
3Do a top stitch along the top side and bottom side for reinforcement. Your top stitch will also hold the nose wire in place between the fabric pieces, so sew just below the wire. Use your sewing machine or a hand-sewing needle and thread to sew an additional topstitch along the top and bottom of the masks to make the seams stronger.[23]
- Double check that the nose wire is between the first stitch and topstitch as you sew along the top side.
- Be careful not to let your needle sew on the wire. This can dull the needle very quickly, and may break it.
Sewing the Sides and Inserting the Filter
-
1Make a .25 in (0.64 cm) fold on the sides of the outer layer. The excess fabric on the sides of the outer layer will create the loops on the sides of your mask that will hold the elastic. Fold the edge over and line it up just inside the gap between the outer layer of fabric and the liner, which you left open. Then, use your iron to gently press the fold to make it a crease.[24]
- The ear flap is where you’ll put the elastic that holds the mask in place on the wearer’s face.
-
2Sew the edge of the side loop down into the outer layer of fabric. You want to leave the gap between the 2 layers of mask open so you can insert a filter material, so don’t sew through the liner. Use your sewing machine or a hand sewing needle and thread to stitch along the edge of the side flap to secure it to the outer layer of the mask. This will leave a narrow channel on each side of the mask where the elastic pieces will go.[25]
Variation: You can use hair ties instead of an elastic piece if you like. If you’re using hair ties, insert the hair tie into the ear flap when you fold it down. Then, sew the flap down around the hair tie.
-
3Fold the frayed edges of the liner inside and stitch seams on each side. While the elastic loop will finish your seam on the outer layer of the mask, you’ll still need to create a seam on the liner to keep the fabric from fraying. Use your fingers to fold about 1⁄8 inch (0.32 cm) of the liner fabric in toward the gap in the side of the mask. Then, use your sewing machine or a hand sewing needle and thread to sew along the edge. Remember not to sew the liner to the outer fabric, or you won't be able to insert any filter media between the layers.[26]
- Repeat on the other side of the mask.
- This will leave pockets in the sides of the mask where you can put a filter.
-
4Push 1 end of the elastic through the channel on the side. Use a 27 in (69 cm) long piece of elastic that’s 1⁄4 in (0.64 cm) wide or 3⁄8 in (0.95 cm) wide. Open the tunnel on one side of the mask and use your fingers to push the end of the elastic through it. Work the elastic through to the other side of the tunnel and pull out the end. Then, push the other end of the elastic through the tunnel on the other side of the mask. Tie the ends of the elastic together until they’re secure.[27]
- Tying the elastic allows you to adjust the size of the mask as needed.
- The elastic may shrink in the wash, so it's good to have extra length.
-
5Wash the mask in laundry detergent and hot water before you use it. Even though you probably took precautions, your mask won’t be sterile after you finish making it. Before using it, launder it in your washing machine using a high-temperature setting and laundry detergent. Dry the mask on a hot setting until it’s completely dry.
- If you don’t have a washing machine, boil the mask for 10 minutes to sterilize it.[28]
-
6Insert an air filter into the side of the mask for added protection. A filter will make your mask as effective as possible. Use a HEPA filter, vacuum filter, or nonwoven fabric as a mask filter. Place the filter inside the mask between the liner and the outer layer before you put it on. When you remove your mask, discard the filter and replace it with the next use.[29]
- You can still use the mask without a filter. However, the filter will make the mask more effective.[30]

Things You’ll Need
- Pattern
- Sewing machine or hand sewing needle and thread
- Tight-woven, non-stretch fabric for outer side
- Tight-woven, non-stretch cotton fabric for liner
- 5.5 to 6 in (14 to 15 cm) pieces of floral wire
- 27 in (69 cm) pieces of 3⁄8 inch (0.95 cm) or 1⁄4 in (0.64 cm) elastic
- Filter material (optional)
Warnings
- Homemade medical masks aren’t nearly as effective at preventing illness as medical-grade masks, which can block as much as 95% of germs. Only use a homemade mask if you don’t have access to medical supplies.[34]⧼thumbs_response⧽


References
- ↑ https://wwwnc.cdc.gov/eid/article/12/6/05-1468_article
- ↑ https://health.clevelandclinic.org/are-cloth-masks-enough-against-omicron/
- ↑ https://wwwnc.cdc.gov/eid/article/12/6/05-1468_article
- ↑ https://ufhealth.org/news/2020/uf-health-anesthesiology-team-devises-respirator-mask-made-existing-hospital-materials
- ↑ https://wwwnc.cdc.gov/eid/article/12/6/05-1468_article
- ↑ https://smartairfilters.com/en/blog/best-materials-make-diy-face-mask-virus/
- ↑ https://www.youtube.com/watch?v=M19HtUhBcM8&feature=youtu.be&t=18
- ↑ https://www.youtube.com/watch?v=LFOBhV6TTr8&feature=youtu.be&t=81
- ↑ https://www.youtube.com/watch?v=LFOBhV6TTr8&feature=youtu.be&t=81
- ↑ https://www.youtube.com/watch?v=LFOBhV6TTr8&feature=youtu.be&t=105
- ↑ https://www.youtube.com/watch?v=LFOBhV6TTr8&feature=youtu.be&t=121
- ↑ https://www.youtube.com/watch?v=LFOBhV6TTr8&feature=youtu.be&t=105
- ↑ https://www.youtube.com/watch?v=LFOBhV6TTr8&feature=youtu.be&t=133
- ↑ https://www.youtube.com/watch?v=tgiA6IVuj78&feature=youtu.be
- ↑ https://www.youtube.com/watch?v=tgiA6IVuj78&feature=youtu.be
- ↑ https://www.youtube.com/watch?v=tgiA6IVuj78&feature=youtu.be&t=32
- ↑ https://www.youtube.com/watch?v=tgiA6IVuj78&feature=youtu.be&t=32
- ↑ https://www.youtube.com/watch?v=tgiA6IVuj78&feature=youtu.be&t=70
- ↑ https://www.youtube.com/watch?v=tgiA6IVuj78&feature=youtu.be&t=127
- ↑ https://www.youtube.com/watch?v=tgiA6IVuj78&feature=youtu.be&t=144
- ↑ https://www.youtube.com/watch?v=tgiA6IVuj78&feature=youtu.be&t=305
- ↑ https://www.youtube.com/watch?v=tgiA6IVuj78&feature=youtu.be&t=406
- ↑ https://www.youtube.com/watch?v=tgiA6IVuj78&feature=youtu.be&t=446
- ↑ https://www.youtube.com/watch?v=tgiA6IVuj78&feature=youtu.be&t=614
- ↑ https://www.youtube.com/watch?v=tgiA6IVuj78&feature=youtu.be&t=698
- ↑ https://www.craftpassion.com/face-mask-sewing-pattern/
- ↑ https://www.craftpassion.com/face-mask-sewing-pattern/
- ↑ https://wwwnc.cdc.gov/eid/article/12/6/05-1468_article
- ↑ https://www.craftpassion.com/face-mask-sewing-pattern/
- ↑ https://www.gfclinic.com/approved-pattern-info-for-homemade-masks/
- ↑ https://www.cdc.gov/coronavirus/2019-ncov/if-you-are-sick/steps-when-sick.html
- ↑ https://www.cdc.gov/coronavirus/2019-ncov/prevent-getting-sick/diy-cloth-face-coverings.html
- ↑ https://www.cdc.gov/coronavirus/2019-ncov/if-you-are-sick/steps-when-sick.html
- ↑ https://wwwnc.cdc.gov/eid/article/12/6/05-1468_article
About This Article

To sew your own medical mask, start with heavyweight, tight-woven fabric, like a pre-shrunk cotton t-shirt. Cut out one 7 by 8-inch (18 by 20-cm) rectangle and two 36 by ½-inch (91 by 1-cm) strips. Then, center one of the strips at the top of the rectangle, and fold the top edge of the rectangle down ½ inch (1 cm) over the strip. Sew along the raw edge to create a pocket. Next, take a metal wire for the nose piece and bend it in half and flatten it. Insert the metal wire into the pocket so it’s centered, then stitch the pocket closed to secure it in place. Now, make 3 evenly-spaced pleats going down from the top of the mask. Sew down the sides of the mask to secure the pleats. Then, center the second strip at the bottom of the rectangle, and fold the bottom edge of the rectangle up ½ inch (1 cm) over the strip. Finally, sew along the raw edge and catch the strip in the seam to secure it. To use your mask, place the fabric over your nose and mouth and mold the metal wire so it’s shaped to the bridge of your nose. Then, tie the ends of the strips together behind your head. A homemade medical mask may help reduce your exposure to viruses and prevent you from spreading them if it’s all you have available, but keep in mind that it won’t be as effective as a manufactured medical mask.