This article was co-authored by Eric Shipe. Eric Shipe is a Kitchen and Bath Designer and the Owner of Bath + Kitchen based in Washington DC. Eric and his team specialize in cabinetry, design, and remodels. They serve homeowners, interior designers, architects, and contractors with a refined process, creative ideas, 4K photo-realistic renderings, and 360 Panoramic views. Bath + Kitchen was featured in Best of Houzz 2017-2020. Eric holds a BA in Economics and Business Administration from Ursinus College.
There are 14 references cited in this article, which can be found at the bottom of the page.
This article has been viewed 18,898 times.
Whether you just bought new cabinets or you want to give old cabinets a new look, a fresh coat of stain can be just what you’re looking for! This might seem like the job that you’d need a professional for, but it’s a lot easier than you might think. You just need the right tools and preparation, plus some patience. With these simple steps, you can give your cabinets a fresh new look.
Steps
Removing the Doors and Hardware
-
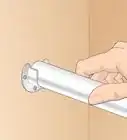
1Cover the walls and floor around the cabinets with drop cloths and tape. You don’t have to remove the cabinets completely if they’re already on the walls, but you do need to take some steps to protect the area. Put a drop cloth or sheet down on the floors and countertops. Protect the walls close to the cabinets by applying painters tape.[1]
- Work on the cabinets outside or in a dedicated work area if they aren't attached to the wall. Put them down on a drop cloth so you don’t get stain and sawdust everywhere.
-
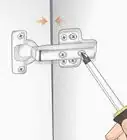
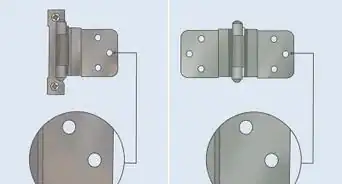
2Unscrew the cabinet doors from the hinges with a screwdriver. Find the 2 hinges on each door and locate the screws. Hinge screws are usually on the front or inside of each door. Take a screwdriver and remove the screws on each hinge by turning them counterclockwise. Repeat this to take off all the doors.[2]
- Hold the doors steady as you’re unscrewing them so they don't fall off.
- Keep the screws in a safe place so you can reattach the doors easily when you’re done.
- You can use a power drill to remove the screws by running it in reverse. This is faster and might be a good choice if you have a lot of cabinets to work on.
Advertisement -
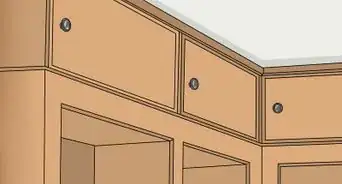
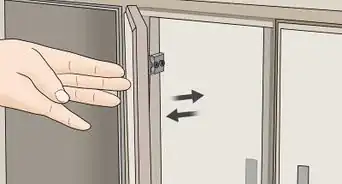
3Remove all the hinges and handles from the cabinets. First, unscrew all of the hinges and pull them away from the surface. Then, take off the knobs or handles on the cabinet doors by removing the screws on the front or back of the door.[3]
- Keep all of the hardware and screws in a safe place, like a bag or jar. That way, you won’t lose any.
-
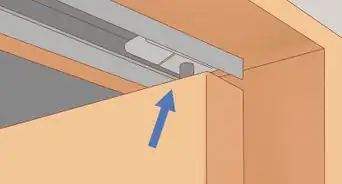
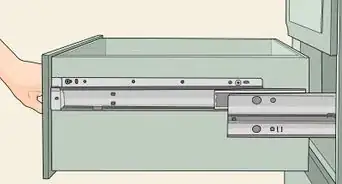
4Pop out the shelves inside the cabinets and set them aside. In most cabinets, the shelves just rest on top of plugs. Lift each shelf up and slide it out of the cabinet. Then, pull out the plugs along the side of the cabinet interior. If you’re staining the shelves, then keep them nearby. If not, put them in a safe place where you won’t step on them.[4]
- Just like with the hardware, make sure you don’t lose any of the plugs.
- If the shelves are screwed in, then just remove those screws to get the cabinets out.


Sanding and Conditioning the Cabinets
-
1Wipe down the cabinets with soap and water if they aren't painted. If the cabinets are raw or unstained, wipe the surfaces down with a wet rag and mild detergent. Then, wipe them again with a wet rag to remove any soap residue from the surface. Let the cabinets dry before moving on.[5]
- You don't have to wash off cabinets if they're already stained or painted because you will be removing the previous finish.
-
2Sand the previous stain off with 100 to 120-grit sandpaper. Old finish, stain, or paint needs to be removed before you can add a fresh coat of stain. Use a coarse-grit sandpaper to sand along the grain of the wood using smooth, back-and-forth motions. Sand all of the surfaces where you plan to apply stain.[6]
- If the cabinets are raw and unfinished, do a light sanding with fine-grit sandpaper before staining.
- Use an electric sander to get this done faster. Make sure you keep the sander moving so you don't damage the wood surface.
- Chemical paint stripper is a good option if you have a lot of cabinets and don't want to spend a lot of time sanding. Be sure to work in a well-ventilated area and follow all the safety instructions.
-
3Wipe the cabinets down with a rag or tack cloth to remove sawdust. Run a damp rag or tack cloth across all of the surfaces. Be sure to get rid of all the dust residue before moving on.[7]
- If dust is building up on the floor, vacuum that up before you start staining.
-
4Sand once more with fine-grit sandpaper so the stain grips properly. Do one final sanding with 150 to 200-grit sandpaper to get the wood surface ready for the stain. Sand all the parts that you’ll be finishing the same way as you did before.[8] Then, make sure that the surface is nice and smooth.[9]
- Work the sandpaper into all the detailing and ridges to ensure an even finish.
-
5
-
6Repair any discolored spots with a touch-up pen, if necessary. Older wood may have faded or discolored spots that could cause the fresh stain to look uneven. You can fix these spots easily with a touch-up pen. Simply use the pen to color in any discolored areas so they match the base color of the wood.[12]
- You can get a touch-up pen from any hardware store. Try to get one that matches the base color of the wood.
-
7Apply wood conditioner to prep the surface and ensure even coverage. Wood conditioner helps the stain adhere and gives you a better finish. Dip a brush into a can of conditioner and brush it onto the wood. Spread a thin layer on all of the surfaces that you'll be staining. Wait for the conditioner to dry, then brush the wood lightly with #000 steel wool to rough up the surface a little.[13]
- Follow the product's instructions for drying time. Most wood conditioner dries in as little as 15 minutes.
- Conditioning is especially important if you're staining a porous wood like pine. The conditioner closes up the wood pores and keeps the stain on the surface.[14]


Applying the Stain
-
1Choose a color and type of wood stain for your cabinets. Decide if you want to use an oil-based stain or a water-based stain. When it comes to color, you have many choices, ranging from dark to light and different tints. Look at samples to decide which matches the room best.[15]
- If you aren’t sure which stain you want, try testing a few out. Put a small amount on a hidden spot of the cabinet and see how it looks when it dries.
- Oil-based stains are slower to apply and susceptible to mold, but usually give a more even finish and tend to last longer. Water-based stains dry faster, but they tend to show imperfections more clearly and could fade sooner.
-
2Open the can of stain and stir it thoroughly to get rid of clumps. Sediments tend to settle at the bottom of wood stains, so get all of that up before painting with it. Use a wooden paint stirrer and scrape along the bottom of the can. Then stir thoroughly until the stain is even and there are no more clumps in it.[16]
- To test the stain, lift the paint stirrer up and hold it over the can. If there aren’t any clumps, then you’re ready to start staining.
-
3Brush the stain into the detailed parts of the cabinet first. Most cabinet doors have some detailing on the front, so focus here first. Dip a brush or clean rag into the stain, and rub it into these detailed sections. Work along the grain of the wood to apply a thin, even layer of stain on all of the detailed areas.[17]
- Make sure that the brush or rag you use is clean. Any dirt or dust will get trapped in the stain and ruin the finish.
- You may need to use a small brush for tight spaces.
-
4Cover the flat cabinet surfaces with an even coating of stain. After covering all the detailed areas, move on to the rest of the cabinet. Brush the stain onto all the flat surfaces with smooth, even strokes along with the grain of the wood. Cover the outside and inside of the cabinets, along with the doors and shelves.[18]
- If the cabinets are still attached to the walls, then you probably won’t be able to reach the backs and sides. That’s fine! Just focus on the visible areas.
- Remember to apply a thin coat of stain. If some spots are darker than the others, spread the stain a bit more in that area.
-
5Wipe off any excess stain with a clean rag. If the stain coating is thicker in some spots, then you'll have dark patches on your cabinets. After the first coat, look over the cabinets and find any spots that are darker than the others. Take a clean rag and wipe away the excess stain in these spots to even out the finish.[19]
-
6Let the first coat of stain dry completely and assess the color. Stain always gets darker once it dries. Check the product's instructions and let the stain dry for the recommended amount of time. Then, check the color to see if it's as dark as you want it to be.[20]
- Drying time varies by product but it's usually somewhere between 8 and 24 hours. Always follow the instructions on the stain.[21]
- In the meantime, you can clean up and vacuum the leftover sawdust. Leave the tape and coverings on the wall, just in case you want another coat.
-
7Sand the wood and apply a second coat of stain for a darker color. If you decide you want the stain to be darker, lightly sand the cabinets with a fine-grit sandpaper to rough up the surface. Wipe them down afterward with a tack cloth to remove the sanding dust. Then, apply a second coat using the same process as before. Let the cabinets to dry for the same amount of time.[22]
- You can even apply a third coat if you want a darker tone. Remember to sand and wipe the cabinets in between coats.
-
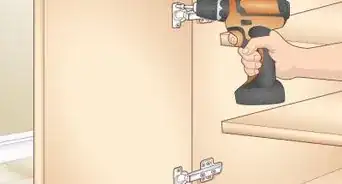
8Reattach the doors and shelves once the cabinets are totally dry. Screw the handles and hinges back onto the doors and reattach them to the cabinets. Then, put the shelf plugs back in and slide the shelves into position to finish the project.[23]


Expert Q&A
-
QuestionDo you have to sand cabinets before staining?
 Eric ShipeEric Shipe is a Kitchen and Bath Designer and the Owner of Bath + Kitchen based in Washington DC. Eric and his team specialize in cabinetry, design, and remodels. They serve homeowners, interior designers, architects, and contractors with a refined process, creative ideas, 4K photo-realistic renderings, and 360 Panoramic views. Bath + Kitchen was featured in Best of Houzz 2017-2020. Eric holds a BA in Economics and Business Administration from Ursinus College.
Home Improvement SpecialistYes! You’ve got to ensure the wood surface is sanded smooth. After sanding, wipe the surface thoroughly to remove the dust completely.
Things You’ll Need
- Wood stain
- Sandpaper (fine and coarse-grit)
- Paintbrush or rag
- Tack cloth
- Painter’s tape
- Drop cloths or sheets
- Mineral spirits
- Screwdriver


References
- ↑ https://www.bobvila.com/articles/how-to-stain-cabinets/
- ↑ https://youtu.be/tuWP1ozXNYs?t=34
- ↑ https://www.hgtv.com/design/rooms/kitchens/staining-kitchen-cabinets
- ↑ https://youtu.be/tuWP1ozXNYs?t=40
- ↑ https://www.bobvila.com/articles/how-to-stain-cabinets/
- ↑ https://www.bhg.com/kitchen/cabinets/makeovers/how-to-stain-kitchen-cabinets/
- ↑ https://www.bobvila.com/articles/how-to-stain-cabinets/
- ↑ https://www.bobvila.com/articles/how-to-stain-cabinets/
- ↑ Eric Shipe. Home Improvement Specialist. Expert Interview. 12 July 2021.
- ↑ Eric Shipe. Home Improvement Specialist. Expert Interview. 12 July 2021.
- ↑ https://youtu.be/tuWP1ozXNYs?t=127
- ↑ https://youtu.be/tuWP1ozXNYs?t=143
- ↑ https://www.bobvila.com/articles/how-to-stain-cabinets/
- ↑ https://youtu.be/pcL3v5Qe-AI?t=36
- ↑ https://youtu.be/LWz1aqnUrKs?t=58
- ↑ https://youtu.be/tuWP1ozXNYs?t=193
- ↑ https://youtu.be/tuWP1ozXNYs?t=227
- ↑ https://www.bobvila.com/articles/how-to-stain-cabinets/
- ↑ https://www.bobvila.com/articles/how-to-stain-cabinets/
- ↑ https://www.bobvila.com/articles/how-to-stain-cabinets/
- ↑ https://woodworkingskills.com/how-long-to-let-stain-dry-before-polyurethrane/
- ↑ https://www.bobvila.com/articles/how-to-stain-cabinets/
- ↑ https://youtu.be/tuWP1ozXNYs?t=300
About This Article

To stain cabinets, start by removing the doors and hardware, but make sure to label where everything goes so you can easily put things back when you're finished. Next, remove the existing finish with a small power sander or several sanding blocks, and vacuum up the dust when you're done. Then, dip a cloth in the stain and apply several thin coats to allow the wood to absorb the liquid. Make sure to allow the stain to dry between each coat, stopping once you get to the desired color. Finally, use a foam brush to apply a polyurethane topcoat in order to seal the cabinets. To learn how to choose the right stain color for your cabinets, keep reading!