This article was co-authored by wikiHow Staff. Our trained team of editors and researchers validate articles for accuracy and comprehensiveness. wikiHow's Content Management Team carefully monitors the work from our editorial staff to ensure that each article is backed by trusted research and meets our high quality standards.
This article has been viewed 39,683 times.
Learn more...
With their supple skin, sweet-and-seedy flavor, and chewy texture, figs are a summertime treat. They are also a delicate fruit and one of the most perishable foods. Raw figs last only a day or two before spoiling, so if you can't eat your haul that quickly, think about freezing or canning them, which extends their life. Fig storage is a bit of an art, but the rewards (fresh figs year-round!) are worth the effort.
Steps
Storing Figs in the Open
-
1
-
2Put the figs on a cardboard or styrofoam tray. Egg trays work well, as do trays for canned milk. You can also use a plate lined with a paper towel.[3]
- Space out the figs as much as you can.
- Don't stack or crowd them. They need room to breathe to keep from getting moldy.
Advertisement -
3Cover the tray or plate tightly with plastic wrap. This keeps the figs from getting crushed, drying out, or absorbing odors from other foods.
-
4Transfer uneaten figs to the refrigerator after 3-4 days. Leave them covered on the tray or plate. They can last up to a month refrigerated.[4]


Storing Figs in the Freezer
-
1Wash the figs under cool water. Use only ripe figs, which have a plump, tender feel and yield to the touch. Overripe ones won't freeze well, so remove these to be eaten immediately.
- Remove dirt by rubbing gently with your fingers.
- Twist off the stems as you wash.
- Figs bruise easily, so don't use a vegetable brush.
- Pat the figs dry using a towel.
-
2Put the figs on a wax-lined baking sheet, spaced half an inch apart.[5] Make sure they don't touch one another. Touching can bruise their flesh.
-
3Put the baking sheet in the freezer. The figs should stay there 2-4 hours.
-
4Remove the figs from the freezer. This should be done after 2-4 hours. Remove from the baking sheet, seal in a plastic freezer bag, and put them back in the freezer for storage.
- Once frozen, figs will be good 6-8 months.[6]
- Make sure you thaw them before you are ready to eat.


Canning Figs
-
1Sterilize the jars and lids by immersing them in boiling water (2-3 minutes). Alternatively, you can use the sterilize cycle of your dishwasher.
-
2Wash the unpeeled, uncut figs in cold water. Remove the stems and set aside until you are ready to cook them.
-
3Cook the figs in a large pot of water on low heat. You want your figs to be light brown and syrupy. Stir in eight cups of sugar to the water, then add sixteen cups (1 gallon) of figs. If you have fewer figs, use less sugar and water. The ratio should be 1 part fig to 1/2 part sugar.[7]
- Cook over low heat, stirring occasionally and gently, for 2-3 hours.[8]
-
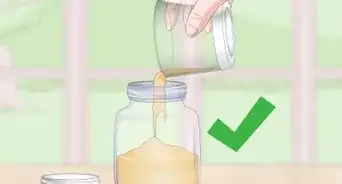
4Pour the fig mixture into each canning jar. Fill the jar to 1/2 an inch from the top. Screw a lid onto each jar. Make the lids tight but not airtight.[9]
-
5Immerse the fig-filled jars in boiling water for 30 minutes. Remove the jars and tighten the lids. Set them aside to cool.
- You should hear the lids pop as they seal.
- Don't store any jars whose lids don't seal. These jars should be refrigerated and eaten immediately.[10]
-
6Label and date the jars. They should last 18 months to two years.[11]


References
- ↑ https://noshon.it/tips/how-to-store-prepare-fresh-figs/
- ↑ https://noshon.it/tips/how-to-choose-ripe-figs/
- ↑ https://www.chowhound.com/post/fresh-figs-refrigerator-countertop-437127
- ↑ https://noshon.it/tips/how-to-store-prepare-fresh-figs/
- ↑ http://nchfp.uga.edu/how/freeze/headspace.html
- ↑ https://www.eatbydate.com/fruits/fresh/figs/
- ↑ http://generalhorticulture.tamu.edu/prof/Recipes/FigsCanned/FigsCanned.html
- ↑ http://generalhorticulture.tamu.edu/prof/Recipes/FigsCanned/FigsCanned.html
- ↑ http://generalhorticulture.tamu.edu/prof/Recipes/FigsCanned/FigsCanned.html
About This Article