This article was co-authored by Arthur Sebastian. Arthur Sebastian is the Owner of Arthur Sebastian Hair Salon in San Francisco, California. Arthur has worked as a hair stylist for over 20 years and received his Cosmetology License in 1998. He believes that the true work of a successful hair stylist comes from passion and a love for hairdressing.
There are 7 references cited in this article, which can be found at the bottom of the page.
This article has been viewed 569,267 times.
If you’d like your thick, curly hair to be straight, but you don’t want to damage it, you have a few different options. You may be able straighten your hair after washing with a careful blow-dry, so you may want to try that technique first.[1] The most popular and effective method is using a flat-iron while taking some precautions. Finally, if you have loose-to-medium curls, there are a few all-natural methods that you can try.
Steps
Trying Natural, Heat-Free Straightening Methods
-
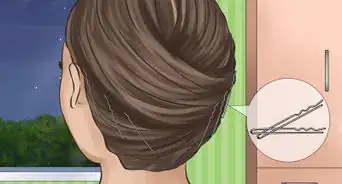
1Wrap wet hair tightly around your head. For hair that has looser or medium curls, you may have success with wrapping your hair around your head when it’s wet. Comb your wet hair and part it down the middle. Comb the left portion all the way around your head, from back to front, and pin it in place throughout.[2]
- Do the same with the right side of your hair. Allow your hair to air-dry, and sleep with a scarf over it for extra protection.
-
2Sleep with elastic hair bands every inch down your ponytail. Put wet, combed hair into 1 or 2 low, loose ponytails. Fasten more elastic hair bands loosely, so you don’t create dents in your hair, every inch down each ponytail. Sleep with the bands in your hair, and remove them in the morning.[3]Advertisement
-
3Try a natural straightening mask. There are several homemade hair mask recipes that some people experience success with. All of them use basic kitchen ingredients and require leaving them on your hair for 30-60 minutes before rinsing them out.[4]
- Try 8 fluid ounces (240 mL) of whole or coconut milk mixed with 1 tablespoon (15 mL) of honey. Let it to soak into your hair for 1 hour before washing it out.
- Try mixing 16 fluid ounces (470 mL) of milk with 1 egg and soaking your hair in it for 10 minutes. Squeeze the excess out, and put on a plastic cap for another 30 minutes. Then wash it out and brush your hair dry.
- Combine 8 fluid ounces (240 mL) of coconut milk, 5 tablespoons (74 mL) of lemon juice, 2 tablespoons (30 mL) of olive oil, and 3 tablespoons (44 mL) of cornstarch. Heat the mixture at a low temperature until it’s smooth, and apply it to your hair for 30 minutes. Do this twice a week for 2 months as a natural relaxant.


Washing, Conditioning, and Blow-Drying
-
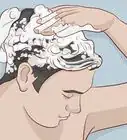
1Use smoothing, sulfate-free shampoos and conditioners. While shampoo and conditioner alone won’t straighten your hair, there are few types to look for that are good for keeping straightened hair healthy. Products labeled “smoothing” provide lots of moisture to your hair and prepare it for straightening. After washing your hair, brush conditioner through your hair with a paddle brush and rinse it with lukewarm water.[5]
- Make sure your hair is already detangled before brushing conditioner through it. If it is tangled, try using your fingers or a wide-toothed comb first.
- Avoid using any products that contain sulfates, which are known to strip hair of moisture during cleaning and dry it out, producing more frizz.[6]
- Using hot water to rinse conditioner out of hair contributes to drying out your hair and increasing frizz because it opens the cuticle. Use cool rinse the conditioner out of your hair to close the cuticle.
-
2Pat your wet hair gently downward in your towel. Rough towel-drying tends to enhance curls. To dry your hair, wrap pieces of it gently in your towel and pat each piece using a downward motion. This will help to reduce frizz more than rubbing the towel in up-and-down motions all over your hair.[7]
- Instead of a traditional terrycloth towel, try a microfiber towel for your hair to promote sleekness.
-
3Detangle your hair with a wide-tooth comb. After your shower, apply a hydrating cream or spray leave-in conditioner to your hair, again using a sulfate-free and smoothing product. Work the product gently into all of your hair, from root to tip. Then comb your hair gently with a wide-tooth comb to remove any tangles.[8]
- If you run into more tangles as you’re combing, reapply some leave-in conditioner to that area so you don’t break pieces of your hair getting out the knots.
-
4Divide your hair into 4 sections. Section out your hair with a comb into 4 sections: front left, front right, back left, and back right. Try making 1 part down the middle from your forehead to the nape of your neck, and 1 part from ear to ear. Within these sections, you can section further if your hair is especially thick.[9]
- Use clips to temporarily hold the sections you are not currently drying into place while you focus on 1 section at a time with your dryer.
-
5Blow dry each section of hair downward with a boar bristle and nylon brush. Find a round brush with nylon and boar bristles as opposed to plastic, which are known to cause breakage. The nylon and boar bristle combos are sometimes called “blow-out” brushes. Hold the brush under each small section of hair and move it down as you move the hot blow-dryer along each piece from top to bottom.[10]
- Move the dryer away from your hair each time you need to place it back at the top. Avoid using upward motions on your hair with the blow dryer, as this can encourage curls and frizz.
- If your hair straightens easily, you may not need to use the hot setting on your blow-dryer. The less heat you can use, the better. Experiment with cold and warm settings to see if your hair straightens before using hot.
- If your hair is thick or tightly curled, then you may be better off using a denman brush to blow-dry it.
-
6Apply a smoothing serum if you’re not flat-ironing. If your hair straightens somewhat easily and blow-drying is your last step, apply a finishing serum to lock your straight locks into place. Squeeze a dime-sized amount of serum into your hand and rub some on the other hand. With your fingers, apply the serum to your hair using downward strokes, focusing mainly on the top layer and the ends of your hair.[11]


Using Your Flat-Iron
-
1Find a quality digital flat-iron. There are many flat-irons to choose from on the market. Sometimes cheaper ones don’t distribute heat evenly, and you end up having to make several passes on the same piece of hair to get it straight. Look for an iron that uses Nano-smart technology or infrared heat to keep the most moisture in your hair while straightening.[12]
- Look for a flat-iron that has titanium or ceramic plates.
- An iron with a digital temperature setting is also a good investment. You can experiment with the lowest temperature setting necessary to straighten your particular hair type.
-
2Prepare afro-textured hair 2-3 weeks ahead of time. Because afro-textured hair is especially prone to dryness and breaking, it’s a good idea to deep-condition yours once per week for 2-3 weeks before flat-ironing it. Do a weekly deep-conditioning regimen, starting 2-3 weeks before you flat-iron, and a protein treatment 1 week before you flat-iron.[13]
- Find a deep-conditioner and protein treatment specifically for afro-textured hair for the best results.
- Non-afro-textured hair can benefit from weekly deep conditioning as well, especially if you flat-iron your hair often and it begins looking dry.
-
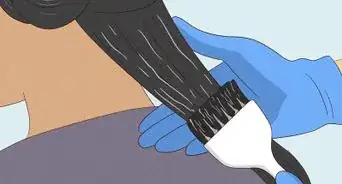
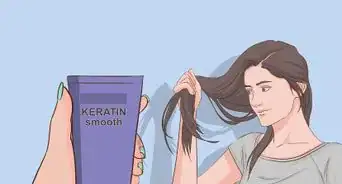
3Apply a heat-protectant spray to dry hair from root to tip.[14] Make sure your hair is completely dry, either from blow-drying or air-drying, before you use a flat iron. Use a heat-protectant spray that is not alcohol-based on each piece of your hair before you straighten it to prevent damage to your hair. Sprays high in keratin protein are the best to use.[15]
- Some people prefer to use the heat-protectant spray at the same time as leave-in conditioner before they blow-dry. You can do this if you prefer.
-
4Test the temperature of your iron on a small piece of hair first. Different hair textures respond differently to different temperature settings. Many people prefer to use an iron set at 300 °F (149 °C), but your hair may need a hotter or lower setting.[16]
- If your test piece of hair responds easily to the temperature, you may be able to turn it down a bit. Try to use the lowest heat setting necessary. If your hair doesn’t straighten easily at the test temperature, you’ll need to turn it up.
-
5Move your hot straightener down each small piece of hair quickly. Avoid leaving the straightener on 1 section of hair for longer than it needs to be there. Especially for high-temperature flat-irons, you should be able to achieve a straight piece by locking the iron over your hair at the top, and moving it quickly downward.[17]
- If your hair doesn't straighten in the first pass, you may need to turn the temperature up, or reduce the amount of hair in the piece that you're trying to straighten.
-
6Hydrate your hair with oil or heat protectant as you go. As you’re straightening small pieces of hair with your iron, check to see if it needs hydrating. If it’s looking frizzy and not straightening easily, add a light oil like olive oil to it with your fingers, or another squirt of heat-protectant spray.[18]
-
7Apply oil, serum, or butters to coarse curly hair after flat-ironing. Styling oils, serums, and butters can help hydrate coarse hair and keep it straight, so it's a good idea to use them after flat-ironing. Avoid using these products until you’re finished flat-ironing, so that your hair doesn’t sizzle and break in the iron. Find oils, serums, or butters specifically designed for your hair texture for the best results.[19]
-
8Wrap afro-textured hair in a silk or satin scarf overnight. To protect your straightened hair from becoming dry overnight, wrap it in a silk or satin scarf. This will also help to keep your hair from reverting back to curls if you sweat during the night.[20]
-
9Keep your flat-iron clean. Any dried product debris left on your flat-iron can cause stickiness and damage to your hair. Clean your iron when it’s cool with a clean cloth and dish soap, or with rubbing alcohol on a clean cloth.[21]
- Gently scrub any hard-to-remove product debris from your flat-iron with the rough side of dish sponge while you’re cleaning it.


Expert Q&A
Did you know you can get expert answers for this article?
Unlock expert answers by supporting wikiHow
-
QuestionWhat is the best temperature to flat iron natural hair?
 Laura MartinLaura Martin is a Licensed Cosmetologist in Georgia. She has been a hair stylist since 2007 and a cosmetology teacher since 2013.
Licensed CosmetologistThe best temperature for your hair is the lowest one at which it will effectively straighten. If in doubt, start with your iron's lowest setting and gradually increase until you achieve the desired result.
Support wikiHow by unlocking this expert answer.
-
QuestionDo flat irons damage your hair?Laura MartinLaura Martin is a Licensed Cosmetologist in Georgia. She has been a hair stylist since 2007 and a cosmetology teacher since 2013.
Licensed CosmetologistFlat irons put a lot of stress on your hair because of the high temperature. If they are used every day, they will damage your hair over time.Support wikiHow by unlocking this expert answer.
-
QuestionCan you damage your hair by straightening it?Laura MartinLaura Martin is a Licensed Cosmetologist in Georgia. She has been a hair stylist since 2007 and a cosmetology teacher since 2013.
Licensed CosmetologistStraighteners can be very damaging to the hair, especially if you are using them on a high setting. To minimize damage, only straighten completely dry hair that has been treated with a thermal protectant.Support wikiHow by unlocking this expert answer.
Things You'll Need
- Sulfate-free shampoos and conditioners
- Wide-tooth comb
- Blow-dryer
- Boar and nylon bristle brush
- Smoothing serum
- Digital flat-iron
- Deep conditioner
- Scarf
- Bobby pins
- Elastic hairbands
- Ingredients for hair masks: coconut milk, honey, egg, lemon juice, olive oil, cornstarch


References
- ↑ Arthur Sebastian. Professional Hair Stylist. Expert Interview. 29 April 2019.
- ↑ https://www.treehugger.com/organic-beauty/6-ways-straighten-your-hair-naturally.html
- ↑ https://www.treehugger.com/organic-beauty/6-ways-straighten-your-hair-naturally.html
- ↑ https://www.treehugger.com/organic-beauty/6-ways-straighten-your-hair-naturally.html
- ↑ https://www.teenvogue.com/story/top-ten-flat-iron-mistakes
- ↑ Arthur Sebastian. Professional Hair Stylist. Expert Interview. 29 April 2019.
- ↑ https://www.elle.com/beauty/hair/how-to/a39788/how-to-straighten-hair-without-heat/
- ↑ http://www.curlynikki.com/2014/02/the-dos-and-donts-of-flat-ironing.html
- ↑ https://www.cosmopolitan.com/uk/beauty-hair/hair/advice/a34769/top-tips-for-straightening-curly-hair/
- ↑ https://www.teenvogue.com/story/top-ten-flat-iron-mistakes
- ↑ https://www.elle.com/beauty/hair/how-to/a39788/how-to-straighten-hair-without-heat/
- ↑ https://www.today.com/style/best-flat-iron-hair-straightener-healthy-hair-t115012
- ↑ http://www.curlynikki.com/2014/02/the-dos-and-donts-of-flat-ironing.html
- ↑ Arthur Sebastian. Professional Hair Stylist. Expert Interview. 29 April 2019.
- ↑ https://www.cosmopolitan.com/uk/beauty-hair/hair/advice/a34769/top-tips-for-straightening-curly-hair/
- ↑ http://www.curlynikki.com/2014/02/the-dos-and-donts-of-flat-ironing.html
- ↑ https://www.teenvogue.com/story/top-ten-flat-iron-mistakes
- ↑ https://www.cosmopolitan.com/uk/beauty-hair/hair/advice/a34769/top-tips-for-straightening-curly-hair/
- ↑ http://www.curlynikki.com/2014/02/the-dos-and-donts-of-flat-ironing.html
- ↑ http://www.curlynikki.com/2014/02/the-dos-and-donts-of-flat-ironing.html
- ↑ http://www.curlynikki.com/2014/02/the-dos-and-donts-of-flat-ironing.html
About This Article

Before you straighten your hair, apply a heat-protectant spray to help prevent damage. Then, as you're straightening your hair, make sure you move your flat-iron quickly so you're not holding it on one section of hair for too long. If parts of your hair look frizzy or seem difficult to straighten, apply some more heat-protectant spray or olive oil to help hydrate them. When you’ve finished straightening your hair, apply some styling oil, serum, or butter to keep your hair hydrated and straight. If you have afro-textured hair, you can also wrap it in a silk or satin scarf overnight to prevent it from getting curly while you sleep. For more tips from our Beauty co-author, including how to straighten your hair without a flat-iron, read on!