This article was co-authored by Michael Van den Abbeel. Michael Van den Abbeel is a Professional Hair Stylist and the Owner of Mosaic Hair Studio and Blowout Bar in Orlando, Florida. He has been cutting, styling, and coloring hair for over 17 years. Michael loves showing his clients how to wash and wear their hair easily and effortlessly. Mosaic Hair Studio and Blowout Bar is recognized as a Diamond Top Tier level Wella salon.
There are 11 references cited in this article, which can be found at the bottom of the page.
This article has been viewed 123,845 times.
Because there isn't as much to work with, shoulder-length hair can seem less versatile compared to longer hair. While it's true that certain complex updos require long hair, shoulder-length hair can be styled into most any look. Since shoulder-length hair isn't weighed down as much as longer hair, styles that showcase its natural ability to hold more volume are especially flattering.[1] Whether you keep it loose as a long bob, up in a Gibson tuck, or somewhere in between as voluminous waves, your shoulder-length hair will look great.
Steps
Knowing the Basics
-
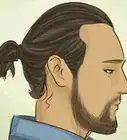
1Get the right cut. Before you style, you need to get the cut that's right for you. Straight bangs pair very well with shoulder-length hair, but sideswept and bangs-free cuts also look great. Use your own personal preference to decide which cut is right for you.
- While shoulder-length hair can be great on anyone, people with fine-to-medium hair will pull off this look the most effortlessly. For these hair types, a simple trim is often all that's needed to create a shoulder-length cut.
- Thicker, curly hair will need to be cut in layers to avoid being wide at the bottom.[2]
-
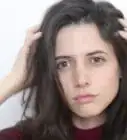
2Pick your part. No matter your hair length, you should part your hair with your face shape in mind for the most flattering hairstyle.
- Side parts are best for round, square, and diamond faces.
- For a person with a heart-shaped face and shoulder-length hair, a center part is the most flattering.
- Any type of part can flatter an oval face.[3]
- Just because a certain type of part may look best doesn't mean you have to wear your hair that way. Feel free to experiment with different styles.
- Pushing your hair to one side, or the opposite side you usually have it, can spice things up. Try a dramatic side part above the outer edge of one eyebrow, or do a more subtle side part an inch or two away from center.
- Because the roots are used to your hair being positioned one way, switching will give your hair a little extra volume. For that same reason, though, it may take a while to "train" a new part to stay in place. To train a new part quickly, blow dry freshly-styled hair.[4]
Advertisement -
3Experiment with accessories. Because shoulder-length hair tends to have more body than other hair lengths, it can support a greater number of accessories. It's long enough to put up in a hair tie while short enough for heavy clips not to flatten.
- Slide on some flashy hair clips or pins to either hold your style together or simply decorate your 'do.
- When wearing a headband, you can choose to tease out your hair to showcase its volume or flatten it down for a sleek look. Either will work for shoulder-length hair.[5]
-
4Trim your hair regularly. How you define "regularly" will depend on how fast your hair grows. Shoulder-length hair can go longer without a trim compared to shorter styles. However, it should still be cut at least every 4-8 weeks to maintain a neat cut and to avoid breakage.


Styling Boho Waves
-
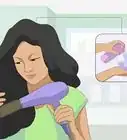
1Make sure your hair is completely dry. Using a styling iron on wet hair can seriously damage it. If you wash your hair daily, shampoo and condition it before you begin. Add a heat-protecting product before blow-drying.[6]
- If your hair is naturally wavy or has loose curls, then it's already in perfect shape for a shoulder-length cut. Instead of heat styling, simply spritz in a little texturizing spray.
- If your hair is naturally very curly, you can still style it into waves. However, you will likely need to straighten your hair first.
-
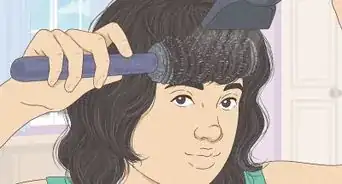
2Preheat your iron. For boho waves, you can use any type of curling wand. However, specialty waving wands may be easier to work with.[7] Be sure to have a heat-resistant or "thermal" glove on hand to keep from burning your skin as you style.
-
3Wrap a section of hair loosely around your curling iron. With one hand, separate out a one-to-two inch section of hair. Wrap it around your styling iron, leaving at least an inch of unwrapped hair at the tip. Shoulder-length hair only needs to be wrapped two or three times around a medium curling wand.
-
4Hold the strand straight as it cools down. Release the section from your iron after 10 to 15 seconds.[8] With your gloved hand, hold the tip of the section out away from your head. It may seem counterintuitive to straighten your freshly-curled locks back out, but this will give them the relaxed, effortless boho look.
-
5Move on to the next strand. Take a second section of hair and curl it just like you did the first. Repeat this process until all of your hair is in waves, moving from one side of your head to the other.
- Don't worry about making your strands the same size, as a little unevenness will give your hair a more natural look.
- Likewise, don't wrap each section around your wand in exactly the same way. Alternate directions when winding and start at slightly different lengths.[9]
-
6Finish up with a texturizing spray. Texturizing sprays are a relatively new type of product specifically designed to create a dry look without leaving behind residue. Spray a light dusting on your hair to mimic tousled, sea breeze-kissed texture. Afterwards, give your locks a quick finger comb, and your perfect boho curls are done.[10]

Doing a Gibson Tuck
-
1Put your hair back into a basic ponytail. Use an elastic hair tie to hold it in place. Any type of simple ponytail will work, and placement is entirely up to you. High, mid, low, side, and center ponytails can all be made into a Gibson tuck.
- Gibson tucks, also known as Gibson girl buns, are great for shoulder-length hair, as only a short length of hair is necessary to create a complicated-looking updo.
- With practice, a Gibson bun takes only a few minutes to do. It's a great alternative to a plain ponytail for days where you want your hair out of the way but don't want to spend a lot of time styling.[11]
-
2Make an opening through your hair above the hair tie. Using your fingers, create a hole wide enough for your ponytail to fit through directly above the hair tie holding it in place. Be careful not to undo your ponytail or loosen it too much. Keep it open with your thumb and index finger while moving on to the next step.[12]
-
3Flip your ponytail around and draw it into the opening. Take the tip of your ponytail in your free hand and flip it around towards your head. Gently pull it through the opening you made. You may need to twist your ponytail into a spiral before flipping it to move through the hole more easily. Once it's through, tug it downward so that the free end resembles a shorter version of your original ponytail.[13]
-
4Flip your ponytail around a second time. Without creating a new hole, flip the ponytail back around. Tuck the tip and any loose hair into the pocket formed by the first loop around. Finish the bun by securing it in place with a few bobby pins.
Expert Q&A
-
QuestionHow do I know what haircut is best for me?
 Michael Van den AbbeelMichael Van den Abbeel is a Professional Hair Stylist and the Owner of Mosaic Hair Studio and Blowout Bar in Orlando, Florida. He has been cutting, styling, and coloring hair for over 17 years. Michael loves showing his clients how to wash and wear their hair easily and effortlessly. Mosaic Hair Studio and Blowout Bar is recognized as a Diamond Top Tier level Wella salon.
Professional Hair StylistThe right cut for you depends on the texture of your hair. Most people who struggle with their hair haven't learned to work with their natural texture. The more you fight against your hair, the harder it's going to be to style it. -
QuestionAre there any other hairstyles suitable for shoulder-length hair?
 Community AnswerYou could just leave it down after moisturizing, or you could try some twist-outs.
 -
QuestionWhat if I have layers?
 Community AnswerTry not to get your hair trimmed, but if you do, do the ends and not layers.

References
- ↑ http://www.realsimple.com/beauty-fashion/hair/holiday-hair-accessories/accessories-medium-length-hair
- ↑ https://intothegloss.com/2014/02/medium-length-hair-ideas/
- ↑ http://youqueen.com/beauty/hair/how-to-part-your-hair-to-suit-your-face-shape/
- ↑ http://beautybanter.com/how-to-part-your-hair-for-your-face-shape
- ↑ http://www.realsimple.com/beauty-fashion/hair/holiday-hair-accessories/accessories-medium-length-hair
- ↑ http://www.womenshealthmag.com/beauty/how-to-use-a-curling-iron
- ↑ http://rockmystyle.co.uk/stay-in-all-day-beachy-boho-waves/
- ↑ http://rockmystyle.co.uk/stay-in-all-day-beachy-boho-waves/
- ↑ http://rockmystyle.co.uk/stay-in-all-day-beachy-boho-waves/
- ↑ http://www.seventeen.com/beauty/hair/tips/g560/best-beachy-hairstyles
- ↑ http://www.saralynnpaige.com/style/simple-gibson-tuck/
- ↑ http://www.saralynnpaige.com/style/simple-gibson-tuck/
- ↑ http://www.saralynnpaige.com/style/simple-gibson-tuck/
- ↑ http://www.beautylish.com/a/vpyia/gibson-tuck-hair
- ↑ http://www.huffingtonpost.com/2013/05/01/lob-haircut-every-face-shape_n_3191975.html
- ↑ https://intothegloss.com/2014/02/medium-length-hair-ideas/
- ↑ http://stylecaster.com/beauty/medium-short-hairstyles/
About This Article

To style shoulder length hair into boho waves, start by loosely wrapping a section of hair around a curling iron for 10-15 seconds, leaving at least an inch of unwrapped hair at the tip. Once you’ve worked through all of your hair, use a texturizing spray to give your locks a tousled look. Alternatively, try a Gibson tuck by putting your hair in a basic ponytail and making an opening in your hair right above the hair tie. Then, draw your ponytail through the opening twice, tucking the ends into the pocket to create a bun. To learn how to pick a shoulder-length haircut style, keep reading!