This article was co-authored by wikiHow staff writer, Devin McSween. Devin McSween is a wikiHow Staff Writer. With a background in psychology, she has presented her research in social psychology at a variety of conferences and has contributed to several manuscripts for publication. At wikiHow, Devin combines her love of writing and research with the goal of bringing accessible information to wikiHow readers that will help them learn and grow. She earned her BS in Psychology from the College of Charleston.
There are 27 references cited in this article, which can be found at the bottom of the page.
Learn more...
Sublimation dye is one of the best ways to create bold, colorful graphics. However, this dye works best on polyester, which can leave you wishing for the soft embrace of cotton. As it turns out, you don’t have to wish for it – there are actually some super easy solutions to get sublimation dye to work on cotton! In this article, we’ll provide you with 3 different options to choose from to sublimate on cotton. Read on to get crafting!
Things You Should Know
- Create a base for your cotton shirt with regular Heat Transfer Vinyl. Then, sublimate over the vinyl.
- Prepare a cotton t-shirt for sublimation by spraying it with a sublimation spray. Then, use a heat press to add your design to your shirt.
- Use a special sublimation paper, called EasySubli, to quickly adhere your design to a cotton shirt.
Steps
Sublimating with Heat Transfer Vinyl
-
1Upload your design to Cricut Design Space as a “Print then Cut” image. Choose a design for your shirt that has a transparent background. Upload the image and choose the “Complex” image type. Then, select the “Print then Cut” image.[1]
- With this sublimation method, you can use any color shirt that you want! A white shirt works just as well as a black or colorful shirt.
-
2Resize your image to 6.75 inches by 9.25 inches (17.15 by 23.5 cm). When using the “Print then Cut” feature, your image needs to have a width of no more than 6.75 inches (17.15 cm) and height of no more than 9.25 inches (23.5 cm).[2]
- It’s okay if your design’s length or width isn’t exactly 6.75 inches x 9.25 inches (17.15 x 23.5 cm). Just make sure it’s not larger than those dimensions.
Advertisement -
3Create an offset to your image. On the Design Space toolbar, click “Offset.” A blue outline will appear around your image, which shows you how large the offset, or shadow layer, is behind it. Reduce the offset size to about 0.10 inches (0.25 cm).[3]
- You’ll now have a black image–your offset–behind your original design.
- The offset is the image that you’ll cut out of your Heat Transfer Vinyl (HTV). Your design will actually sublimate onto the HTV on your shirt.
- Because your offset is slightly larger than your design, a bit of the HTV will be visible on your shirt. If you don’t want to see any, make your offset the same size as your design. If you want to see more, make the offset larger.
-
4Change the offset’s cut type to “Basic.” Currently, both your design and offset are set to “Print then Cut.” However, the offset needs to be a “Basic” cut type. Select your offset in the right-hand layer panel. Then, at the top toolbar, change the “Operation” from “Print then Cut” to “Basic.”[4]
-
5Mirror both images. Click “Make It” in the top, right-hand corner of the Design Space. Select the “Mirror” toggle for your design, or the “Print then Cut” image. Then, select your offset, or “Basic” image, and check the “Mirror” toggle.[5]
-
6Print your design on sublimation paper using a sublimation printer. Place your sublimation paper face up in your printer’s back tray. Then, print using your system’s dialogue. Set your paper type to “Photo Matte Paper” and select the highest quality option as possible. Then click “Print!”[6]
- Make sure the reverse image option is deselected. You already mirrored your image in Cricut Design Space.
-
7
-
8Cut your offset on HTV using your Cricut. Now, select your offset image. Set your base material to the finish that matches your HTV. For example, if you’re using a glitter HTV, choose “Glitter Iron-On.” Then, put your HTV on your mat with the decorative side down. Insert the mat into your Cricut. Once it’s cut, remove the excess vinyl with a weeding tool.[8]
- Regular matte, shiny, and holographic HTV's are great to use for sublimating on a cotton shirt.
- Always place the shiny or more decorative side of your HTV face down on your mat. This is the side that you’ll see on your shirt.
-
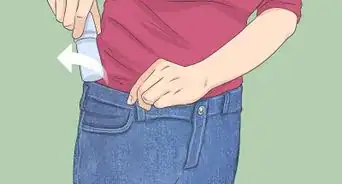
9Lint roll your shirt and preheat it with a heat press at 350° F (176° C). Remove any lint or stray hairs from your shirt with a lint roller. Then, put a pressing pillow inside your shirt and lay a piece of teflon over it to protect it from the heat. With your heat press set to 350° F (176° C), press down on your shirt for several seconds.[9]
- If you want to apply your design precisely, use your heat press to create a crease down the center of your shirt. Simply fold your shirt in half and apply the heat press to the fold for several seconds.
-
10Place the HTV on your shirt and press it for 3 seconds at 400° F (204° C). Center your HTV face down on your shirt. Place a piece of teflon on top of the HTV. Then, hold your heat press on top for 2 to 3 seconds. Once your shirt’s cooled down, remove the translucent carrier sheet from the HTV.[10]
- To prevent any potential color bleeding, put a piece of paper inside your shirt.
-
11Press your design onto the HTV at 400° F (204° C) for 60 seconds. Place your design face down on top of the HTV, making sure it’s centered. Place a sheet of parchment paper and teflon over your design. Then, hold your heat press on top for 60 seconds.[11]
- If you want extra security as you press, use heat resistant tape to stick your design to the HTV so it doesn’t move.
-
12Carefully peel away the paper from your shirt. Let your design and shirt cool down for a few minutes. Then, pull off the paper. You’ve successfully sublimated your design on a cotton shirt![12]


Sublimating with Sublimation Spray
-
1Upload your design to a design software and mirror the image. When you sublimate, you mirror your design so it faces the right way on your shirt. Simply add your favorite design to your preferred software, like Cricut Design Space or Silhouette Studio, and mirror the image.[13]
- For this sublimation method, T-shirts in lighter colors like white, gray, and pastels usually work the best.
-
2Print your design on sublimation paper using a sublimation printer. Place a piece of sublimation paper in your printer’s back tray. Then, print your design using your system’s dialogue. Make sure the printer you have set up for sublimation is selected. Finally, set the paper type to “Photo Matte Paper” and choose the highest quality option.[14]
- Be sure to print your design on the side of the paper with no words. Whether you place your paper up or down in your paper tray depends on your printer.
- Before printing, double check that the reverse image option is deselected.
-
3Spray your shirt with sublimation spray. First, place your design on top of your shirt to figure out where you need to spray. Remove the design and spray the entire area until it’s damp, but not sopping wet. Make sure you give the area a good, even coat so the dye sticks![15]
- Sublimation doesn’t usually work well on cotton because the dye can’t penetrate the cotton fibers. The sublimation spray gives the sublimation dye something to soak in to.
-
4Press your shirt with a heat press at 330° F (165° C) for 30 seconds. Place your damp shirt under your heat press. Put a piece of parchment paper under your shirt, inside of it, and cover it with a piece of teflon. Then, hold the heat press on top of your shirt for 30 seconds.[16]
-
5Add a 2nd layer of spray and press again at 330° F (165° C) for 30 seconds. Remove the parchment paper and teflon from your shirt. Then, spritz on a lighter layer of sublimation spray so your shirt is just barely damp to the touch. Add the parchment paper and teflon back to the shirt and press it again for 30 seconds.[17]
-
6Press your shirt at 380° F (193° C) for 60 seconds. Place your design on your shirt face down. Heat up your press to 380° F (193° C) and add a piece of teflon on top of your design. Then, hold your shirt under the press for 60 seconds.[18]
-
7Remove the sublimation paper to reveal your design. When you remove the paper from your shirt, your bright and bold design should have transferred onto your shirt. Congratulations, you sublimated on a cotton shirt![19]


Sublimating with EasySubli Paper
-
1Add your design as a “Print then Cut” image to Cricut Design Space. Select a fun design for your shirt that also has a transparent background. Upload your design into Design Space and choose the “Complex” image type. Then, choose the “Print then Cut” image.[20]
- White, gray, and lighter colored t-shirts tend to work the best with this method.
- With “Print and Cut,” remember to size your image to a width no more than 6.75 inches (17.15 cm) and a height no more than 9.25 inches (23.5 cm).
- It’s okay if your design’s length or width isn’t exactly 6.75 inches x 9.25 inches (17.15 x 23.5 cm). Just make sure it’s not larger than those dimensions.
-
2Mirror your image. In the top, right-hand corner of Design Space, click “Make It.” Simply select the “Mirror” toggle for your design to flip it.[21]
-
3Print your design on EasySubli paper using your sublimation printer. In the Design Space print options, check “Use System Dialogue.” Change your paper type to “Photo Paper Glossy.” Then, insert your EasySubli paper in your rear printer tray so your design prints on the rough side of the paper.[22]
- Because you already mirrored your design, sure the reverse image option is deselected.
-
4Set your design under a heat press at 310° F (154° C) to dry for 2 minutes. Your design will come out wet from the printer, so dry it out to keep the colors bold and beautiful. Set your heat press to 310° F (154° C). Place your design on top of a piece of parchment paper and set it under the press. Just be sure to leave about 6 inches between the press and your design.[23]
- Do not press your design. This can smudge the ink and melt the adhesive.
-
5
-
6Remove the excess paper from your design. Using a weeding tool, pull off the paper around your design. Be careful not to touch your design so the ink doesn’t smear.[25]
- When you finish pulling off the excess paper, you’ll be left with your design resting on top of translucent, backing paper.
-
7Smooth a piece of EasySubli Mask on top of your design. Cut out a piece of the mask that fully covers your design and the translucent backing paper. Simply press it on top and smooth it down. Then, flip the whole thing over and remove the translucent backing paper.[26]
-
8Lint roll and preheat your shirt with a heat press at 350° F (176° C). Use a lint roller to remove any loose lint or debris from your shirt. Then, get your heat press up to 350° F (176° C) and press it into your shirt for several seconds.[27]
- Preheating your shirt before you press on your design removes any pesky wrinkles and unwanted moisture.
-
9Press your design into your shirt at 350° F (176° C) for 45 seconds. Center your design on your shirt: the design side faces down while the transparent mask faces up. Place a piece of paper on top of your design and heat your press to 350° F (176° C). Then, simply press it down for 45 seconds.[28]
- To prevent any potential color bleeding, put a piece of paper inside your shirt too.
-
10Remove the transparent mask from your shirt. Using a heat glove, peel the mask off while it’s still hot. Voila! Your design transferred onto your shirt.[29]


Things You’ll Need
Sublimating with Heat Transfer Vinyl
- Cricut and Cricut Design Space
- Sublimation paper
- Printer set up for sublimation
- Heat Transfer Vinyl (HTV)
- Weeding tool
- Lint roller
- Cotton shirt
- Heat press
- Pressing pillow
- Teflon
- Parchment paper
Sublimating with Sublimation Spray
- Design software, such as Cricut Design Space or Silhouette Studio.
- Sublimation paper
- Printer set up for sublimation
- Sublimation spray
- Cotton shirt
- Heat press
- Parchment paper
- Teflon
Sublimating with EasySubli Paper
- Cricut and Cricut Design Space
- EasySubli paper
- Printer set up for sublimation
- Heat press
- Parchment paper
- Weeding tool
- EasySubli Mask
- Cotton shirt
- Lint roller
- Heat glove


References
- ↑ https://youtu.be/cekdJwnxkkU?t=151
- ↑ https://youtu.be/cekdJwnxkkU?t=204
- ↑ https://youtu.be/mwKyhEiJVjU?t=354
- ↑ https://youtu.be/mwKyhEiJVjU?t=402
- ↑ https://youtu.be/cekdJwnxkkU?t=392
- ↑ https://youtu.be/ke72TNCttCo?t=327
- ↑ https://youtu.be/mwKyhEiJVjU?t=541
- ↑ https://youtu.be/mwKyhEiJVjU?t=586
- ↑ https://youtu.be/cekdJwnxkkU?t=627
- ↑ https://youtu.be/cekdJwnxkkU?t=658
- ↑ https://youtu.be/cekdJwnxkkU?t=684
- ↑ https://youtu.be/mwKyhEiJVjU?t=785
- ↑ https://youtu.be/cwdRC9e72Bs?t=258
- ↑ https://youtu.be/ke72TNCttCo?t=327
- ↑ https://youtu.be/HyWVuZE4YPY?t=227
- ↑ https://youtu.be/cwdRC9e72Bs?t=1145
- ↑ https://youtu.be/cwdRC9e72Bs?t=583
- ↑ https://youtu.be/cwdRC9e72Bs?t=1249
- ↑ https://youtu.be/RdRvTczIsCI?t=708
- ↑ https://youtu.be/eQjOeEWXxRw?t=84
- ↑ https://youtu.be/cekdJwnxkkU?t=392
- ↑ https://youtu.be/eQjOeEWXxRw?t=127
- ↑ https://youtu.be/eQjOeEWXxRw?t=234
- ↑ https://youtu.be/eQjOeEWXxRw?t=297
- ↑ https://youtu.be/eQjOeEWXxRw?t=318
- ↑ https://youtu.be/eQjOeEWXxRw?t=341
- ↑ https://youtu.be/eQjOeEWXxRw?t=372
- ↑ https://youtu.be/eQjOeEWXxRw?t=407
- ↑ https://youtu.be/eQjOeEWXxRw?t=438
About This Article