X
wikiHow is a “wiki,” similar to Wikipedia, which means that many of our articles are co-written by multiple authors. To create this article, volunteer authors worked to edit and improve it over time.
This article has been viewed 61,494 times.
Learn more...
A right opening door is one that, when opened, swings to the right. It is also a door that is grabbed with your right hand to open it. Doors open into the room in which you are entering. If the room is small, changing the door from a right opening to a left opening may give the room the appearance of having more space. To switch a door from right opening to left opening, follow these steps.
Steps
-
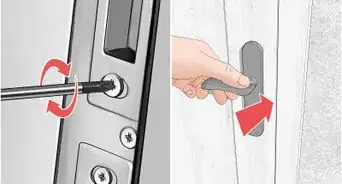
1Remove the doorknob or handle if it's a locking knob. Use an electric drill with a screwdriver bit or a hand held screwdriver.
-
2Calculate where the new hinges and latch will be installed.
- Measure the distance from the top inside corner of the door frame to the top of each of the existing hinges. Write down the measurements.
- Measure from the inside top of the door frame down to the top of the latch hardware and write down the measurement.
Advertisement -
3Remove the door from the door frame, leaving the hinges screwed into the door. Use an electric drill with a screwdriver bit.
-
4Remove the hinges from the door using the drill and screwdriver bit.
- Brace the door prior to taking the hinges off or have someone hold the door. If you don't have anyone to hold the door, place something under the door to hold it in place while you are taking the hinges off.
-
5Mark where the new hinges and latch belong.
- Use the measurements you took prior to removing the door from the frame. Mark where the top, middle and bottom hinges will be attached on the new opening side of the door frame.
- Determine where the new latch will be placed by using the previously indicated measurements.
- Hold each hinge up to the marks you made for the new hinge locations on the top, middle and bottom of the door frame. At each location, trace around the new hinge with a pencil.
- Remove the latch on the door frame. This can be done using the drill and screwdriver bit.
- Use the latch to trace around the mark for the location of the new latch in the same way as you did for the hinges.
-
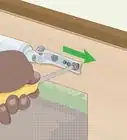
6Use a chisel to carve out the pencil outlines for the hinges and latch placings. Only chisel deep enough to equal the depth and thickness of the hinges and latch, so that they lay flush with the frame.
-
7Drill the hinges and latch into their new locations.
-
8Fill in the gaps where the original hinges and latch were.
- Use small blocks of wood to fill in the gaps. Glue the blocks into the gaps and sand over them.
- Repaint the door frame to hide the original hinge and latch areas.
-
9Attach the door to the hinges in the new locations.
-
10Reinstall the door handle or knob.


Advertisement
Things You'll Need
- Electric drill with a drill bit
- Screwdriver
- Measuring tape
- Chisel
- Pencil and paper
- Small blocks to fill in gaps
- Glue
- Sandpaper
- Paint for the door frame


References
About This Article
Advertisement