This article was co-authored by Ryan Corrigan, LVT, VTS-EVN. Ryan Corrigan is a Licensed Veterinary Technician in California. She received her Bachelor of Science in Veterinary Technology from Purdue University in 2010. She is also a Member of the Academy of Equine Veterinary Nursing Technicians since 2011.
This article has been viewed 50,387 times.
In horseback riding, a "neck rein" is a way of steering the horse by giving it cues with the reins on either side of its neck. One of the benefits of the neck rein is that it allows the rider to control the horse with one hand. It's also a necessary skill for certain types of riding, such as riding with a curb bit. While the neck rein isn't a terribly advanced skill, it does require some prior training and knowledge on the part of the rider for training to be successful.
Steps
Teaching the Neck Rein
-
1Teach basic riding skills first. Ideally, neck reining isn't the first skill you teach your horse. The horse should already be trained in certain riding skills before you begin — neck reining is essentially a culmination of these beginner skills that gives you greater control over the horse. The skills you'll want your horse to know already are:
- How to travel in a straight line and stop
- How to steer (direct rein)
- How to disengage the hips
- How to control the shoulders
- How to pivot on the hindquarters
-
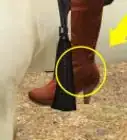
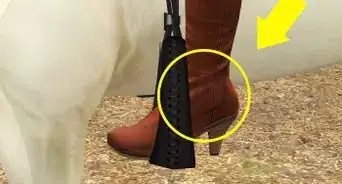
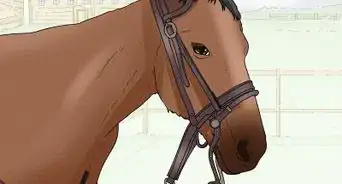
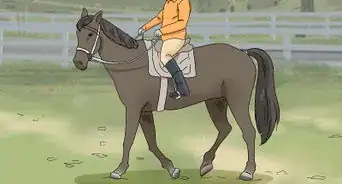
2Mount up. Start by getting your horse ready to ride. Saddle your horse and connect your reins to a smooth-cheek snaffle bit.[1] You may use either one-piece or split reins. The reins should be long enough that they can be held with one hand behind the center of the horse's neck — usually, for split reins, this is about seven and a half feet.[2]
- Don't use a shanked bit, as this can be painful for the horse to learn with. Some riders choose to eventually switch to a shanked bit once the horse learns this skill.[3]
Advertisement -
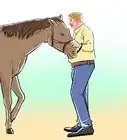
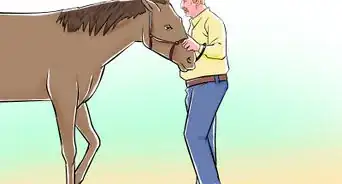
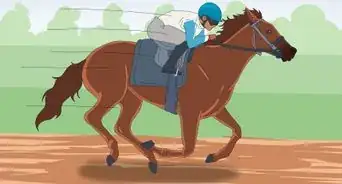
3Start off at a gentle walk. Go to a safe, secure place and ask your horse to walk forward or in a large circle. Make sure you have plenty of space on all sides to move around.
-
4Turn the horse with a direct rein. When you're ready, cue your horse to turn with a direct rein. In other words, gently guide the horse's nose to the side that you want to turn by pulling on the rein on that side.
- For example, if you want the horse to turn left, pull on the left rein so that the horse's nose turns slightly to the left. The rest of the horse's body should follow.
-
5Lay the outside rein against the horse's neck as you turn it. This step is crucial. As you cue your horse to turn, lay the outside rein (the rein on the opposite side as the way you're turning) against the side of the horse's neck. Put some pressure on the rein as you apply it so your horse will feel it. For example, if you're turning to the left, lay the rein against the right side of the neck.
- The goal here is to connect the act of turning with the sensation of the rein against the horse's neck so that eventually this is all you'll need to do to cue the horse to turn. Thus, you want to be decisive — don't be harsh or rough, but make sure your horse feels the rein against his neck.
-
6Use the rest of your body to cue the turn. At the same time as you're using your reins to cue the horse to turn, use your leg muscles and body weight to drive the point home. Apply gentle pressure with the calf of your outside leg (the leg on the side opposite the way you're turning) just behind the cinch.[4] Simultaneously, look in the direction of the turn and ever-so-subtly shift your weight to guide the horse into the turn.
-
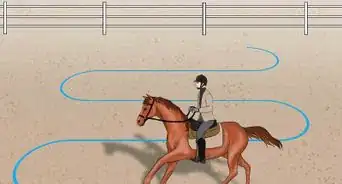
7Repeat the training process. Your horse won't learn this skill immediately, so you'll probably need to repeat the process outlined above until your horse starts to "get it." For consistency, it's best to practice neck reining in a variety of conditions. Vary your routine with the following guidelines:
- Try turning both left and right.
- Make both sharp and shallow turns.
- Practice at a range of speeds (for example, a walk, a trot, and a lope.)
- Practice in multiple locations.
-
8Test your horse's skill by turning with an indirect (neck) rein. When you think your horse has learned to neck rein, test your new skill. Hold the reins in one hand behind the horses neck. Cue the horse to turn by draping the reins against one side of his neck (rather than gently pulling on his nose as you would when riding direct rein.) As you do this, push with your leg on the same side and lean your weight slightly into the turn. If your training has been successful, the horse should turn away from the draped rein.
- Keep in mind that you are cuing your horse to turn by laying the reins against the opposite side of the neck as the direction you want your horse to turn. In other words, to turn left, you'll lay the reins against the right side of the horse's neck (and vice versa.)


Avoiding Common Errors
-
1Correct any errors in your technique early. For experienced riders, neck reining can seem almost second-nature. However, for a beginner, it can be deceptively difficult. Since making errors while training your horse can cause the horse to start to expect these errors while neck reining, you'll want to nip them in the bud early. In the rest of this section, we'll discuss a few common errors (and how to avoid them.[5]
-
2Don't use extra pressure to turn when neck reining. If you're neck reining and you can't get your horse to turn, don't pull extra hard to turn the horse's head in the correct direction. Because of your one-handed grip, this actually forces the horse's head to turn in the wrong direction. Instead, switch to direct (two-handed) rein and pull the inside rein to turn the horse's head.
-
3Don't let accidental hand movements guide the horse. It's easy to forget that, from the horse's perspective, any minor movements of the reins can be interpreted as a cue to turn. Try to keep your hands reasonably steady while riding, especially while neck reining.
-
4Don't underestimate the importance of shifting your weight. Your horse can feel even minor shifts in your body weight. Be sure to look into each turn — this should make you subconsciously shift your weight. If you're having a hard time getting a response from your horse, you may guide it by more deliberately shifting your weight and applying leg pressure as noted in the section above.


Perfecting Your Horse's Training
-
1Be consistent. As when training any sort of animal, consistency is key. Once you start training your horse to neck rein, stick with it, using the proper technique outlined above each time. Don't make sudden changes in your training technique — remember that the horse won't ever be able to understand your logic for making the change, so it can easily become confused if you use inconsistent technique. Repeated inconsistencies can even cause the horse to learn "bad" behaviors.
- Remember — being consistent when you train your horse is just as much for your own benefit as it is for the horse's. If you plan on riding your horse, you'll want to be confident that it will react to your cues predictably, and the only way to ensure this is to train consistently.
- Keep your training sessions short, such as 30 minutes or less at a time. Otherwise, you might lose your horse's attention. Try to work with your horse for short training sessions 5 days a week to create consistency.
- End your training sessions on a positive note. For example, stop the session when your horse successfully recognizes a command. This will motivate both you and your horse to keep going.
-
2Be patient. Compared to other riding commands, neck reining is fairly simple (both to learn and to teach.) In general, most horses should start to get the hang of neck reining within about six to ten training sessions.[6] However, all horses are different and it's not uncommon for it to take longer for a horse to master this skill. Be patient and persistent and you'll eventually be neck reining with ease.
-
3Don't be afraid to contact a professional. If you're worried about being able to teach your horse to neck rein properly, don't worry — help is available. Consider contacting a horse professional (like a trainer, a breeder, a rancher, etc.) to help you get your horse to neck rein. Though these options can tend to be expensive, it's money well spent if it helps you ride your horse safely in the long term.
- To find a trainer near you, consider using the online "Find a Trainer" service offered by the American Quarter Horse Association (AQHA) at http://aqha.com/findatrainer.[7]


Warnings
- Be sure to observe all horse safety rules while riding and interacting with your horse.⧼thumbs_response⧽


References
- ↑ http://trailridermag.com/article/teach-neck-rein
- ↑ http://trailridermag.com/article/teach-neck-rein
- ↑ http://trailridermag.com/article/teach-neck-rein
- ↑ http://trailridermag.com/article/teach-neck-rein
- ↑ http://www.horsechannel.com/horse-training/horse-neck-reining-69.aspx
- ↑ http://www.horsechannel.com/horse-training/horse-neck-reining-69.aspx
- ↑ http://aqha.com/findatrainer
About This Article

It may take practice, but if you’re patient, you can teach a horse to neck rein. Once your horse knows some basic riding skills, saddle your horse and connect your reins to a smooth-cheek snaffle bit. Mount the horse and hold the reins in one hand behind the center of the horse’s neck. Start off at a gentle walk, then cue your horse to turn with a direct rein. At the same time, lay the outside rein against the side of the horse’s neck. Shift the weight of your body to cue the turn. Repeat this process until the horse understands. Read on to learn how to test your horse’s new neck reining skills!