This article was co-authored by Haley Snyder. Haley Snyder is a former Division I Student-Athlete and Softball Player. With over a decade of experience, she specializes in softball mechanics, fundamentals, and pitching. Haley holds a BA and MA from Stanford University, where she competed in the PAC-12 Conference as a pitcher.
There are 12 references cited in this article, which can be found at the bottom of the page.
This article has been viewed 54,361 times.
The changeup (a slower pitch thrown between faster ones to keep batters on their toes) is one of the most effective pitches in softball. Many pitchers want to focus on their fastball, but without the changeup, batters will know what to expect and get hits more easily. The circle changeup is the most common, but there are multiple other methods. If you learn the flip, stiff wrist, knuckleball, and shove changeups in addition to the circle, you’ll be throwing no-hitters in no time.
Steps
Throwing a Circle Changeup
-
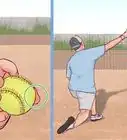
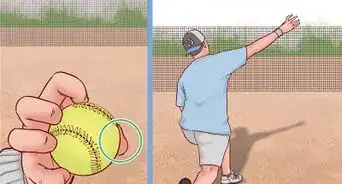
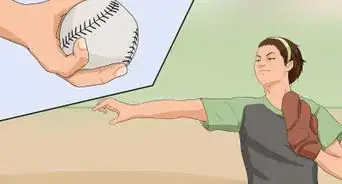
1Form a circle with your thumb and first finger on the side of the ball. Form your circle at the horseshoe (U shape) of the stitches. Try to find a visual point to form your circle around, like the first or last letter in the ball’s branding label (if it has one). That way you can form your grip at the same place every time you throw.
-
2Spread your other 3 fingers evenly over the top of the ball. Spread your middle, ring, and pinky finger over the top of the ball, but focus on squeezing the ball with your pinky and thumb in particular. You should be able to throw the ball with just those 2 fingers.
- This will help you get a better feel for how to grip the ball when you release.
Advertisement -
3Turn your hand at the release point so that the circle is facing the catcher. Swing your arm around and, as your hand approaches the release point, turn your hand around so that the circle is facing the catcher. Then release the ball by popping your fingers outwards as your arm reaches full extension at your hip.[3]
- Imagine there is a dot in the middle of your circle and you are throwing it to the catcher.[4]


Using a Flip Changeup
-
1Spread 4 fingers evenly along the seam of the ball. Spread your forefinger, middle, ring, and pinky fingers along one of the stitches on the side of the horseshoe (U shape) of the ball with your fingertips pressing into the stitch. Then, position your thumb on the opposing side of the ball with the tip pressing into the ball.[5]
- This is the same grip as a fastball.
-
2Rotate the ball as you swing your arm around. Swing your arm around at full speed and as your arm comes parallel with your leg, rotate your hand so that your fingers are facing the catcher. This changeup can be hard to control, so make sure you have a tight grip on the ball as your arm comes up.[6]
- If you’re having trouble controlling the ball, you can try gripping the ball with your thumb and pinky on the sides of the ball.[7]
-
3Snap your wrist back as you release the ball. When your arm reaches full extension at your hip, release the ball by flipping your wrist backwards and popping your fingers away from the ball. The ball should feel like it’s being ripped off your fingers.[8]
- If it doesn’t, you may not have a tight enough grip or be throwing fast enough. Experiment with your grip and speed to get the needed effect.[9]


Throwing a Stiff Wrist Changeup
-
1Palm the ball with your fingers going in the same direction as the stitches. The deeper the ball is in your hand, the slower your pitch will be. Putting the ball deep in your palm will also help stiffen your wrist. Cup the ball in your palm and place your fingers along the ball’s stitches on the side of the horseshoe (U shape).[10]
- Placing your fingers along the stitches will create a 2-seam rotation. This means that only 2 of the stitches will encounter airflow, so the pitch will be slower and easier to control.[11]
- Placing your fingers along the stitches will also help keep you from snapping the ball, pulling on the seams, and speeding up the pitch.[12]
-
2Dig your nails into the ball with your knuckles raised. Place the fingertips of your middle, ring, and pinky finger along the stitches near the horseshoe, and your first finger at the bend of the horseshoe. Then place your thumb along the stitches on the opposite side from your middle, ring, and pinky fingers. Grip the ball tightly by digging your nails in.[13]
- If you have larger hands, you can also use the knuckle grip. Tightly grip the ball with your thumb and pinky on either side and place the first bend of your other 3 fingers along the stitches.
-
3Keep your wrist stiff as you release the ball. Swing your arm around, keeping your wrist stiff as your arm moves. Then, when your arm reaches full extension at your hip, pop your fingers open and release the ball. Push the ball towards the catcher with the heel of your palm, making sure to keep your wrist stiff as you release the ball.[14]
- Your arm should move the same way it does for a fastball.


Using a Knuckleball Changeup
-
1Grip the ball on the side of the horseshoe stitches with your first 2 or 3 knuckles. Place the first bend of your first and middle or first, middle, and ring fingers on the stitches that form the side of the horseshoe (U shape). Make sure to grip the ball as tightly as possible.[15]
-
2Pop open your knuckles at the release point. Swing your arm around, keeping your wrist stiff. When your arm reaches full extension at your hip, pop your knuckles away from the ball as you throw it towards the catcher.[18]
- Squeeze your fingers together as the ball comes out of your hand, and make sure your fingers come away from the ball simultaneously. This will help keep speed to a minimum.[19]
-
3Push the ball through the release on the heel of your hand. As your fingers move away from the ball, push it forward towards the catcher with the ball of your hand. This will help reduce spin on the ball so that it doesn’t pick up speed as it moves.[20]
- The release of a knuckleball changeup is roughly the same as the one used in a stiff wrist changeup.


Throwing a Shove Changeup
-
1Rest the ball deep in your palm and form a circle with your fingers. Form a circle around a visual point on the horseshoe (the U shape of the stitches) as you would in a circle changeup, but with the ball resting deep in your palm rather than gripping the top of it with your other fingers.[21]
- Practice your grip by tossing the ball up in the air by pushing upwards with your palm.
-
2Curl your other 3 fingers underneath the ball without letting your fingertips touch it. Curl your middle, ring, and pinky fingers around the ball. Hold the ball without digging your fingertips into it. If you dig your fingertips in, you’ll create spin that will make your pitch go too fast.[22]
- Continue practicing your grip by tossing the ball upwards, this time adding in your middle, ring, and pinky fingers.
-
3Use the heel of your palm to shove the ball out and down towards your catcher on release. Swing your arm around, with the ball facing outwards. Once your arm reaches full extension at your hip, pop your fingers away from the ball and push it out and down towards your catcher.[23]
- Practice releasing the ball by starting off pitching it to your catcher from a short distance, and increasing the distance as your grip becomes more confident.


Expert Q&A
-
QuestionHow can I improve my pitching skills?
 Haley SnyderHaley Snyder is a former Division I Student-Athlete and Softball Player. With over a decade of experience, she specializes in softball mechanics, fundamentals, and pitching. Haley holds a BA and MA from Stanford University, where she competed in the PAC-12 Conference as a pitcher.
Softball PlayerRepetition is key! The throwing motion in softball is a lot easier on the arm than an overhand throw, so you can get away with practicing those throws more before you experience any soreness. If you don't want to practice too long, try practicing more often instead. You don't always need to put 100% into all your throws—you can throw at 70% to conserve energy.

References
- ↑ https://www.youtube.com/watch?v=hb5wQcH04m0
- ↑ https://www.youtube.com/watch?v=hb5wQcH04m0
- ↑ http://www.pitchsoftball.com/thebestchange-up.html
- ↑ http://www.pitchsoftball.com/thebestchange-up.html
- ↑ https://youtu.be/6y0fEO1wuio?t=15
- ↑ https://youtu.be/6y0fEO1wuio?t=44
- ↑ http://www.pitchsoftball.com/thebestchange-up.html
- ↑ https://youtu.be/6y0fEO1wuio?t=56
- ↑ https://youtu.be/6y0fEO1wuio?t=63
- ↑ http://www.humankinetics.com/excerpts/excerpts/mastering-the-stiff-wrist-changeup
- ↑ https://www.drivelinebaseball.com/2016/11/spin-rate-part-ii-spin-axis-useful-spin/
- ↑ http://www.humankinetics.com/excerpts/excerpts/mastering-the-stiff-wrist-changeup
- ↑ http://www.humankinetics.com/excerpts/excerpts/mastering-the-stiff-wrist-changeup
- ↑ http://www.pitchsoftball.com/thebestchange-up.html
- ↑ http://www.pitchsoftball.com/thebestchange-up.html
- ↑ http://www.pitchsoftball.com/thebestchange-up.html
- ↑ https://healthyliving.azcentral.com/throw-knuckleball-softball-8083.html
- ↑ http://www.pitchsoftball.com/thebestchange-up.html
- ↑ https://healthyliving.azcentral.com/throw-knuckleball-softball-8083.html
- ↑ http://www.pitchsoftball.com/thebestchange-up.html
- ↑ https://youtu.be/xYlLGTt_Mi8?t=8
- ↑ https://youtu.be/xYlLGTt_Mi8?t=13
- ↑ https://youtu.be/xYlLGTt_Mi8?t=36
About This Article