X
This article was co-authored by wikiHow Staff. Our trained team of editors and researchers validate articles for accuracy and comprehensiveness. wikiHow's Content Management Team carefully monitors the work from our editorial staff to ensure that each article is backed by trusted research and meets our high quality standards.
This article has been viewed 22,221 times.
Learn more...
Tie dye bikinis are colorful and stylish. By making your own tie dye bikini, you can ensure that no one else will be wearing the same bikini as you at your next pool or beach party. To create your own tie dye bikini, you will need to get some special materials and then just set aside about 30 minutes to tie dye.
Steps
Part 1
Part 1 of 3:
Setting Up Your Tie Dye Materials
-
1Gather your materials. Making your own tie dye bikini is easy, but you will need some special materials before you can begin. You will need:[1]
- a tie dye kit and any extra tie dye colors you want to use
- spray bottles (for any custom colors you want to create)
- a large trash bag, some newspaper, or a tarp
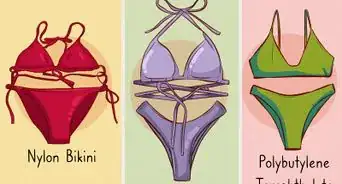
- a white bikini
- soda ash
-
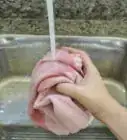
2Wash the bikini. To make sure that there are no dyes or oils on the bikini fabric that might interfere with the dyeing process, you should wash your bikini before you dye it.
- Put the bikini in a washing machine on the regular cycle with a small amount of detergent.
- You do not need to dry the bikini after you wash it.
Advertisement -
3Put on gloves. You will need to protect your hands from the chemicals and dye, so put on your gloves before you start mixing anything. Leave the gloves on throughout the entire dyeing process and then remove them after you have set out the bikini to dry.
- You may also want to wear an apron or an old t-shirt to avoid damaging any of your good clothes.
-
4Soak your bikini in warm water and soda ash. Prepare a solution of warm water and soda ash by mixing 1 cup of soda ash immerse your bikini in the solution.[2] Let the bikini soak in the soda ash solution for about an hour.[3]
- The soda ash will prepare the bikini fabric for the dye, which will result in bright, bold colors.
- If you prefer more of a pastel look, then you can skip the soda ash.
- Wring out the bikini after it is done soaking.
-
5Lay out a trash bag. Tie dyeing can be messy and the dye may leave permanent stains on hard and soft surfaces, such as countertops, tables, and carpets. To protect the surfaces in your area, lay out a large trash bag, some layered newspaper, or a tarp.[4]
- Make sure that you have covered a large enough area to work on.
-
6Prepare the dyes. Take the tie dye bottles provided with the kits and/or purchased separately and remove the caps. Then, fill the bottles up with cool or room temperature water to the fill line. Then, cover the bottles with the caps again and shake the contents until the powder has fully dissolved in the water.[5]
- It is important to shake the bottles well or else you may end up with inconsistent dye colors or even some black speckles on your tie dye items.
-
7Mix custom colors. If you want to create any custom colors to use on your bikini, then you can mix them in the empty spray bottles.[6] For example, if you want to make a pinkish purple color, then you might add a little pink to some purple dye in one of these bottles.
- Make sure that you mix the custom colors well.
Advertisement
Part 2
Part 2 of 3:
Dyeing Your Bikini
-
1Twist and secure sections of the bikini top and bottom. To create the tie dye pattern, you will need to section off fabric and secure the sections with rubber bands. You can section off the bikini fabric in as many areas as you like to create the pattern that you want.[7]
- Twist each section of material tightly before you secure it with a rubber band.
- Make sure that you secure the rubber bands tightly as well.
-
2Apply dye to the fabric sections. Use your dye and/or spray bottles to squirt the dye onto your secured segments. Apply the dye in the desired pattern.[8] For example, you might use pink on one section, then green on the next section, and then yellow on the next section.
- Make sure that you squeeze enough dye onto the sections to saturate the fabric through to the twisted layers. Otherwise, you may end up with undyed white spots on your bikini.
- Don’t forget to wear gloves on both of your hands to avoid staining your hands while you dye the bikini.
-
3Let the bikini dry outside for four hours. When you have finished dyeing your bikini, remove the rubber bands. Then, lay your bikini outside in a dry, sunny place and allow it to dry for about four hours. This will help the dye set in.[9]
- Make sure that you lay the bikini out somewhere that will not be damaged if any dye leaks onto it. To be safe, you may want to leave the plastic garbage bag under it.
-
4Put the bikini into a dryer for 20 minutes. After the bikini has dried, put it into a dryer without any other clothes. Run the dryer on high for about 20 minutes. This will help the dye set in even more. After the 20 minutes are up, your tie dye bikini is ready to wear![10]
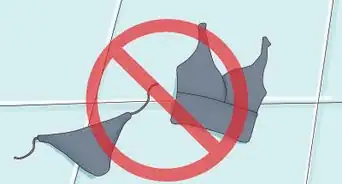
- You may want to wash the bikini before you wear it to remove any excess dye. Otherwise, the dye may run when you wear the bikini for the first time.
Advertisement
Part 3
Part 3 of 3:
Experimenting With Designs
-
1Try a central twist. Twisting the fabric starting in the center is one of the most classic ways to tie dye. Grab the fabric in the center (either of a bra cup or your bikini bottom) and then twist it tightly. Then, bundle the fabric with rubber bands so that they criss-cross each other.
- The rubber bands and fabric segments should resemble pieces of a pie. Your end result will be a spiral design that starts in the center of your bikini bra cups and bottoms.[11]
-
2Use a fan fold pattern. You can create a wavy striped pattern on your bikini by folding your bikini before you dye it. Fold the material in narrow pleats and then place rubber bands about an inch or two apart to secure the folds in place. Use the rubber bands as your guide to apply the dye.
- You can use as many colors and rubber bands as you want to create your unique fan fold design.
-
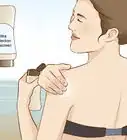
3Draw a heart. You can also draw a heart over you tie dye after it is done drying. After you finish tie dyeing in your desired colors and the colors have set, take a bleach pen or a darker color dye and draw a heart somewhere on your bikini bottoms or bra top.[12]
- Try drawing a heart near your hip or on one corner of one of your bra cups.
- You can also draw stars, initials, and other symbols on your bikini.
Advertisement

-Step-12-Version-3.webp)


References
- ↑ https://www.youtube.com/watch?v=XYMhzUCawQ0
- ↑ http://www.dharmatrading.com/techniques/tiedye/the-soda-soak-tie-dye-method.html
- ↑ https://www.youtube.com/watch?v=XYMhzUCawQ0
- ↑ https://www.youtube.com/watch?v=XYMhzUCawQ0
- ↑ https://www.youtube.com/watch?v=XYMhzUCawQ0
- ↑ https://www.youtube.com/watch?v=XYMhzUCawQ0
- ↑ https://www.youtube.com/watch?v=XYMhzUCawQ0
- ↑ https://www.youtube.com/watch?v=XYMhzUCawQ0
- ↑ https://www.youtube.com/watch?v=XYMhzUCawQ0
About This Article

wikiHow Staff
wikiHow Staff Writer
This article was co-authored by wikiHow Staff. Our trained team of editors and researchers validate articles for accuracy and comprehensiveness. wikiHow's Content Management Team carefully monitors the work from our editorial staff to ensure that each article is backed by trusted research and meets our high quality standards. This article has been viewed 22,221 times.
Co-authors: 4
Updated: June 29, 2021
Views: 22,221
Categories: Swimwear | Tie Dyeing Clothes and Fabric
Advertisement