This article was co-authored by wikiHow Staff. Our trained team of editors and researchers validate articles for accuracy and comprehensiveness. wikiHow's Content Management Team carefully monitors the work from our editorial staff to ensure that each article is backed by trusted research and meets our high quality standards.
There are 9 references cited in this article, which can be found at the bottom of the page.
This article has been viewed 10,175 times.
Learn more...
A net wire fence is a type of woven wire fencing that looks like a grid of medium-sized rectangular squares. You might choose to put up a net wire fence to keep farm animals in a certain area of your property, for example. In order to install a net wire fence, make sure you already have wooden corner posts driven into the ground to tie the end wires around. The fencing is heavy and unwieldy, so make sure you also get an extra pair of hands to help you out with the job! With some elbow grease, patience, and the right technique, you can have a new net wire fence built on your property in an afternoon or two.
Steps
Stapling Net Wire Fence to Corner Posts
-
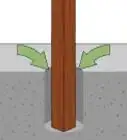
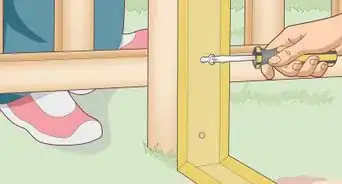
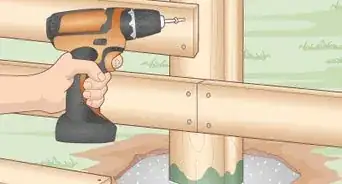
1Install wooden corner posts. Use round wooden corner posts that are 4–6 in (10–15 cm) in diameter for the best results when installing a net wire fence. It will be easiest to wrap the end wires around round posts.[1]
- You could also use square posts if you don’t have round ones. It will just be a little more awkward to wrap and tie the end wires around them.
- If your fence is going to be longer than 50 ft (15 m), install an anchor post of the same type as your corner posts every 30–50 ft (9.1–15.2 m) for additional stability.
- The posts in between the corner posts can be smaller wooden posts or metal T posts. It’s up to you and the look you’re going for or what your budget allows for. They should be placed about every 10 ft (3.0 m).
-
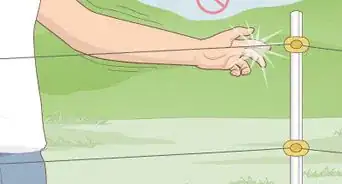
2Put on a pair of heavy work gloves, safety glasses, and sturdy footwear. These will protect your hands, eyes, and feet from accidents while you install your net wire fence. The ends of the wires are very sharp, so it’s easy to scratch or cut yourself.[2]
- You’ll need a helper for this project. Make sure they are wearing all the proper protective gear as well.
Advertisement -
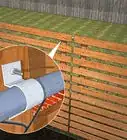
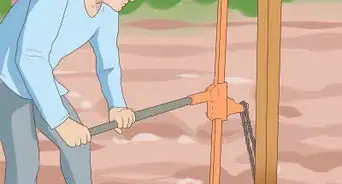
3Roll out a length of net wire fencing on the ground where you will install it. Lay your roll of net wire fencing on the ground at 1 corner of the fence. Unroll it completely, so that it reaches the opposite corner post and is laying on the ground in the position you will install it in.[3]
- Depending on how big and heavy your roll of fencing is, you might want to have your helper push it along with you to unroll it. It will be easier and faster this way.
- Net wire fencing is available in different roll lengths, so you can probably get the right length for the fence you’re building. If you can’t find the exact length, get a longer roll and cut it to size using high-tensile wire cutters.
-
4Hold the end of the net wire fencing up against a corner post. Have a helper lift the fencing up off the ground with you and hold it in position while you secure it. Place the end of the fencing against the corner post so that the last column of wire squares in the netting of the fence rests against the post.[4]
- Have your assistant help hold the fencing up straight while you align the end on the post.
-
5Hammer a galvanized fence staple over the second wire down from the top. Place a U-shaped galvanized fence staple on top of the second row of wire down from the top of the fencing. Use a hammer to drive the staple into the wooden fence post to hold the fencing in place.[5]
- Double-check that the fence is lined up straight on the post before you drive the fence staple in to hold it in place.
-
6Staple every other wire to the fence post. Position galvanized fence staples over every other row of wire underneath the first staple you put in. Hammer them into the wooden post as you go until you reach the bottom.[6]
- You don’t have to worry about being super precise with the placement of the staples. As long as they hold the wire in place on the corner post, it’s fine.


Making Tensile Knots in the End Wires
-
1Start with 1 of the middle end wires and wrap it around the corner post. Grab 1 of the end wires from 1 of the horizontal line wires around the middle of the fence. Wrap it all the way around the corner post until it crosses back over the horizontal section of itself.[7]
- The line wires are the sections of the wire netting that run horizontally at a 90-degree angle to the post.
- Starting with an end wire from one of the line wires near the middle will make the fence more stable while you finish tying all of it.
-
2Bend the wire into a Z shape where it crosses over itself. Hold the end wire where it crosses back over the horizontal line wire to mark where to bend it. Bend it back once at this point at about a 45-degree angle, then bend it forward again about 2–3 in (5.1–7.6 cm) up from the first bend to make a Z shape.[8]
- You don’t have to be precise with the bends or the shape, just make a rough Z.
-
3Loop the Z-bent part of the wire back over the line wire. Hook the first bend of the Z shape over the horizontal line wire, so the next section of the Z starts going back under it. Pull the bent wire back under and up over the line wire between the end wire and the post to make a loop.[9]
- The loop doesn’t have to be tight.
-
4Twist the remaining wire over the line wire in 2.5 spirals. Pull the last bend in the wire up over top of itself and the line wire, so it isn’t between the end wire and the post anymore. Push the loop in the wire close to the post, then wrap the excess about 2.5 times around the horizontal line wire.[10]
- It should now look like there is 1 loop and 2 full spirals of the end wire wrapped around the horizontal line wire.
-
5Break the excess wire off by bending it 90 degrees back. Bend the excess wire down to weaken it first. Bend it backwards about a half turn at a 90-degree angle to the way you wrapped it to snap it. [11]
- This will leave the wire tied securely around itself with no loose ends.
- The wire should snap fairly easily. However, if you’re having trouble with this, you can always use high-tensile wire cutters instead.
-
6Tie rest of the end wires using the exact same method. Wrap each end wire over the line wire by bending it into a Z shape and twisting it in 2.5 spirals over the line wire. Bend the excess wire back at about 90 degrees to the direction you wrapped it in to snap it off.[12]
- The order you do the next wires in doesn’t matter.
-
7Stretch the fence tight to the other post and repeat the whole process. Hold the opposite end of the net wire fence up against the opposite corner posts, stretch it tight, and staple every other row of wire to the post using galvanized fence staples and your hammer. Tie all the end wires, starting with 1 in the middle, and break off the excess wire length.[13]


Warnings
- Always wear thick work gloves, protective eyewear, and sturdy footwear like work boots when you’re installing a net wire fence.⧼thumbs_response⧽
Things You’ll Need
- Corner posts
- Net wire fencing
- Work gloves
- Safety glasses
- Sturdy shoes
- Hammer
- Galvanized fence staples
- A helper
- High-tensile wire cutters (optional)


References
- ↑ http://diydiva.net/2009/12/how-to-install-a-woven-wire-fence/
- ↑ https://www.youtube.com/watch?v=OoGKuyleVu0&feature=youtu.be&t=13
- ↑ http://diydiva.net/2009/12/how-to-install-a-woven-wire-fence/
- ↑ https://www.youtube.com/watch?v=8gnt4k5r1_o&feature=youtu.be&t=1
- ↑ https://www.youtube.com/watch?v=OoGKuyleVu0&feature=youtu.be&t=57
- ↑ https://www.youtube.com/watch?v=OoGKuyleVu0&feature=youtu.be&t=59
- ↑ https://www.youtube.com/watch?v=8gnt4k5r1_o&feature=youtu.be&t=23
- ↑ https://www.youtube.com/watch?v=8gnt4k5r1_o&feature=youtu.be&t=30
- ↑ https://www.youtube.com/watch?v=8gnt4k5r1_o&feature=youtu.be&t=37
- ↑ https://extension.umaine.edu/livestock/pasture-course/lesson-3/working-with-high-tensile-fence-wire/
- ↑ https://extension.umaine.edu/livestock/pasture-course/lesson-3/working-with-high-tensile-fence-wire/
- ↑ https://extension.umaine.edu/livestock/pasture-course/lesson-3/working-with-high-tensile-fence-wire/
- ↑ http://diydiva.net/2009/12/how-to-install-a-woven-wire-fence/
About This Article