This article was co-authored by Britt Edelen. Britt Edelen comes to wikiHow after graduating in 2019 from Brown University, where he studied English and German literature and philosophy. While at Brown he contributed frequently to campus publications and worked in the university’s Writing Center. More recently, he has had several articles published in various journals devoted to literary criticism. During his time at wikiHow, Britt supervised and collaborated with writers and editors to continue producing high-quality content and promote wikiHow’s mission of enabling everyone to learn anything.
There are 7 references cited in this article, which can be found at the bottom of the page.
This article has been viewed 255,653 times.
The clove hitch knot is fairly simple, and it can be useful for securing ropes to trees, posts, or poles. One benefit of this knot is it's fairly easy to adjust the length of the rope if you need to. It's often used in boating and sailing, and you may also use it climbing, as you can tie it with one hand.
Steps
Tying a Cove Hitch Knot over an Attached Pole
-
1Wrap the end halfway around the pole. Move from the front to the back and drag the rope over so the end is hanging off the other side of the pole. Create a length of about 6 inches (15 cm) to work with on the end rope, which should be on the other side of the pole.[1]
- You can leave a longer end if you want, but it will hang out at the end. You need enough to go around the pole at least twice.
- You may need to increase the length if you are working with a larger diameter.
- Always keep your eye on where the ends of the rope are in comparison to one another. That makes it much easier to follow.
-
2Cross the running end over the part in front. Bring the running end under the pole and then over the part of the rope on the front. Form an "X" with the 2 pieces of rope.[2]Advertisement
-
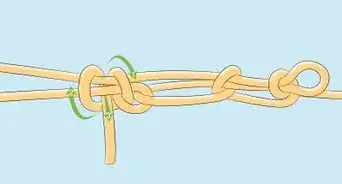
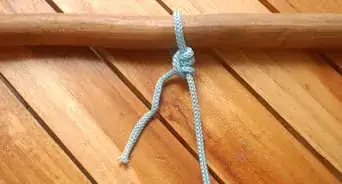
3Wrap the end of the rope over the pole again. When wrapping, make sure the end stays crossed over the first rope, forming an "X" as you go back around the pole, the same one you made when you crossed the ropes in the last step. Go over the pole, not under. Push it halfway around the pole, though you'll bring it to the front again in a minute.[3]
- You should see 2 loops wrapped over the pole, making an "X" in front, the one you just created in the previous step.
-
4Slip the end under the piece you just wrapped around the pole. Bring the rope back around to the front. You should see the original loop and the loop you just made. Go under the loop you just made and pull the end out at the top.[4]
- With this movement, you'll create a second "X."
-
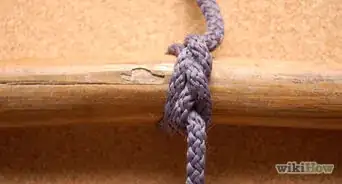
5Tighten the knot to finish it. Pull on both ends of the knot to tighten it up. You may need to push the loops together on the pole if your rope isn't very flexible.[5]


Using a Clove Hitch while Climbing
-
1Place your rope in the carabiner clip. Grasp the rope coming off your harness. Slip the edge of it into the carabiner clip from the left or right, depending on how the clip is facing. The long end of the rope (the one running down to your harness) should be coming out on the side away from you. [6]
- When climbing indoors, carabiner clips are anchored in the rocks so you can tie your rope on them to act as a safety. You can use this in any climbing that uses anchors.
- One benefit of this knot is you can tie it with one hand.
-
2Make a loop with the long end of the rope. Reach across to the other side of the carabiner clip where the long end of the rope is. Grab it on the side opposite the clip part of the carabiner and then twist it up on itself to make a small loop. It should look like a lowercase cursive "e."[7]
- The rope should come down from the clip, then go up and forward to make the loop.
-
3Cross the loop over the rope in front of you to hang it on the clip. Bring the loop around so it goes in front of the rope on your harness. Slip it onto the carabiner clip to complete the knot.[8]
- The "front" of the loop should go over the clip first.
-
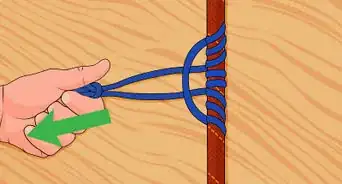
4Pull both ends to tighten the knot. This will make the knot more secure, though it can still come untied if you loosen it up. You can adjust the ends on either side of the knot as needed without untying it.[9]


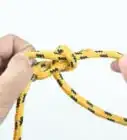
Using the Quick Method over a Loose Pole or Clip
-
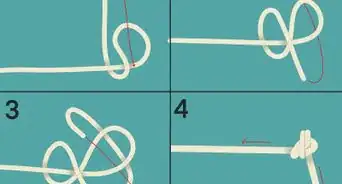
1Make 2 loops in the line. With the end of the rope on the left, twist the rope to the left near the end to make a simple loop. Move down the rope 1 to 2 inches (2.5 to 5.1 cm) away from the end and twist the rope to the right to make a second loop.[10]
- You should end up with 2 loops. On the left loop, the end leading away will be in front of the other part of the loop. On the right loop, the end leading away will be behind the other part of the loop.
- You can only use the quick method with something that has at least one end up to slip the loops over.
-
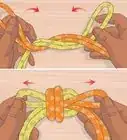
2Slide the right loop over the left loop. Don't flip the loop as you move it. Simply slide it over so that it's sitting in front of the left loop. You should have 2 loops on top of each other now.[11]
-
3Insert the object between the loops. If you're using a pole, slip it inside the 2 loops. You can also do this with a carabiner clip or other object. If it's too tight, use your fingers to open the loops a little.[12]
-
4Tighten the ends of the rope to complete the knot. Pull on both ends of the rope to tighten it over the object. Make sure to keep tension on the knot to hold it in place.[13]


Warnings
- This knot will be secure as long as you maintain tension on it. However, it can come loose in situations where the rope is not taut.⧼thumbs_response⧽
References
- ↑ https://www.britannica.com/technology/knot-cording#ref220842
- ↑ https://www.animatedknots.com/cloveend/
- ↑ https://www.britannica.com/technology/knot-cording#ref220842
- ↑ https://www.animatedknots.com/cloveend/
- ↑ https://www.animatedknots.com/cloveend/
- ↑ https://www.youtube.com/watch?v=k7MXH55q28U&feature=youtu.be&t=29
- ↑ https://www.climbing.com/skills/learn-this-one-handed-munter-and-clove-hitches/
- ↑ https://www.climbing.com/skills/learn-this-one-handed-munter-and-clove-hitches/
- ↑ https://www.climbing.com/skills/learn-this-one-handed-munter-and-clove-hitches/
About This Article

Start your clove hitch knot by wrapping a rope halfway around a tree, pole, or any other vertical object, leaving a loose end that’s at least 6 inches long. Then, take the loose end, bring it over the rest of the rope to form an “X,” and wrap that end around the pole a second time. Make sure the second wrap crosses over the pole, not under it. Next, bring the loose end back around and slide it underneath the loop you just made to form another “X.” Finally, pull the ends of the rope to tighten the knot. To learn how to fasten a clove hitch to a climbing carabiner or a loose pole, keep scrolling!