This article was co-authored by Josh Goldbach. Josh Goldbach is an Outdoor Education Expert and the Executive Director of Bold Earth Adventures. Bold Earth leads adventure travel camps for teenagers all over the world. With almost 15 years of experience, Josh specializes in outdoor adventure trips for teens both in the United States and internationally. Josh earned his B.A. in Psychology from Eckerd College in St. Petersburg, Florida. He’s also trained as a wilderness first responder, a Leave No Trace master educator, and a Level 5 Swiftwater rescue technician.
There are 10 references cited in this article, which can be found at the bottom of the page.
This article has been viewed 66,841 times.
Camping gas stoves can be used almost anywhere you need to cook a meal and are without a kitchen. You may be tailgating or just in a camping area where fires are prohibited. Modern versions of camping stoves provide easy set up, and are compact and light. Knowing how to safely and effectively use these stoves will be a huge help to you when you are out in the wilderness.
Steps
Assembling the Stove
-
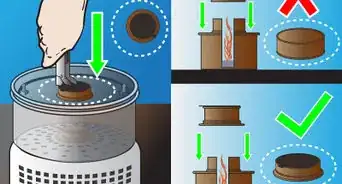
1Remove all the pieces from the bag the stove came in. Camping stoves generally come in several different pieces that need to be connected. Removing all of the pieces from the bag gives you a nice overview of which items you have and are working with.[1]
- There will be a piece of paper or card inside the bag which has a list of the items that should be included with the stove. You can use this list to double check that you have everything. There should be a bottle of gas, a connector hose, the stove, and there may be a few other little items depending on the type of stove you have.
- If you are missing items, do not attempt to assemble the stove as it may be dangerous.
-
2Connect the gas canister to the stovetop using the gas line. This is the main connection that needs to be established for you to be able to cook. The gas line should connect to the stove by twisting on but it may be different depending on the model of stove you have.[2]
- The canister is a metal bottle and the gas line is usually made of hose-like material.
- Be careful not to twist too hard. You will most likely hear a clicking noise once the gas line has been successfully connected.
Advertisement -
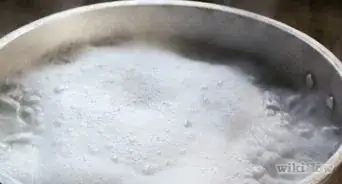
3Spray soapy water on any gas connector points to test for leaks. Once you've sprayed the water on, wait to see if any bubbles appear at the connection points. If bubbles do appear, this means there is a leaky connection and you should retry connecting the gas line to the stove and canister.[3]
- If there are no bubbles, you are free to move on.
- Using any regular dishwashing soap mixed with water in a spray bottle works well here.
- The gas should still be set to ‘off’ here as you are checking whether there are any leaks coming from places there shouldn’t be.
-
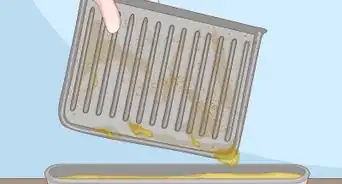
4Pat the connection points dry using a paper towel. If you leave these points wet then there is a risk of the remaining liquid preventing you from being able to light the stove.[4]
- If you don’t have a paper towel, use a towel or some other piece of material.
-
5Find a flat surface to put the stove on. When you are cooking, the stove needs to be completely flat otherwise there is a risk of it falling over. This is not only dangerous but incredibly inconvenient and potentially wasteful.[5]
- If you need to, create a flat surface by digging out some of the ground and piling it up to form a flat area.
- The surface you have the stove on should also be as stable as possible. Avoid any terrain that has the potential to shift while you are cooking on it.


Operating the Stove
-
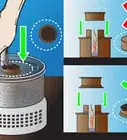
1Separate the arms around the burner so they’re spaced evenly apart. These arms form the support base where your pot/pan will sit. When the stove is packed down, the arms are grouped together. Spread them out by pulling them up and pushing them around the stove.[6]
- Without these arms spread into the correct position, the stove won’t be able to have anything sitting on it as it will just be an open flame.
- It’s usual to have 4 arms but it’s possible that your burner only has 3.
-
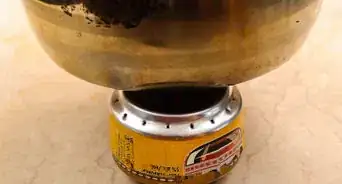
2Pump the gas 15-20 times using the priming pump in the canister. Doing this builds pressure up from the liquid fuel that is needed to convert it from a liquid to a gas. Pump until you can feel a firm resistance from the pump (around 15-20 pumps).[7]
- The priming pump is usually a black pump at the top of the gas canister that may come out either horizontally or vertically.
- It’s possible that this takes less or more pumps and you should look at what is recommended by the manufacturer of your specific stove.
-
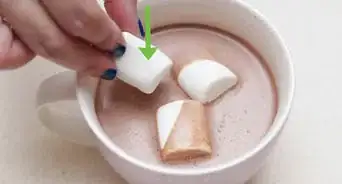
3Open the gas line so about 0.5 tsp (0.083 fl oz) of fuel comes out. The fuel will come out into a little catchment area that the flame forms around. This first little bit of fuel is necessary so you can heat the gas line and provide a space where the liquid gets converted into a gas so it can burn efficiently.[8]
- It doesn't need to be exactly 0.5 tsp (0.083 fl oz). You just need a small amount of fuel to burn.
- To open the gas line, turn the little controller knob that's attached to the stove. The knob looks like a paperclip.
-
4Light the fuel in the catchment area with a match or camp lighter. This process is called “priming” the fuel and it's basically doing the job of the spark on a regular stove by converting the liquid fuel in the line, into a gas.[9]
- Use a long match or lighter to light the fuel and be careful not to burn your hand when you do this. When you touch the flame to the liquid it will be set alight quite easily.
- Let this fuel almost burn out completely before moving onto the next step.
-
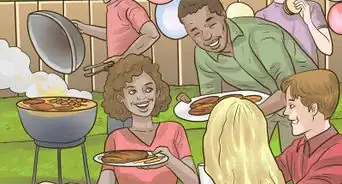
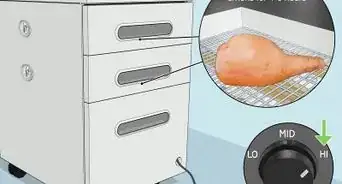
5Adjust the flame to the size you want it using the adjuster. The stove is now completely lit and ready to be used as a regular stove. Opening the fuel adjuster further gives you a larger flame and closing it off reduces the flame.[10]
- The adjuster is usually found attached to the stove and looks a bit like a paperclip attached to the stove.
- Be careful not to turn the flame down too low otherwise you will have to go through the same priming process to get the stove started again.
-
6Set up your wind-break sheet. This is essentially a thin sheet made out of aluminum that you can set up around the stove to stop wind from disrupting the flame. Most camping stoves come with one and they are a huge help if you’re cooking in blustery conditions.[11]
- Set the break up in a circle for it to work most effectively.
- If the wind is particularly strong, put a few rocks around the edge of the break to hold it in place.
-
7Cook away! Your stove is now ready to cook with. Use the fuel adjuster to alter how large the flame is. Make sure that when you are finished you let the parts cool down before you pack them away as they will be hot.
- Cooking on a small gas stove can take a bit longer as the flame you're using isn't quite as hot as home stoves so be patient.
- Most kinds of pots and pans work fine on these stoves and you can even wrap food in tin foil and cook it over the flame!


Community Q&A
-
QuestionMy camping stove blackens pots with smoke, is that normal?
 Galasy4969Top AnswererNo. You likely have a red or orange flame from the stove. You will want to adjust it to have a blue flame with little smoke; that is the most efficient.
Warnings
- There will be a small puff of flame when you first light the stove when you are priming the gas so keep your hands and other body parts well clear.⧼thumbs_response⧽
- Never use a stove unless you are sure it is safe. Conduct the appropriate bubble safety test to make sure the gas line is secure.⧼thumbs_response⧽
-Step-7-Version-2.webp)

-Step-10.webp)
References
- ↑ https://www.campingandcaravanningclub.co.uk/helpandadvice/gettingstarted/campingequipment/campingcooking/
- ↑ https://www.sa.gov.au/topics/energy-and-environment/using-electricity-and-gas-safely/portable-gas-cooker-safety
- ↑ https://www.sa.gov.au/topics/energy-and-environment/using-electricity-and-gas-safely/portable-gas-cooker-safety
- ↑ https://www.elgas.com.au/blog/505-bbq-gas-leak-test-gas-grill-barbecue
- ↑ https://www.lieffcabraser.com/injury/burn-injuries/portable-butane/
- ↑ https://youtu.be/zYAGfKpOX8M?t=46
- ↑ https://www.outsideonline.com/2116806/what-do-i-need-know-about-camp-stove-fuel
- ↑ https://youtu.be/jql6tNQsh00?t=112
- ↑ https://youtu.be/jql6tNQsh00?t=162
About This Article


-Step-7-Version-2.webp)