This article was co-authored by Jeff Baldwin. Jeff Baldwin is a Residential Painter and the Owner of Baldwin Custom Painting. With two decades of painting experience, Jeff specializes in high-end residential and small commercial painting projects. Dedicated to quality craftsmanship, Jeff and Baldwin Custom Painting provide bonded/insured, licensed, and lead-safe certified services in residential painting, light commercial painting, and wood refinishing.
There are 9 references cited in this article, which can be found at the bottom of the page.
wikiHow marks an article as reader-approved once it receives enough positive feedback. In this case, several readers have written to tell us that this article was helpful to them, earning it our reader-approved status.
This article has been viewed 866,825 times.
Using a paint roller is a quick way to modify the interior and exterior walls of your home. While paint brushes might seem like the easier choice, you will actually save yourself a lot of time by opting for a paint roller instead. Paint rollers will cover a larger surface area than a paintbrush and will provide an equally smooth finish to large and small areas. Before you begin rolling on paint, you need to purchase the right type of roller for the job and learn how to apply the paint effectively. Otherwise, you may end up with a streaky or splotchy finish.
Steps
Choosing a Paint Roller
-
1Buy a paint roller with a solid metal frame for reusability. Look for paint rollers that have small teeth or prongs that will grip the roller sleeve when applied. The teeth will keep the sleeve from rotating or falling off while you paint. On average, you can buy a good paint roller for under $20.00 (17.11 euros).[1]
- Avoid purchasing a single-use paint roller, as a low-quality frame will limit the control you have while painting.
-
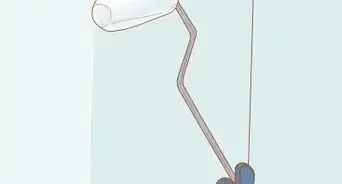
2Attach a handle to the roller frame to easily paint tall or large areas. The handle will give you better control for painting large areas that require long, even paint strokes, and will save you time from scaling up and down a step ladder. Purchase a 48 in (120 cm) wooden handle at your local hardware store for about $3.00 (2.57 euros), or attach a threaded broom handle.[2]
- If you are painting a small or easy-to-reach-area, attaching a handle to the frame is not necessary.
Advertisement -
3Purchase a sleeve based on the area you need to paint. Long sleeves work well for painting large areas like walls, and shorter sleeves are ideal to paint small or narrow areas. Make sure the sleeve fits your roller frame. Choose a nap or sleeve thickness, that will work best with the texture of the surface you are painting. Walls with a coarse texture will require a longer nap than walls with a light texture.[3] [4]
- For oil-based paints use a synthetic or natural fiber sleeve, and for latex-based paints only use a synthetic sleeve.[5]
- Use a 3⁄8 in (0.95 cm) nap on interior walls that have a light texture, and use a 3⁄4 in (1.9 cm) nap on exterior walls that have a coarse texture like stucco.[6]
- Avoid buying a cheap or single-use roller sleeve. It will not hold as much paint as a quality-grade sleeve, and it will not spread the paint as evenly. The average wool-polyester blend sleeve will only cost you about $6.00 (5.18 euros) at a local hardware or paint store.[7]


Loading the Roller with Paint
-
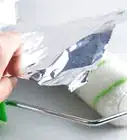
1Pour your paint into a bucket fashioned with a roller screen or a pan. Fill the bucket with 3–4 in (7.6–10.2 cm) of paint, or until the surface of the paint touches the bottom of the roller screen placed inside the bucket. The roller screen will help coat the roller in paint, so it should not be submerged. If you are using a pan, pour about 1 in (2.5 cm) of paint into the well of the pan. Do not overfill the well in the pan.[8]
- It is very easy to spill the paint when loading the roller if the pan is overfilled.
- For large areas, use a bucket with a roller screen placed inside. The bucket will hold more paint than a tray will, and will not be as easy to accidentally push around or spill.[9]
-
2Prime the sleeve by removing stray fibers and dampening it with water. Use a piece of tape or a lint brush to remove loose fibers on the sleeve, as these may clot the paint as you apply it. Then, dampen the roller with water to finish priming it. Shake the roller to remove any water that got inside the metal frame, and pat it dry with a cloth. The sleeve should be slightly dampened, and not dripping with water.[10] [11]
- This technique will save you time, as dry sleeves take longer to load evenly with paint.
-
3Dip the sleeve in the paint and roll it on the screen or on the pan. Continue to roll the sleeve until it has an even coat of paint.[12] The screen and the bumps on the pan will help distribute the paint around the roller. Avoid re-dipping the primed sleeve into the paint directly. Oversaturating the sleeve may cause streaks of paint to run down the wall when you roll it on.[13]
- If you did not prime your sleeve with water, dip and roll the sleeve at least 5 or 6 times to fully coat it.[14]


Painting a Wall
-
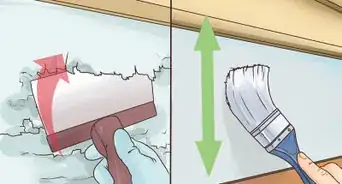
1Use a paintbrush to outline the perimeter of the wall with paint. Paint with long, horizontal strokes for an even coverage. The thickness of the roller sleeve makes it hard to apply paint around adjacent corners, ceilings, moldings, doors, and windows. Even if you do manage to paint those areas closely, the paint will most likely dry with streaks.[15]
-
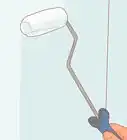
2Roll the paint onto the wall using a slightly angled, upwards stroke. Start painting about 6 in (15 cm) away from the corner of the wall, and about 12 in (30 cm) up from the bottom of the wall. Then, stop your first stroke 2–4 in (5.1–10.2 cm) from the ceiling. Most of the paint on the loaded roller will transfer onto the wall from this first motion. Leaving areas by the ceiling and corners unpainted will give you the room you need to spread all of the applied paint.[16]
- For the best paint coverage, mentally divide large walls into sections that are 2–3 feet (0.61–0.91 m) wide, and divide other smaller areas into thirds. Then work within a single section with 1 load of paint before moving onto the next section with a new load of paint.[17]
-
3Spread the paint to unpainted areas by sweeping the roller up and down. Aim to cover the areas by the corner, ceiling, and bottom portions of the wall that you intentionally left blank. Use continuous motions that move up and down like a vertical zigzag. Continue this motion until the applied paint is evenly spread for that section of the wall.[18]
- Always use a gentle pressure while rolling on or spreading the paint. Forceful motions or too much pressure can put streaks in the paint, and cause paint to build-up on the sleeve.[19]
- If the paint roller begins to stick to the wall and won’t spread the paint, do not add pressure. This means the roller needs to be loaded with more paint.[20]
-
4Reload the roller with paint and begin painting the next wall section. To get a smoother coverage, always spread the paint towards the previously painted section. Leave about 6 in (15 cm) of space between the space you just painted, and the new section.[21]
- Continue this process until the entire wall is painted.
-
5Connect the separate paint sections with overlapping strokes. Use the same up and down, zigzag motions you used to spread the paint. You do not have to clean or get a fresh roller cover for this process. The paint residue left on the roller will help blend the wet paint on the wall without oversaturating it.[22]
- Smoothing out the paint near the ceiling and floor with a vertical stroke is challenging if you have never used a paint roller before. Use a horizontal stroke to smooth the paint near those areas.[23]
-
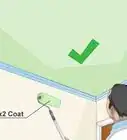
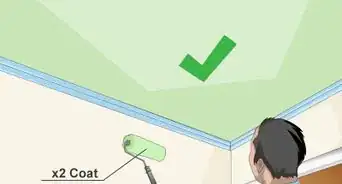
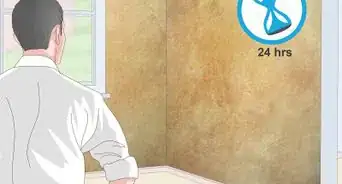
6Apply a second coat of paint once the first coat has dried if needed. Examine the painted area during the day, and see if the color pigment is even. Most light colors of paint will require 2 coats to adequately cover a wall. Some of the darker paints may require 3 coats.[24]
- For oil-based paints, you can apply a second coat after it has dried for 24 hours. Latex paint dries quickly, so you should be able to apply a second coat after 4 hours of drying.[25]
-
7Clean the roller frame and sleeve when you are done painting. Use a roller scraper to remove excess paint from the roller. Run the scraper across the sleeve lengthways. Get as much of the paint off as you can before washing. Then, rinse the sleeve with water until you can squeeze clear water out of it.[26] Allow it to dry overnight before placing it back onto the metal frame.[27]
- Roller scrapers can be purchased in the painting section at a local hardware store. If you do not have a roller scraper, carefully use a putty knife instead.


Expert Q&A
-
QuestionShould I wet a paint roller before using it?
 Jeff BaldwinJeff Baldwin is a Residential Painter and the Owner of Baldwin Custom Painting. With two decades of painting experience, Jeff specializes in high-end residential and small commercial painting projects. Dedicated to quality craftsmanship, Jeff and Baldwin Custom Painting provide bonded/insured, licensed, and lead-safe certified services in residential painting, light commercial painting, and wood refinishing.
Residential PainterGetting the roller damp before using it helps you apply paint smoothly. -
QuestionHow do I get a smooth finish with a paint roller?Jeff BaldwinJeff Baldwin is a Residential Painter and the Owner of Baldwin Custom Painting. With two decades of painting experience, Jeff specializes in high-end residential and small commercial painting projects. Dedicated to quality craftsmanship, Jeff and Baldwin Custom Painting provide bonded/insured, licensed, and lead-safe certified services in residential painting, light commercial painting, and wood refinishing.
Residential PainterThe length of the nap determines how smooth of a finish you'll have. If you want a smooth finish, then go for roller sleeves with short nap. -
QuestionHow do I paint a ceiling?
 DonaganTop AnswererIf you're using a roller, paint it as you would a wall. Cover the floor with a tarp. If it's a different color than the walls, mask off the top of the walls.
Things You’ll Need
- Paint roller
- Roller sleeve
- Bucket or pan
- Roller screen
- Paintbrush or painter’s tape (optional)
- Paint
- Water
- Cloth
- Lint roller or tape (optional)
- Roller scraper or putty knife
References
- ↑ https://www.familyhandyman.com/painting/techniques/paint-roller-techniques-and-tips/view-all
- ↑ https://www.familyhandyman.com/painting/techniques/paint-roller-techniques-and-tips/view-all
- ↑ Jeff Baldwin. Residential Painter. Expert Interview. 26 February 2021
- ↑ http://www.acmehowto.com/paint/use-roller.php
- ↑ http://www.acmehowto.com/paint/use-roller.php
- ↑ http://www.acmehowto.com/paint/use-roller.php
- ↑ https://www.familyhandyman.com/painting/techniques/paint-roller-techniques-and-tips/view-all
- ↑ https://www.bhg.com/decorating/paint/techniques/how-to-use-a-paint-roller/
- ↑ https://www.familyhandyman.com/painting/techniques/paint-roller-techniques-and-tips/view-all
- ↑ Jeff Baldwin. Residential Painter. Expert Interview. 26 February 2021
- ↑ https://www.bhg.com/decorating/paint/techniques/how-to-use-a-paint-roller/
- ↑ Jeff Baldwin. Residential Painter. Expert Interview. 26 February 2021
- ↑ https://www.realsimple.com/home-organizing/home-improvement/painting/how-use-paint-roller
- ↑ Patrick Coye. Painting Specialist. Expert Interview. 22 July 2020.
- ↑ https://www.todayshomeowner.com/video/tips-for-rolling-paint-in-corners-and-storing-wet-paint-rollers/
- ↑ https://www.familyhandyman.com/painting/techniques/paint-roller-techniques-and-tips/view-all
- ↑ https://www.realsimple.com/home-organizing/home-improvement/painting/how-use-paint-roller
- ↑ https://aapkapainter.com/blog/how-to-use-a-paint-roller-roller-painting-techniques/
- ↑ http://www.acmehowto.com/paint/use-roller.php
- ↑ http://www.acmehowto.com/paint/use-roller.php
- ↑ https://www.familyhandyman.com/painting/techniques/paint-roller-techniques-and-tips/view-all
- ↑ https://aapkapainter.com/blog/how-to-use-a-paint-roller-roller-painting-techniques/
- ↑ https://www.familyhandyman.com/painting/techniques/paint-roller-techniques-and-tips/view-all
- ↑ https://www.realsimple.com/home-organizing/home-improvement/painting/how-use-paint-roller
- ↑ https://www.bobvila.com/articles/how-long-does-it-take-paint-to-dry/
- ↑ Jeff Baldwin. Residential Painter. Expert Interview. 26 February 2021
- ↑ https://www.familyhandyman.com/painting/techniques/paint-roller-techniques-and-tips/view-all
About This Article

To use a paint roller, pour your paint into a shallow pan, dampen the roller sleeve with water, and roll the sleeve in the pan to load it evenly with paint. Next, start at one of the bottom corners and roll the paint onto the wall using a slightly angled, upwards stroke, stopping 2–4 inches from the ceiling. Then, sweep the roller up and down to spread the paint on the wall. Finally, reload the roller with paint and start on the next wall section. Always spread the paint towards the previously painted section for the smoothest coverage! For tips on seamlessly connecting painted sections together, read on!