wikiHow is a “wiki,” similar to Wikipedia, which means that many of our articles are co-written by multiple authors. To create this article, 33 people, some anonymous, worked to edit and improve it over time.
The wikiHow Video Team also followed the article's instructions and verified that they work.
This article has been viewed 247,832 times.
Learn more...
Making your own paintbrushes allows you to create customized brushes that provide a wide range of different textures and qualities to your brushstrokes. Paintbrushes can be made from a wide variety of different materials, many of which you probably already have around your house or yard, and which will create different effects in your painting. Making the brushes can also be a fun craft project in and of itself, especially for aspiring young artists. These instructions will guide you through the process of making your own paintbrushes.
Steps
Gathering Your Materials
-
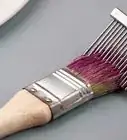
1Gather bristle materials. Decide what you you want to make your brush out of and gather the necessary materials. You can use any material that will hold paint for a brush tip. Below are some suggestions for possible materials..
- You can use hair, such as horsehair from a horse's mane or tail, human hair, or other animal hair, available at sporting good stores for fly-tying.
- Plant materials such as tree needles, grasses, or straw also work well.[1] Larger fibrous plants like yucca or cattail stems can also be shredded to create bristles.
- You can also use household items such as pieces of foam, cardboard, cotton clumps, shredded strips of cloth, broom bristles etc.[2]
- Craft materials like yarn, pom poms, or crepe paper can also work as bristles.[3]
-
2Select a handle. There are likewise many materials from which you can make your brush handle.Try sticks from the yard, bamboo, tongue depressors, or a yardstick.
- For a more professional and finished look, you can use doweling.
- If you are using string, yarn, or some other material with long fibers for your bristles, you can pull your bristles through a wide plastic straw.
- If you are using small items like pom poms or cosmetic wedges for the head of your brush, or if you aren't concerned about your brush being precise or lasting a long time, a quick shortcut is to just clip your brush material into clothes pins, and use the clothes pin as a handle. This is a great approach for young children.[4]
Advertisement -
3Choose an adhesive and binding materials. To make sure your brush holds together, you'll need to select an adhesive material (i.e. some kind of glue) and a binding material to wrap around bristles.[5]


Making the Brush
-
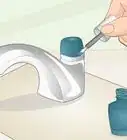
1Apply the glue. Place the glue about 1/4 to 1/2 an inch around the bottom of the stick where the bristles will go.[9]
- If you aren't concerned about creating a long-lasting brush, you can skip the glue and just affix your bristles with your binding material.
-
2Apply your bristles. Cover the end of your handle (where the glue is) with about 1⁄4 to 1⁄2 inch (0.6 to 1.3 cm) of your bristle materials.
- You can vary the thickness of your brush by applying more or less of your bristle material.[10]
-
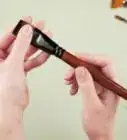
3Bind your bristles in place. Tie string, twine, or other binding material around the bristles and handle.
-
4Let the glue dry. The amount of time necessary for this will vary depending on your glue and the amount you used. Follow the instructions that came with your glue, and if in doubt, wait a longer than might be necessary.
-
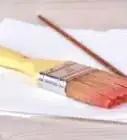
5Cut and shape the bristles. Once the bristles are firmly secured, you can cut them to the length and shape you want.[13] You'll probably want to keep about 1–2 inches (2.5–5.1 cm) in length. The width will vary according to how thick you'd like your brushstrokes to be.
- For a more precise brush, cut the bristles around the outside a little shorter than those in the center, so the bristles come to something of a point.[14]


Community Q&A
-
QuestionCan a use fake hair from like a doll to use as the 'brush' bit?
 Community AnswerAny fiber bunched up will hold paint by capillary action. The quality of the fiber will affect the durability of the brush, how well it maintains a crisp line as you paint, how quickly the paint flows from the brush, etc.
 -
QuestionWill a makeup brush work?
 Community AnswerMight be a little big but if you clean it should work. Don't use it again on your face, though.
 -
QuestionWhat kind of bristles can I use?
 Community AnswerDried tails from deer, goat, squirrel, or other animals. In addition, fly-tying materials from sporting goods stores.
Warnings
- Exercise caution if using a hot glue gun or superglue. These materials are toxic and can lead to injury if not used appropriately. Children should only use such materials with adult supervision.⧼thumbs_response⧽

References
- ↑ http://www.doodlesandjots.com/2012/01/05/making-paintbrushes-with-natural-materials/
- ↑ http://www.parentingchaos.com/diy-paintbrushes/
- ↑ http://www.parentingchaos.com/diy-paintbrushes/
- ↑ http://www.parentingchaos.com/diy-paintbrushes/
- ↑ http://www.alternativeconsumer.com/2011/02/21/diy-make-your-own-arts-and-craft-supplies/
- ↑ http://www.education.com/activity/article/Make_your_own_paintbrushes/
- ↑ http://www.doodlesandjots.com/2012/01/05/making-paintbrushes-with-natural-materials/
- ↑ http://www.alternativeconsumer.com/2011/02/21/diy-make-your-own-arts-and-craft-supplies/
- ↑ http://www.alternativeconsumer.com/2011/02/21/diy-make-your-own-arts-and-craft-supplies/
- ↑ http://www.education.com/activity/article/Make_your_own_paintbrushes/
- ↑ http://www.education.com/activity/article/Make_your_own_paintbrushes/
- ↑ http://www.alternativeconsumer.com/2011/02/21/diy-make-your-own-arts-and-craft-supplies/
- ↑ http://www.alternativeconsumer.com/2011/02/21/diy-make-your-own-arts-and-craft-supplies/
- ↑ http://www.sensubrush.com/2012/how-artist-brushes-are-made/
About This Article
To make a paintbrush, you’ll need a stick, glue, twine, and a material for your bristles, like horse or human hair, yarn, or straw. The first thing you’ll need to do is glue the bristles to the end of your stick so that ¼ to ½ inch sticks out. Then, wrap your twine tightly around the bristles and handle to keep them in place. Add a little more glue over the top of the twine to create a stronger brush. After the glue has dried, use scissors to trim your bristles to the length and shape you want. For more tips, including how to make a more professional looking paintbrush, read on!