This article was co-authored by wikiHow Staff. Our trained team of editors and researchers validate articles for accuracy and comprehensiveness. wikiHow's Content Management Team carefully monitors the work from our editorial staff to ensure that each article is backed by trusted research and meets our high quality standards.
There are 10 references cited in this article, which can be found at the bottom of the page.
This article has been viewed 15,165 times.
Learn more...
Putty knives are useful tools that everyone should have when doing DIY work around the home. They are mainly used to apply window glaze putty, drywall, and similar substances to seal holes. However, putty knives are also good for scraping away loose paint and putty during a repair. Choosing a knife depends on how you plan on using it. Flexible knives are better at applying material, while stiff ones are better for scraping material. When you have a putty knife, you have a versatile tool that you may find yourself reaching for often.
Steps
Spreading Putty With a Knife
-
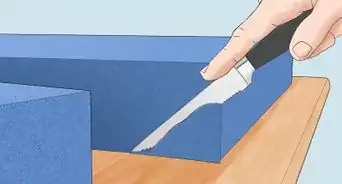
1Select a straight-edged, flexible putty knife for spreading. Putty knives come in all sorts of different shapes and sizes, but choosing the best one for the job doesn’t have to be overwhelming. Between flat and angled blades, flat ones are better at spreading material. Also, select a flexible blade instead of a stiff one. The blade can either be plastic or steel, depending on your preference.[1]
- Plastic knives are inexpensive, but they are also weaker and more disposable than metal ones. If you’re planning on using the knife often, get a stainless steel one instead.
- For most projects, a 3 in (7.6 cm) blade works well. You could use a 4 in (10 cm) blade to fill in bigger areas or switch to a smaller blade to fill smaller holes.
-
2Scoop up a small ball of putty with the flat surface of the knife. Many products used with a putty knife come in plastic tubs. Dip the knife into the tub and pick up some of the putty with its flat edge. Try to get enough putty to cover the gap you plan on filling. If you use too much, you can always scrape off the excess putty afterward.[2]
- Note that many products, including wall putty, have to be mixed with water before they can be applied. Check the manufacturer’s instructions about how much water to use.
- Dry products that don’t have to be mixed, such as window glazes, can often be applied by hand. Set it where you need to spread it instead of trying to pick it up with a knife.
Advertisement -
3Hold the knife at a 30-degree angle above the hole. Touch the edge of the putty knife firmly against the wall. Make sure the putty-covered side is on the bottom. Bring the handle down toward you so the coated edge is easy to move down the wall.[3]
- If you’re working on a gap larger than a nail hole, spread putty around its edges first. That way, you will have enough putty to spread over the entire gap.
-
4Spread the putty vertically across the surface you wish to cover. Glide the putty knife down over the wall. Most of the putty will be smeared on the wall. If you need to, scoop up some extra putty and apply it the same way. Continue moving the knife from top to bottom over the uncovered portions of the surface. Any holes in the surface will be about half-full with putty, and it’s okay if any of them are still visible.[4]
- If you used too little putty earlier, scoop up a little extra and apply it above the hole. Make sure you use a little bit at a time to keep the layer of putty consistent.
- Before beginning, spread some of the putty along the top edge of the area by moving the knife from right to left. This will help you distribute the putty more evenly while you’re moving the knife down the wall.
- If you’re working on a nail hole, use the tip of the knife to force some putty into the center of the hole.
-
5Scrape excess putty by moving the knife horizontally across the wall. Flip the knife over to its clean side. Hold it at a 30-degree angle again, this time with the edge vertical and the handle pointed toward the surface you’re covering. Then, run the knife from side to side. Go over the rest of the surface to finish smoothing out the putty.[5]
- Note any areas that look rough or uneven. Scrape off the excess putty this way before it has a chance to dry.
-
6Reapply a second layer of putty after the first one dries. You may be looking at the wall, thinking that the patch doesn’t look all that convincing. Most projects require at least 2 layers of putty. Apply more putty from top to bottom again, then smooth out the layer by going from side to side afterward. Make sure the entire surface is well-covered and level with the rest of the wall before you finish.[6]
- Putty dries after about 4 hours. Some products may be different, so consult the manufacturer’s recommendations to make sure.
- In some cases, you may need to apply additional layers before the fix looks complete. Remember, you are always better off using sparing amounts of putty than adding too much all at


Using a Putty Knife as a Scraper
-
1Select a stiff putty knife with a chiseled edge. Flexible putty knives bend too much to be effective at taking material off of the wall. If you can, get one with a chiseled edge. The chiseled edge has little teeth on the bottom that help it dig into paint and other surface compounds. Also, get a metal knife instead of a plastic one to ensure it doesn’t break.[7]
- You could use a 1 1⁄4 in (3.2 cm) knife for most projects. The size isn’t as important as getting a quality knife.
- Get larger or smaller blades according to your project. If you’re scraping down a wide area, finish it faster with a bigger knife. Use a smaller one if you need to get into tight areas.
-
2Wear a dust mask when scraping paint and other dusty material. Scraping away material produces a lot of dust, which can be irritating. It also tends to get everywhere when you’re working in an enclosed spot. Open nearby doors and windows for ventilation, then lay plastic tarps as needed to catch some of the mess. Keep other people and pets out of the area until you’re done.[8]
- You may also wish to wear safety goggles and gloves to protect yourself from chipped material coming loose while you work. It usually isn’t necessary unless you suspect you’re dealing with something toxic.
- If you think you’re scraping a toxic material like lead paint, get it tested first. Purchase a lead-testing kit, swab some of the paint, then remove it safely.
-
3Locate an opening in the surface material to insert the putty knife. Any small opening you can find is a spot to fit the tip of the knife. You may notice a crack or a spot of chipped material you could take advantage of. If you can’t find any of these spots, feel for places where the material is soft and easy to chip away with the knife.[9]
- For example, if you see empty spots from peeling paint, you can start there. The space left by the peeling paint gives you some room to move the knife.
- Some other places to use the knife include underneath peeling wallpaper or underneath the edge of a loose tile.
- If you’re evening out a finish, such as with wall putty, look for spots that appear uneven. You can also feel for rough or uneven spots by hand.
-
4Hold the knife at a 30-degree angle next to the surface. Position the knife underneath the spot you want to scrape. Then, tilt the handle toward you until the knife is at a slight angle. Make sure you have plenty of room to move the knife forward while still maintaining control of it.[10]
- Make sure the chiseled edge is face up so it cuts into the surface material. If it is face down, it may scratch something you don’t plan on scraping off.
-
5Push the knife into the surface material to begin scraping it off. Press the knife down with a firm amount of force as you move it across the surface. It will dig into the material and begin moving it. If you’re trying to lift something, such as a tile, push the handle down as well to gain some leverage. Repeatedly push the knife forward to finish removing the loose material.[11]
- If you are unable to remove all of the material, approach it from different sides. Readjust the knife’s positioning while keeping it at a 30-degree angle. Always move toward the loose material.


Warnings
- Scraping material off a surface produces a lot of dust that can be irritating or even toxic. Wear a dust mask at all times, but also use gloves and safety goggles when necessary.⧼thumbs_response⧽
Things You’ll Need
Spreading Putty With a Knife
- Straight, flexible putty knife
- Wall putty or another compound
Using a Putty Knife as a Scraper
- Stiff, chiseled, metal putty knife
- Dust mask
- Safety goggles (optional)
- Rubber gloves (optional)


References
- ↑ https://www.bobvila.com/slideshow/10-reasons-every-diyer-needs-a-putty-knife-50024
- ↑ https://www.thisoldhouse.com/more/using-putty-knife
- ↑ https://www.bobvila.com/articles/how-to-spackle/
- ↑ https://www.thisoldhouse.com/more/covering-wall-cracks
- ↑ https://www.youtube.com/watch?v=1209_VXkuj0&feature=youtu.be&t=92
- ↑ https://www.bobvila.com/articles/how-to-spackle/
- ↑ https://www.youtube.com/watch?v=2bv6xeFouI4&feature=youtu.be&t=60
- ↑ https://www.bobvila.com/articles/bob-vila-radio-removing-plaster/
- ↑ https://www.youtube.com/watch?v=U3ISTc3tpxw&feature=youtu.be&t=96
About This Article