This article was co-authored by wikiHow staff writer, Jessica Gibson. Jessica Gibson is a Writer and Editor who's been with wikiHow since 2014. After completing a year of art studies at the Emily Carr University in Vancouver, she graduated from Columbia College with a BA in History. Jessica also completed an MA in History from The University of Oregon in 2013.
There are 11 references cited in this article, which can be found at the bottom of the page.
wikiHow marks an article as reader-approved once it receives enough positive feedback. In this case, 93% of readers who voted found the article helpful, earning it our reader-approved status.
This article has been viewed 98,832 times.
Learn more...
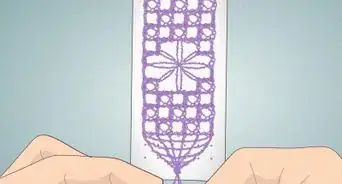
Tatting with a shuttle is a beautiful way of making lacey fabric that's been around for hundreds of years. Once you've gotten your hands on a shuttle or made your own, it's easy to wind the thread around it. Then, you'll make a loop that will form the basis for your stitches. By weaving the shuttle in and out, you'll create beautifully tatted designs in no time.
Steps
Winding the Shuttle
-
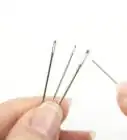
1Select tatting thread for your project. Pick out cotton crochet thread in a color you like to work with. Then, decide how fine you'd like the tatting work to be. If you're a beginner, you might want to use size 10 since it won't snag and its larger size will make it easier to see and unpick. For finer tatting, use size 50 or 80 cotton thread.[1]
- If you're unsure which size you like to use, pick up size 10 and 20 thread. Once you've worked with both, you can determine which size you're more comfortable with using.
Did You Know? The smaller the thread size number, the wider the thread will be. For example, size 20 thread is wider than size 40 thread.
-
2Insert the thread through the hole in the middle of the shuttle. Turn the shuttle on its side so you can see the hole in the center. Then, take the end of your thread and push it through the small hole so 1 inch (2.5 cm) of the thread extends from the side of the shuttle.[2]
Variation: If you're using a homemade shuttle with 2 holes at each end, insert the thread through 1 of the holes at an end. Wrap the thread around the shuttle, through the opposite hole and then back. Keep wrapping so the thread catches on the holes.
Advertisement -
3Wrap the thread through each end of the shuttle. Push the end of the thread against the shuttle so the thread doesn't slip out. Use your other hand to wrap the thread around the middle of the shuttle. You'll have to wrap tightly in order to catch the thread between each end of the shuttle.[3]
- It doesn't matter which direction you wind the shuttle.
-
4Keep wrapping the thread until it's at the edge of the shuttle. Stop winding before the thread extends over the sides of the shuttle since this would make it difficult to tat.
- Try to wind the thread evenly around the center of the shuttle.
-
5Leave a 2 feet (0.61 m) tail and cut the thread. Your shuttle shouldn't be connected to your ball of thread, so pull a long tail and use scissors to cut the thread.[4]
- Don't wind the tail so you can begin tatting with it.


Positioning Your Hands and Wrapping the Thread
-
1Hold the end of the thread with your non-dominant hand. Pinch the end of the thread between your thumb and index finger. You can let about 4 inches (10 cm) of the tail hang down past the point where you're pinching.[5]
- Keep holding the end of the thread in place so your loop doesn't fall apart.
-
2Wrap the end of the thread into a wide loop around your fingers. Wind the thread clockwise around your hand to make a loop that's about 3 to 4 inches (7.6 to 10.2 cm) at its widest point.[6]
Did You Know? The loop you just made is called the working thread. The thread between the loop and the shuttle is called the shuttle thread. You'll work the stitches on the shuttle thread.
-
3Bend your pinky finger to catch the thread. You don't want the loop to slide off your fingers while you're passing the shuttle through it. To keep it in place, catch the thread with your pinky finger and try to keep it pressed against your palm.
- If you prefer, you can wrap the thread around your pinky finger a few times to secure it.
-
4Practice tatting with the shuttle. Now that you've wound the shuttle and are holding the thread correctly, you can make rings, double stitches, and chains. Start with simple beginner projects to build your confidence before moving onto more advanced projects.
- Some shuttles come with a point or hook on 1 end. You can use this to pull out or loosen stitches if you make a mistake.


Trying Basic Tatting Techniques
-
1Learn how to make a double stitch. To practice this basic stitch, move the shuttle in your right hand through the loop in your left hand. Bring it over and back through the loop to make the first knot. Then, pull the shuttle to your right to tighten the knot. Finish the double stitch by moving the shuttle over the loop and pulling it down through the center to make the second knot.[7]
- If you're reading a tatting pattern, the double stitch is abbreviated as DS.
-
2Practice making rings. Once you're comfortable making double stitches, work at least 7 or 8 of them. Hold the stitches in your left hand and use the hand with the shuttle to pull tightly on the thread between the stitches and the shuttle. Keep pulling until the stitches curl in on themselves and form a tight ring.[8]
- To make a large ring, work with thicker thread or make at least a dozen stitches before pulling the thread.
Variation: To expand the ring, pinch the stitches you've already made and pull on the thread below them until the ring is as big as you like.
-
3Make picots for a decorative touch. If you can make a double stitch, you already have the skills to make a picot. Work the first half of the double stitch, but don't pull the first knot tightly towards your left hand. Leave a gap in the knot and hold it while you finish the double stitch. Then, you can slide the picot toward the other stitches near your left hand.[9]
- Try making picots in a variety of sizes by leaving larger or smaller gaps.
-
4Create a chain of stitches instead of a ring. Get out 2 shuttles and tie the ends of the thread together. Hold the knot between the fingers of your left hand and wrap the thread from 1 shuttle over your fingers and around your pinky. Let that shuttle fall down to your work surface. Then, take the other shuttle and begin working double stitches into the thread of your left hand.[10]


Community Q&A
-
QuestionWhat does "CF" mean in tatting?CF in tatting means compare. It is used to refer to other materials to compare them.
Things You'll Need
- Tatting shuttle
- Tatting thread
- Scissors
- Cardboard, optional

References
- ↑ https://www.tattedtreasures.com/2013/03/choosing-thread-sizes/
- ↑ https://youtu.be/jHr173eqLwg?t=32
- ↑ https://youtu.be/jHr173eqLwg?t=46
- ↑ https://youtu.be/jHr173eqLwg?t=60
- ↑ https://youtu.be/OWdbxK-NuNY?t=46
- ↑ https://youtu.be/jHr173eqLwg?t=70
- ↑ https://youtu.be/jHr173eqLwg?t=167
- ↑ https://youtu.be/LFtaZ5rokw8?t=331
- ↑ https://youtu.be/lylMKfaj5Hs?t=66
About This Article